The Most Active and Friendliest
Affiliate Marketing Community Online!

“Adavice”/  “RollerAds”/
LandingTrack - Track + Auto-Optimization.

Official LandingTrack - Track + Auto-Optimization.

LandingTrack

Service Manager
Service Manager
LandingTrack - Track + Auto-Optimization.
Jorge Imedio submitted a new resource:

LandingTrack - Fisrt automated Tracking Platform - Tracker + Auto-Optimizing Machine . The One Stop Solution

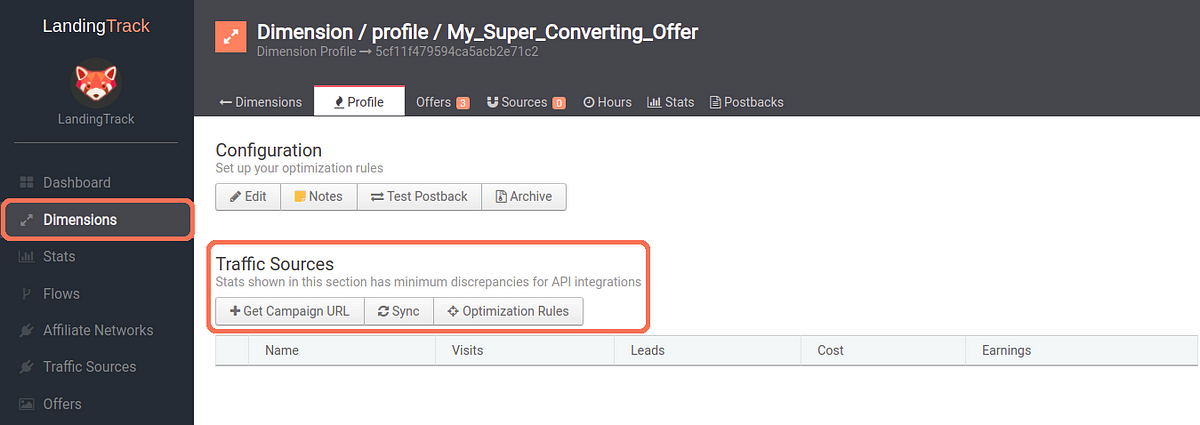
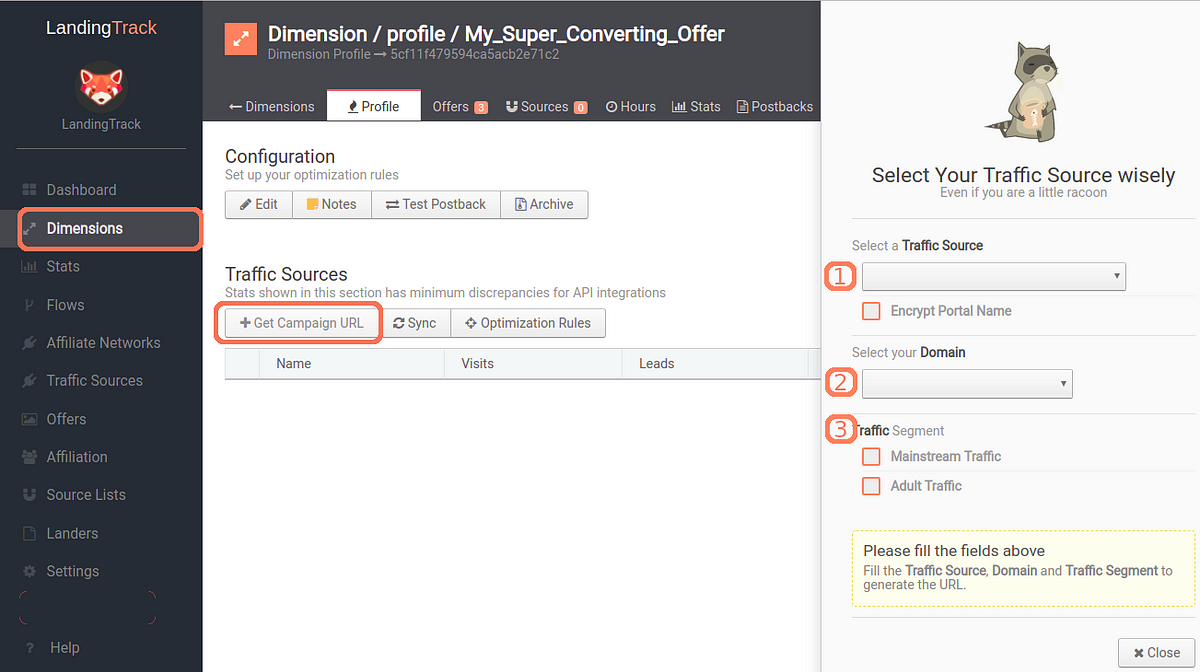
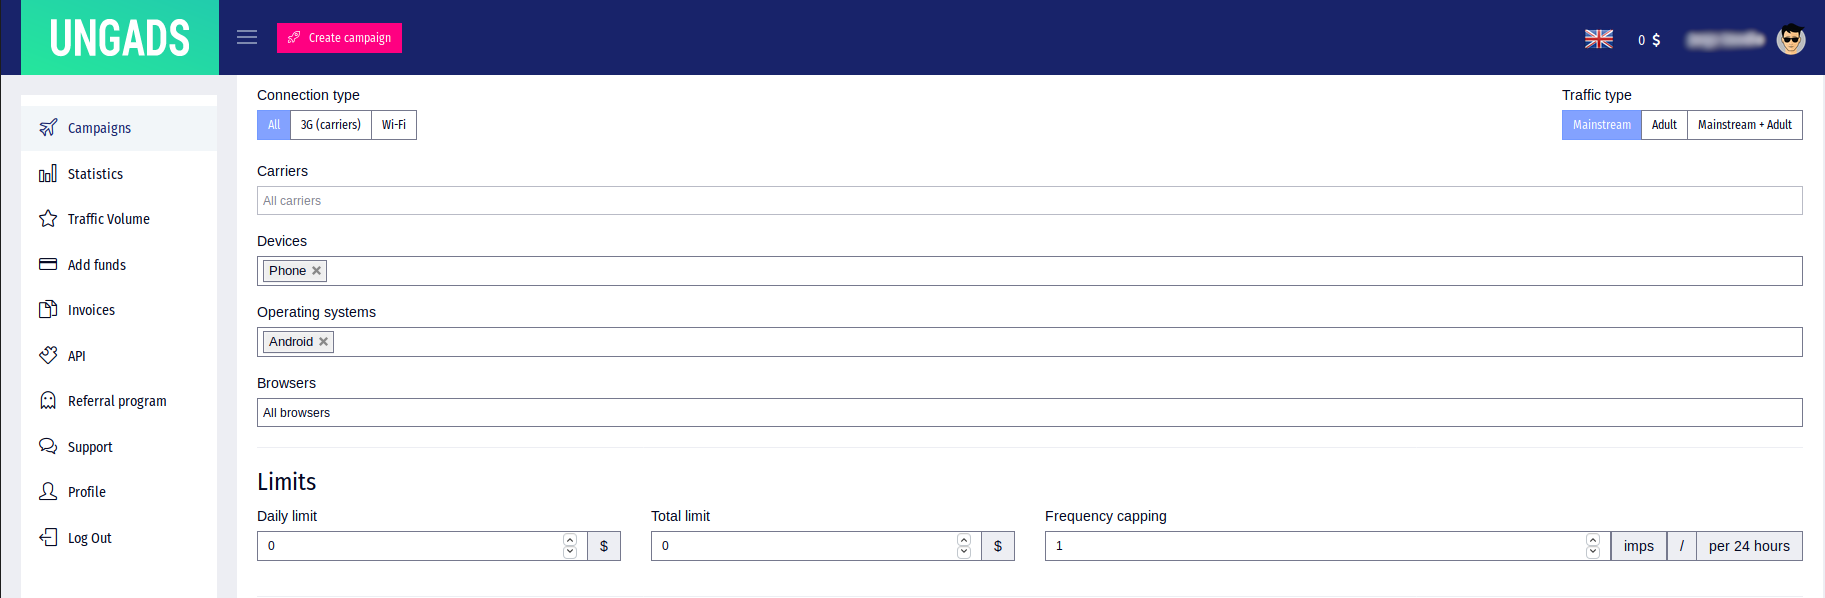
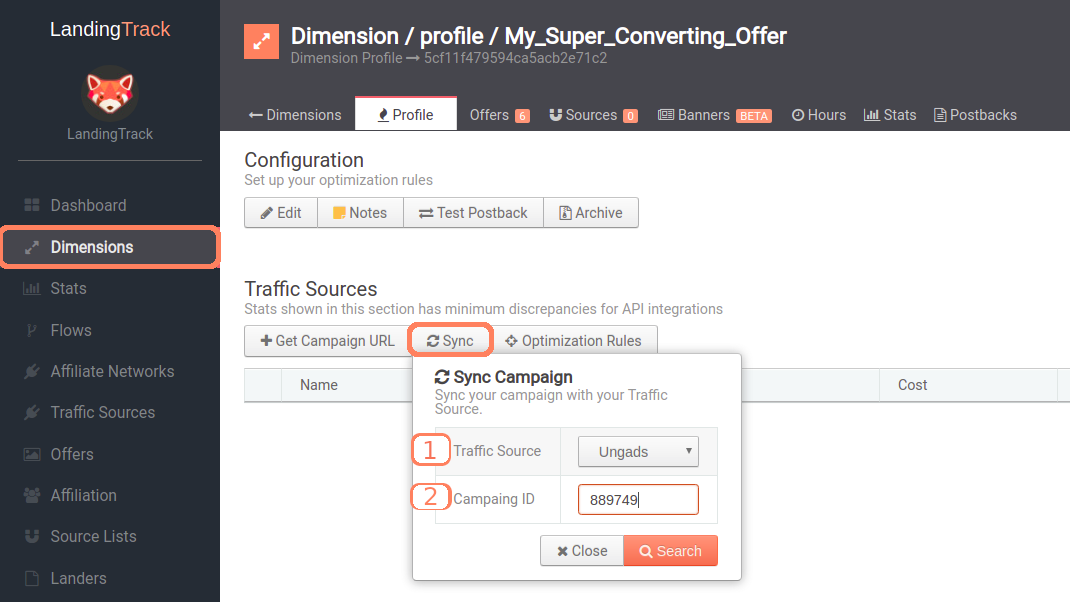
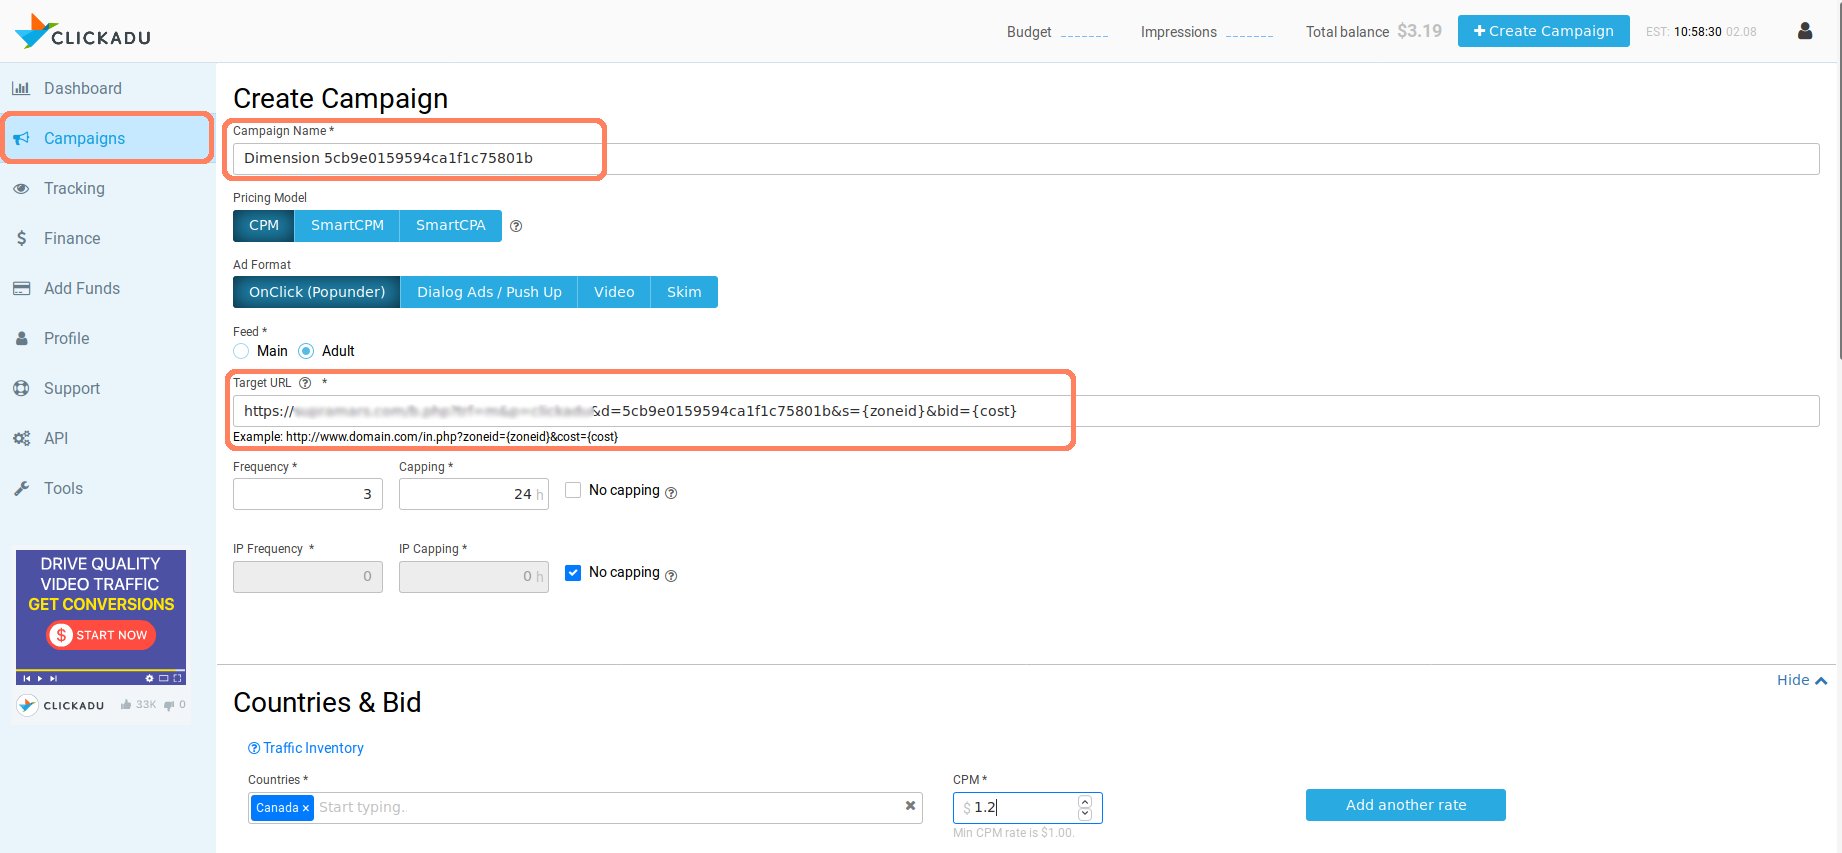
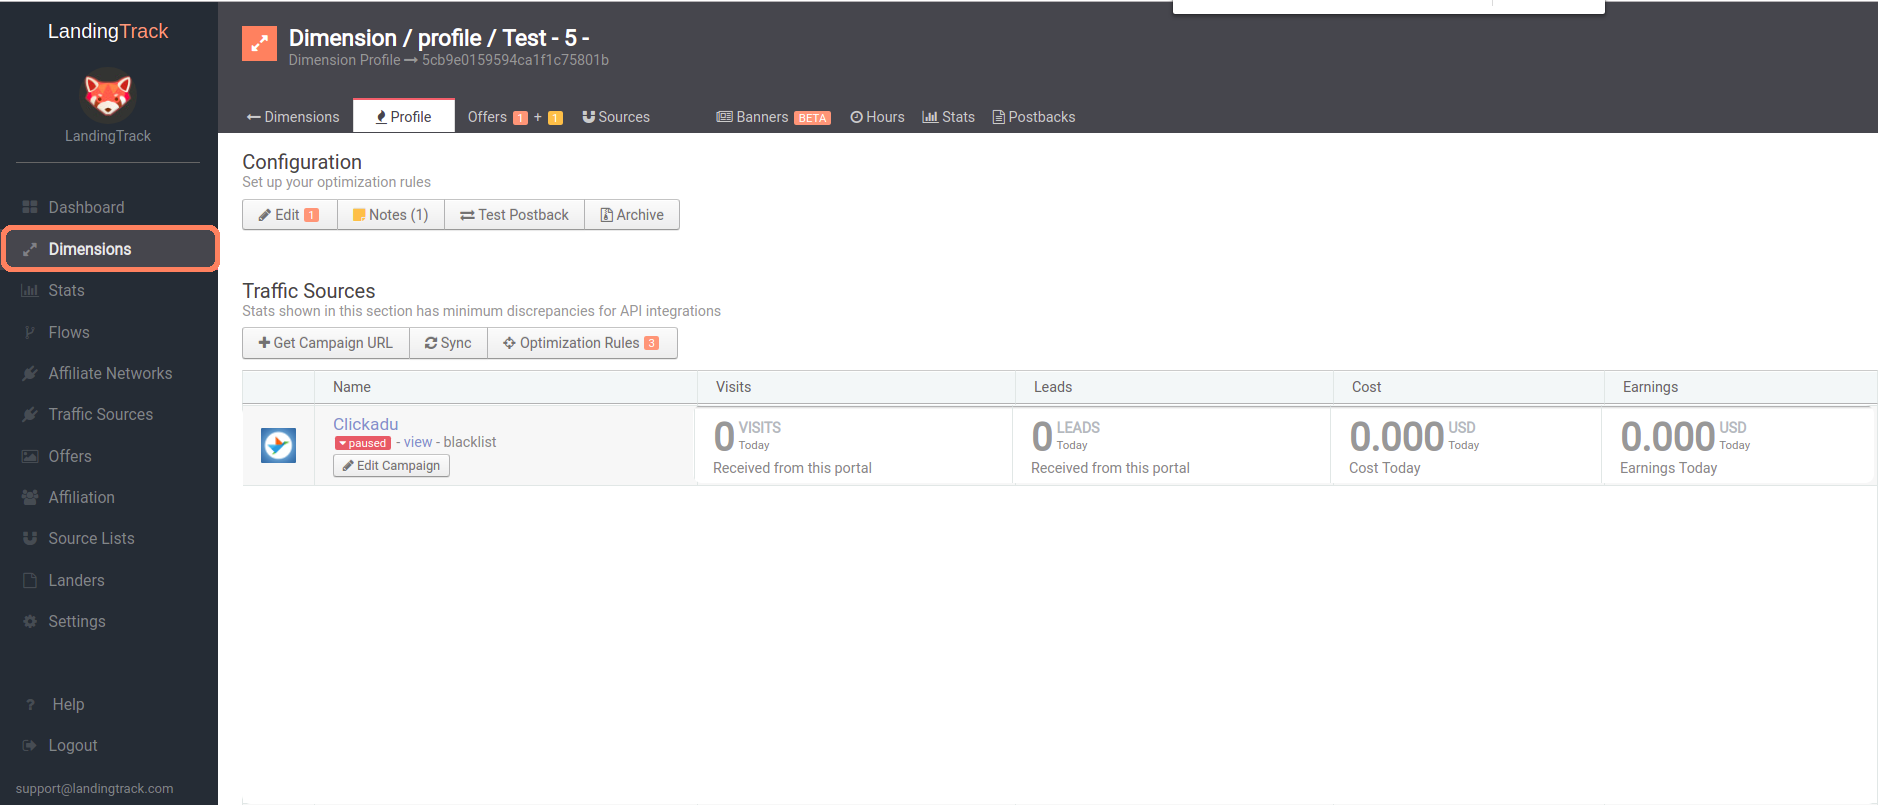
Track + Autoptimizing Platform. LandingTrack counts with several integrations to control all your Push, Pop & Redirect (zeroclick) campaigns automatically.

Top Features:

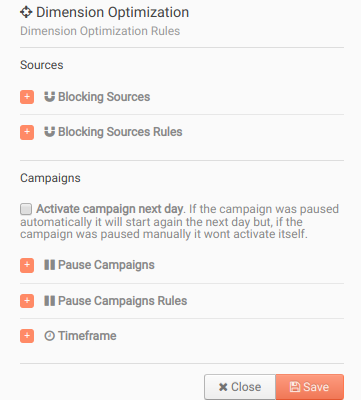
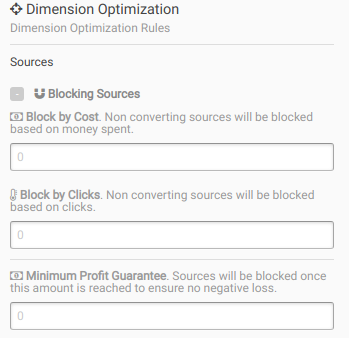
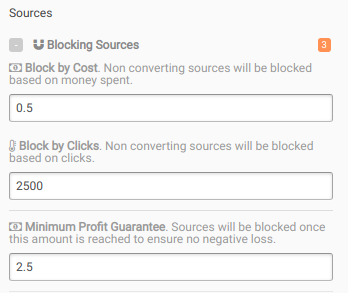
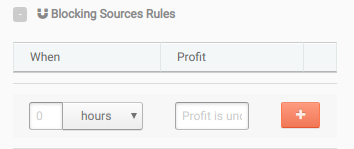
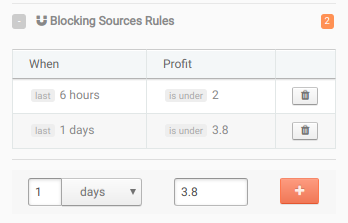
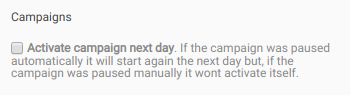
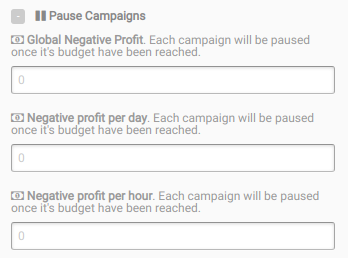
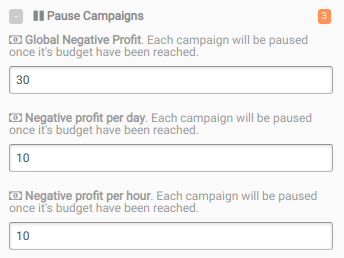
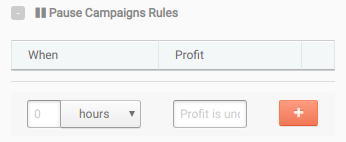
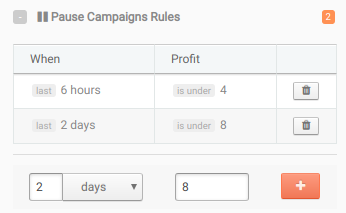
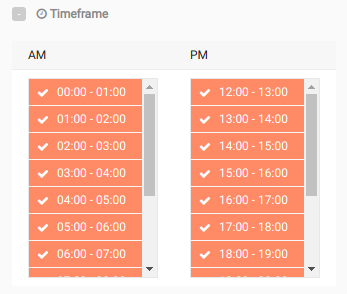
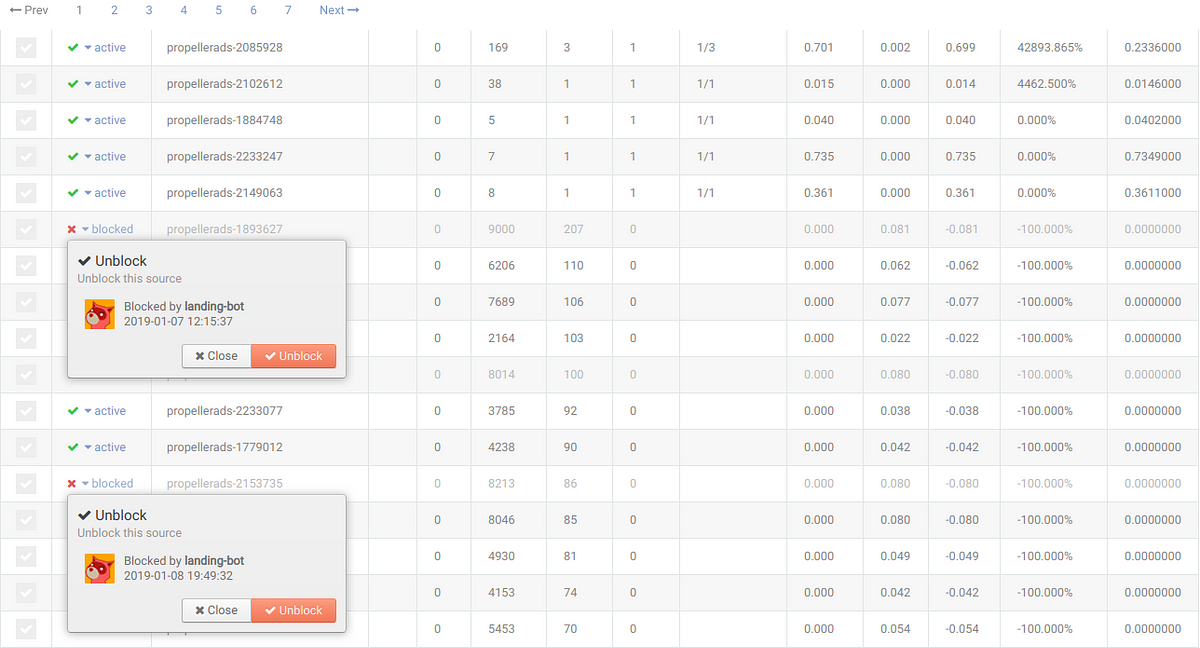
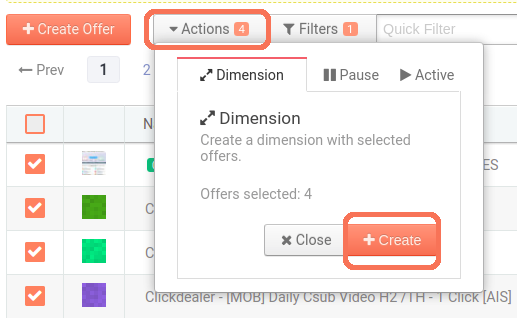
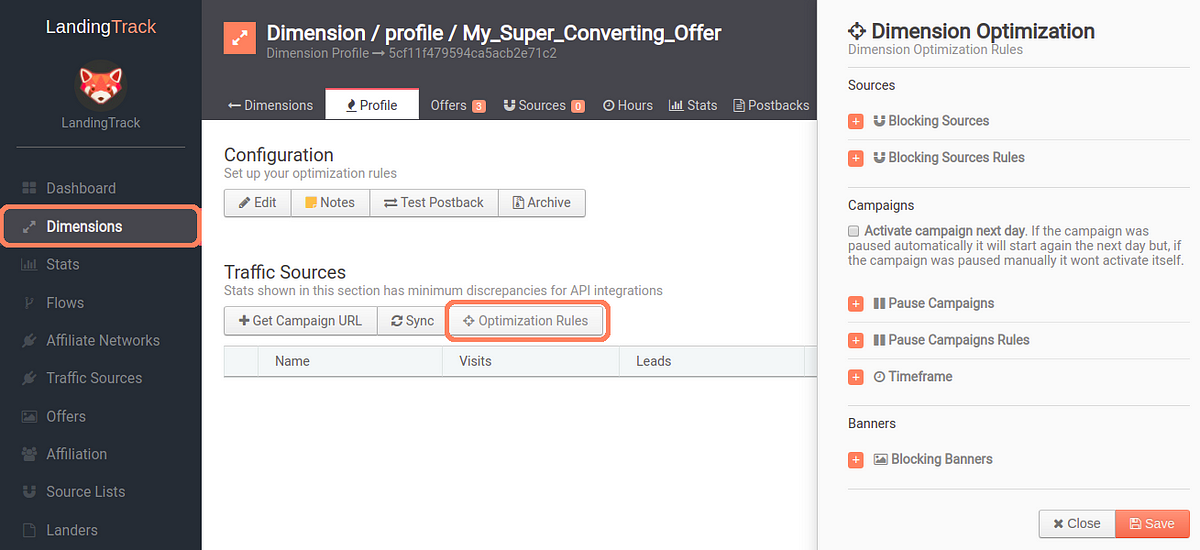
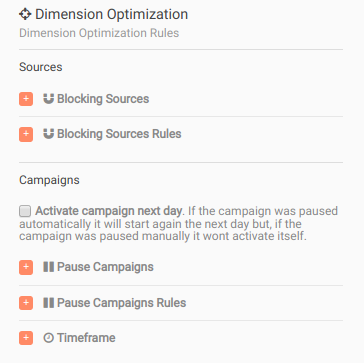
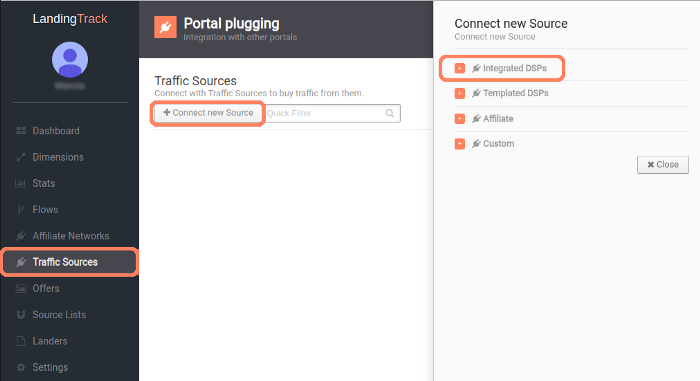
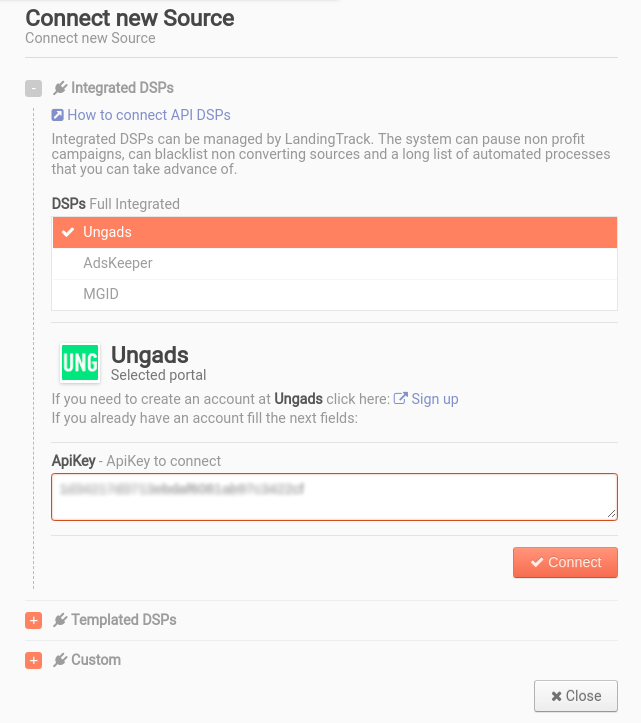
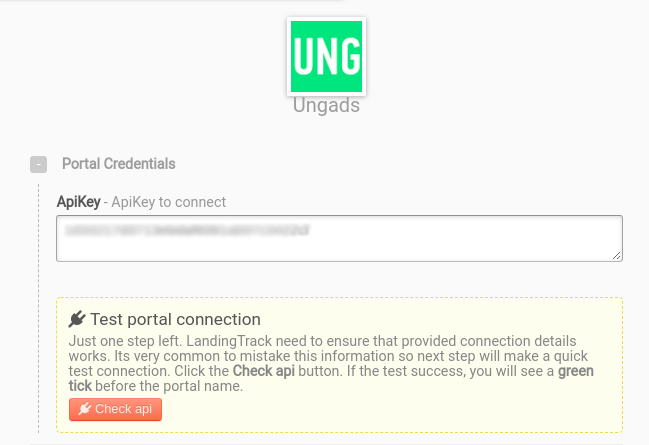
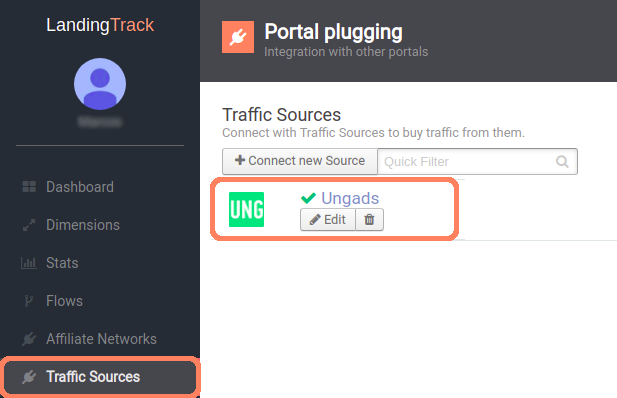
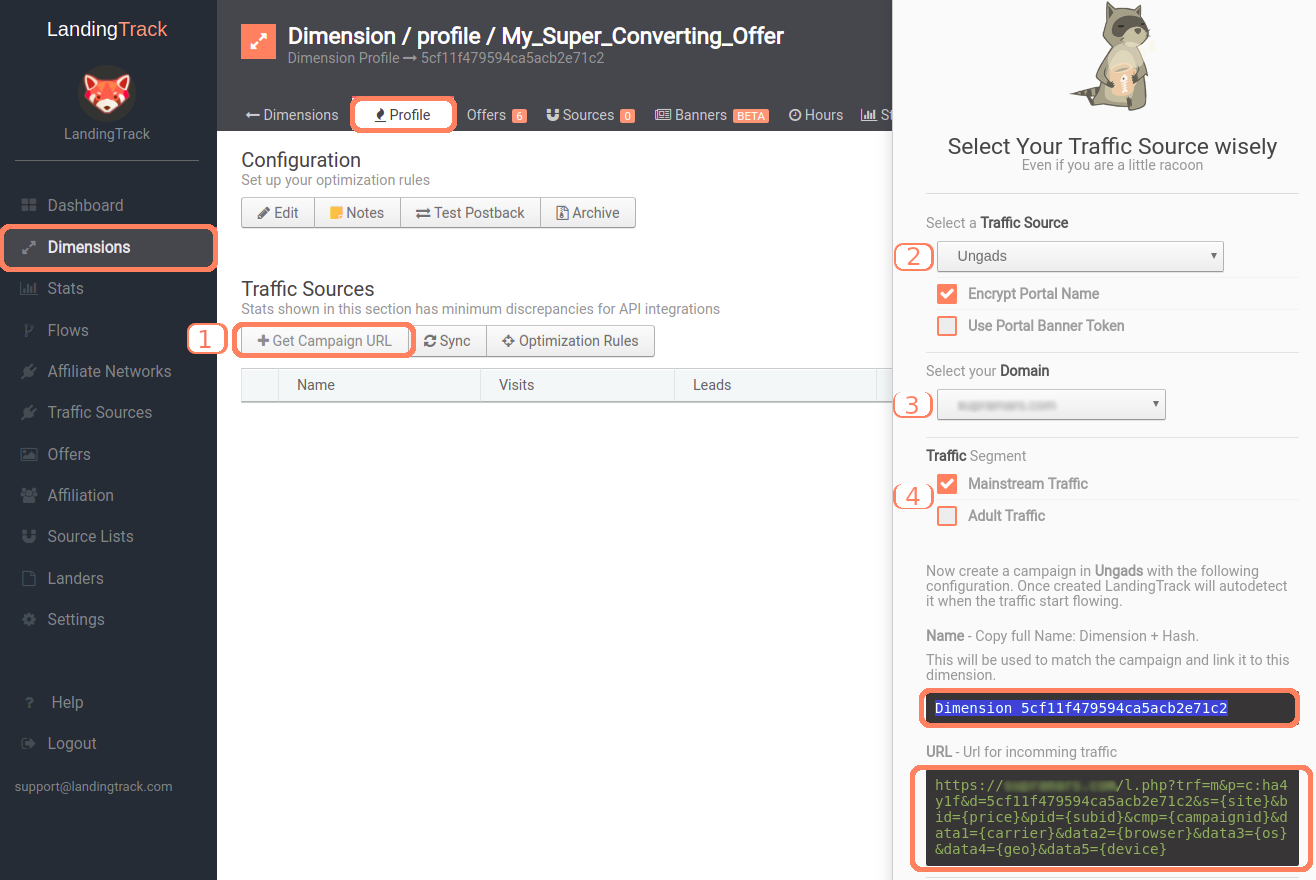
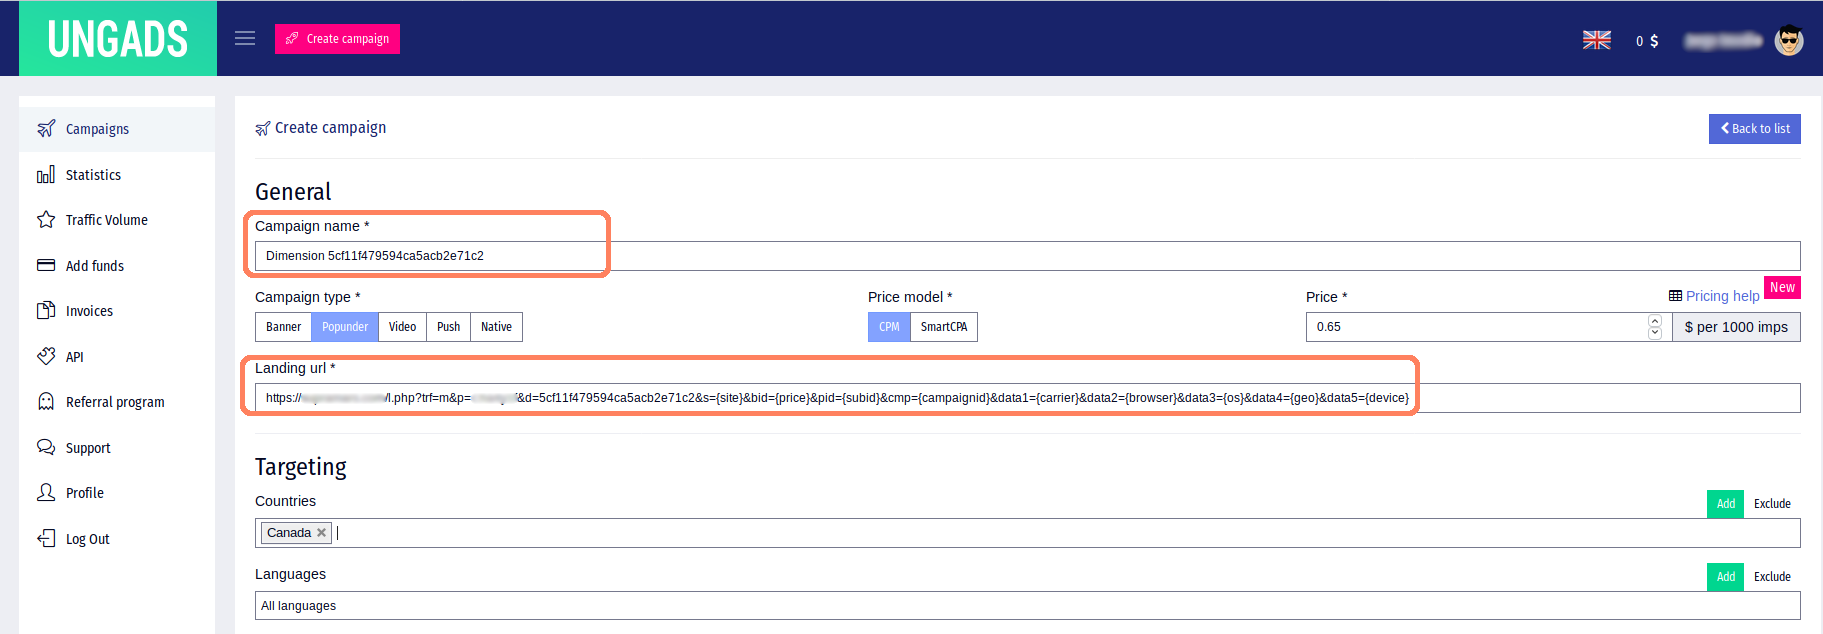
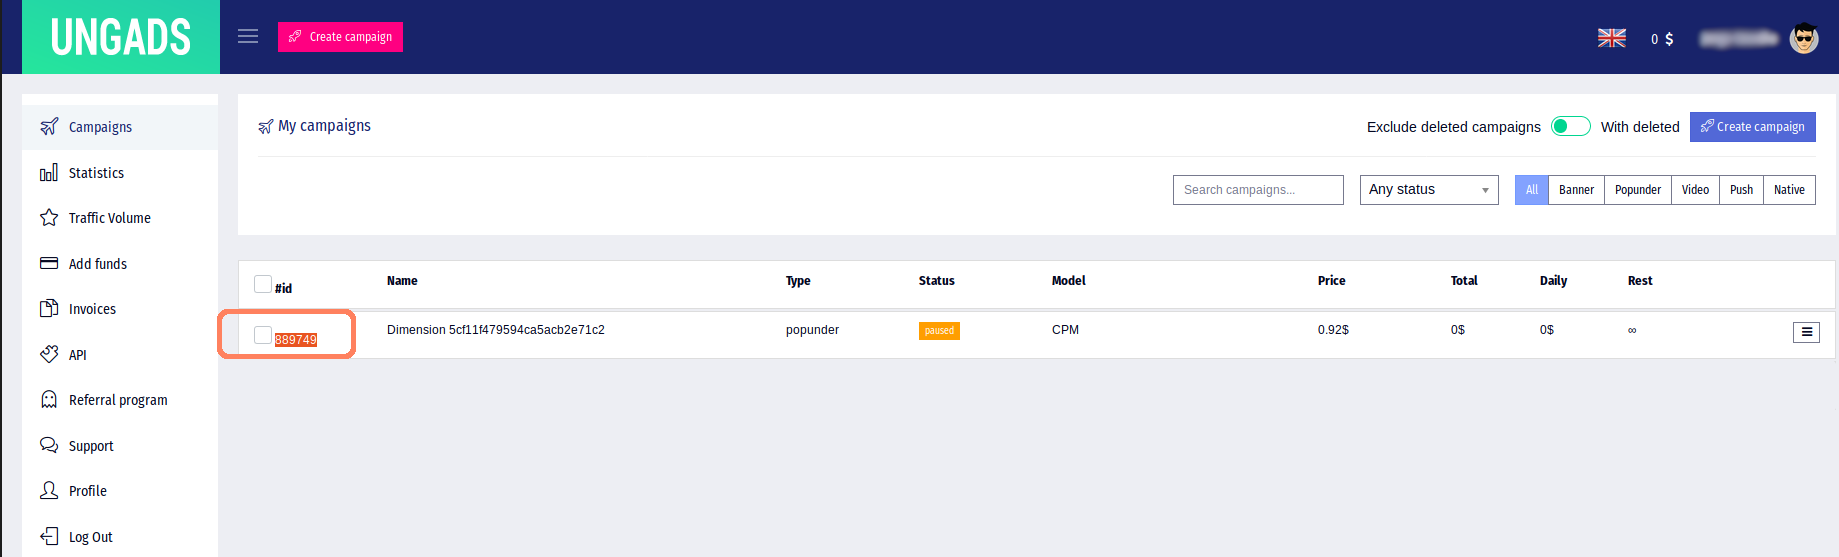
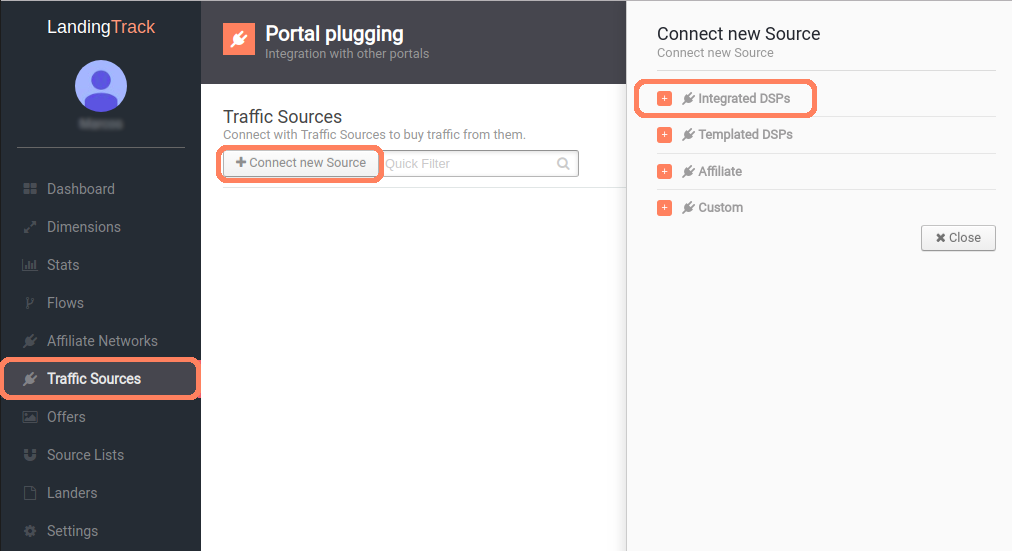
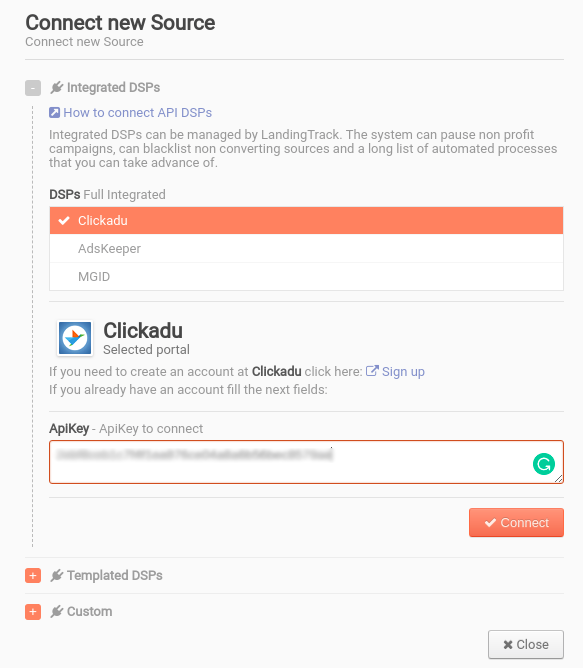
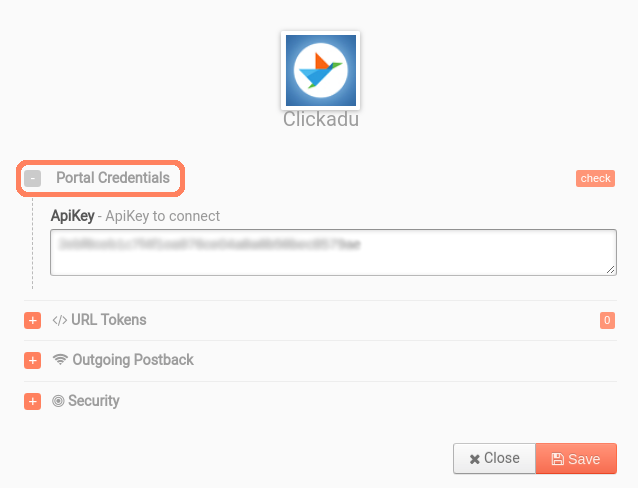
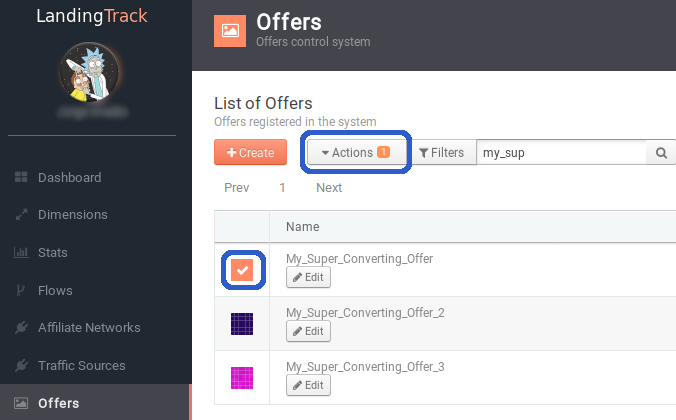
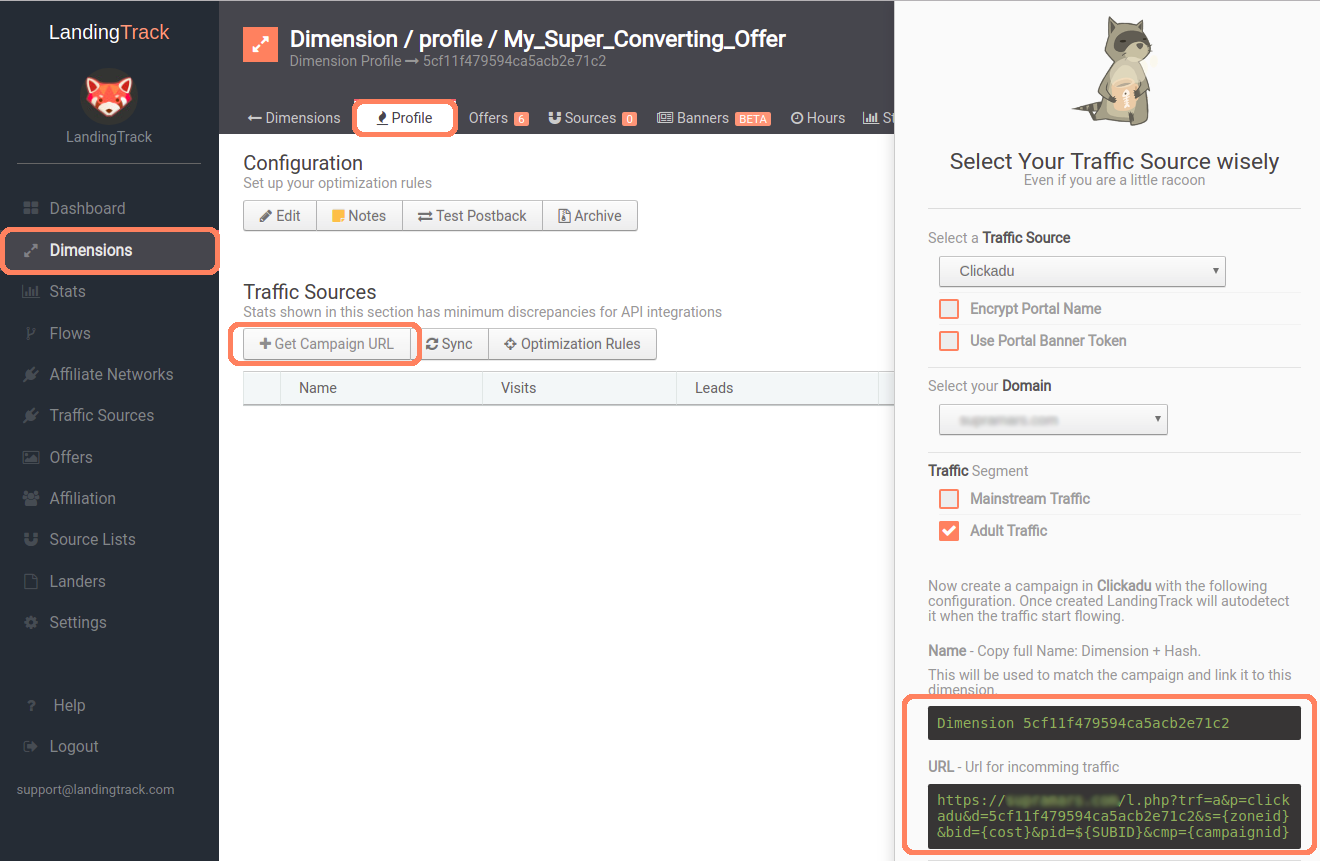
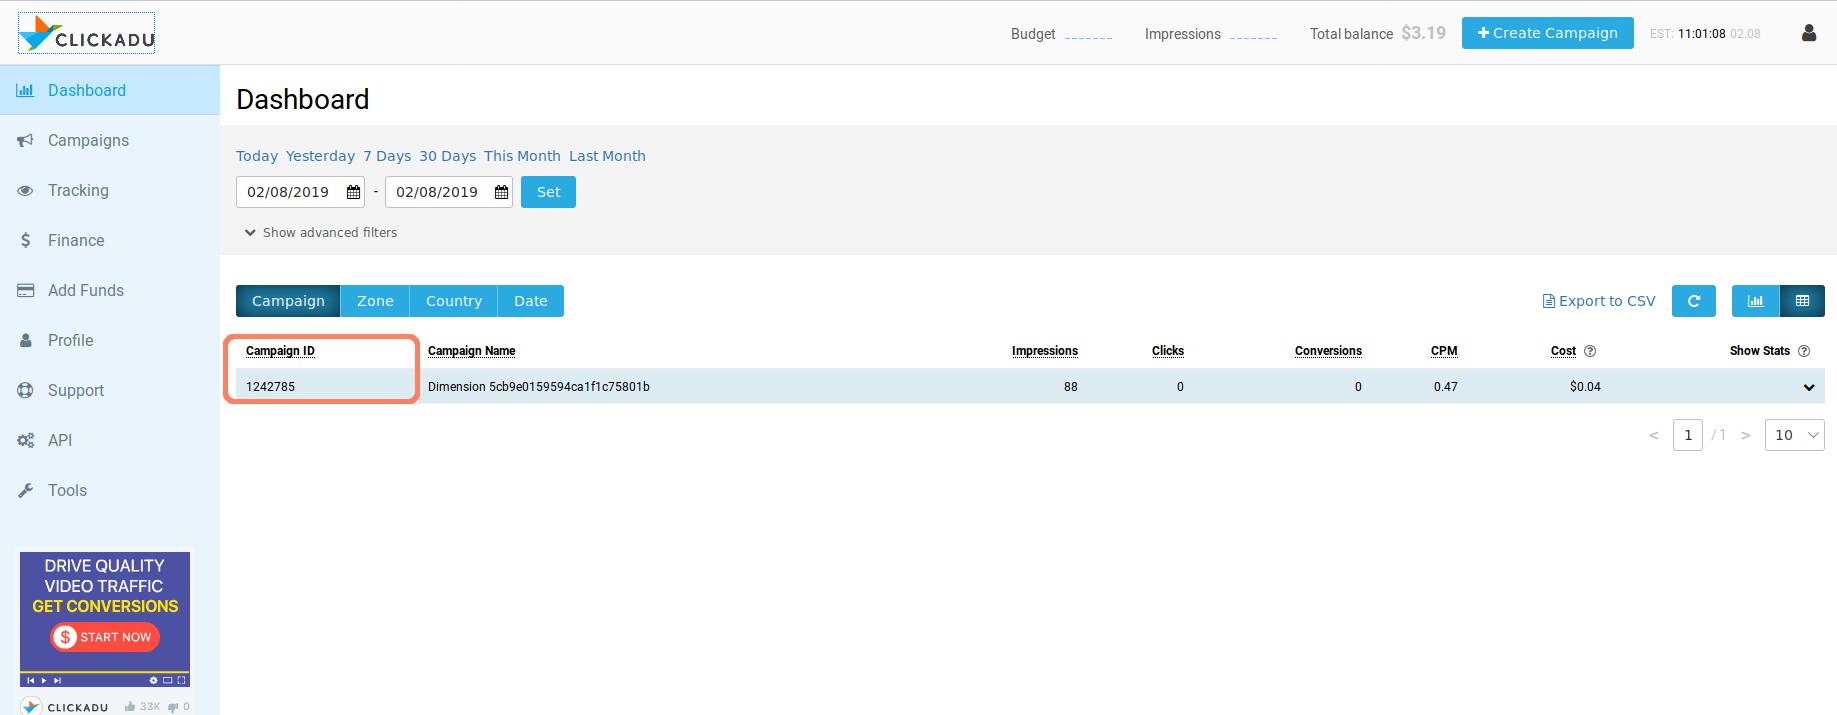
  • Automated all your traffic sources: - Activate campaign - pause, blocking non converting subids. Full control of the traffic.
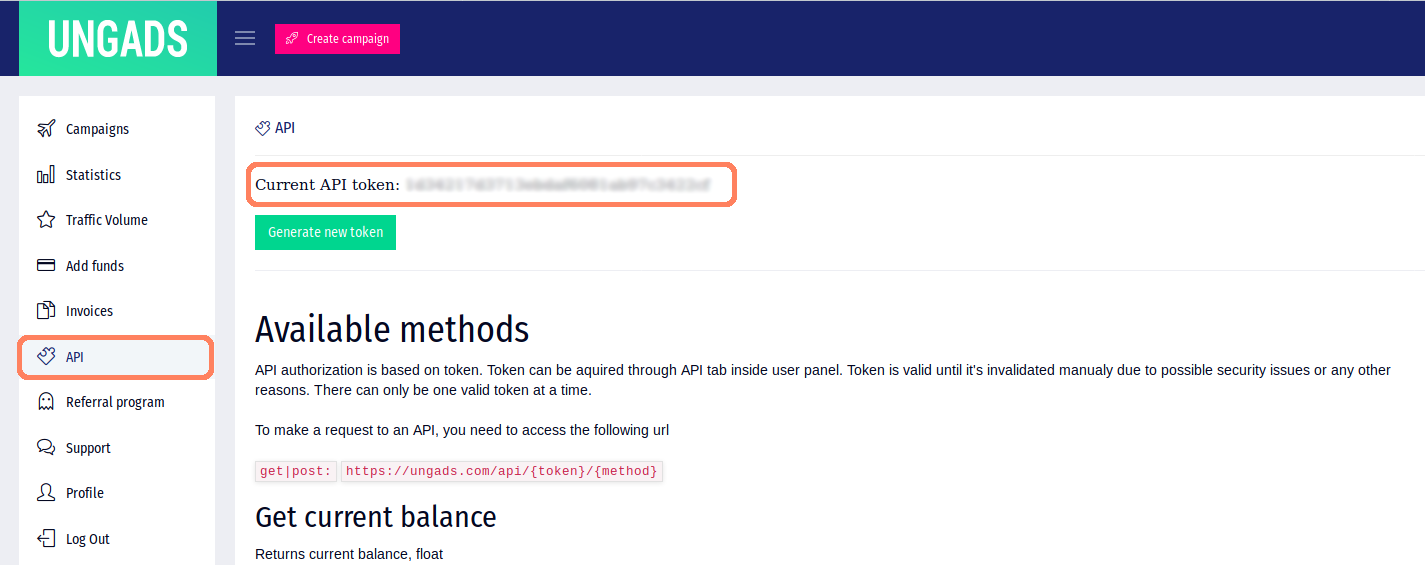
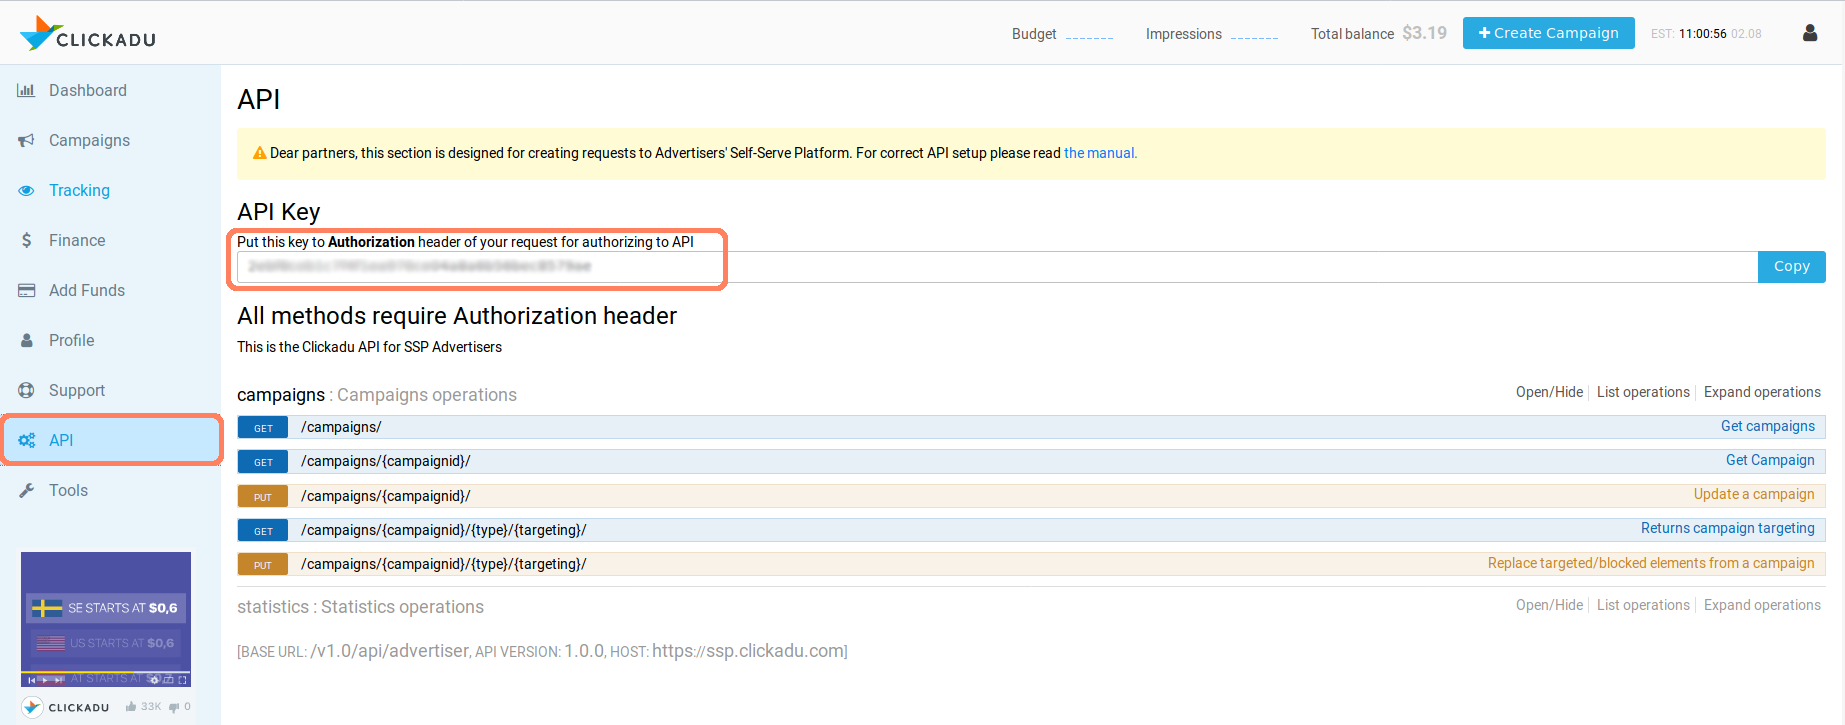
  • API integration with: PropellerAds - ExoClick - Zeropark - PopCash - PopAds - PlugRush - SelfAdvertiser - Yeesshh - Active Revenue - AdMaven - EzMob -...

Read more about this resource...
 
After many years using other trackers, this is definitely the best solution.
1 year already working with landingtrack, and its incredible optimization tools, have made me earn a lot of money and have more free time.
I definitely recommend it
 
Let's Start with Push Traffic¡ Happy to share with you that now LandingTrack can also optimize for you: Push Notifications from PropellerAds - ZeroPark - Admaven - Exoclick - Active Revenue - Ezmob and Plugrush. More coming soon :)

For those who are tired of blocking manually non converting subids/targets/zoneids/placementids etc.. let LandingTrack do it for you. You give the instruction and our bots will execute it.

How can LandingTrack help you to Track and also block those non converting sources?

Simply with this Feature - Optimization Rules - LandingTrack will be checking all different sources for you applying your rules.

1*s_vTd9Wkx6mNu2JkY5PsJg.png

This is your Rule Menu on LandingTrack


1 — Blocking Sources:
We can block Non converting subids for you but, before taking actions you must add some rules here:

1*2xrj6LZTk1WFoqaZ1tHdsQ.png

  • Block by cost: example: block a subid when it has spent 0.5$ and there is no conversion”
  • Block by clicks:example: block a subid when it has reached 2500 clicks and there is no conversion”
  • Minimum Profit guarantee: This section is to guarantee you some profit on those subids that made one single conversion and will never bring more. “Example: if the payout of your offer is 10$ and you have spent 5$ to get the conversion we both agree that your profit for that subid is:5$ but — we said, there won’t be more conversions so if you type 2.5$ on profit guarantee, the sooner the subids reach 2.5$ profit — will be blocked”.

1*UnQIJvPQlBa04lktsdHK8w.png

This is just an example, better if you create your own Rules

2 — Blocking Sources Rules:
Did you say block? this function will check for you which subid/pubid is bringing you negative profit and block it for you based on hours or days


1*SVdMpZUK1960IH6TQ0baRw.png

You can add by Hours or Days
After adding your rules, check the number 2 on the top right side of the image.


1*k2bTVdr2iWFj0FcMX4vm3g.png

Add as many as you want but — do not become crazy.

What if we can Re-active the campaign for you at midnight again?

1*0CjF776y6Mu8qXJxvRCBJw.png

By checking the option at 0:00 AM your server time the campaign will be reactive it.

3 — Pause Campaigns:
Budgets, spent, cost... budgets¡ how important they are every time we set up a Campaign, we strongly recommend you to set up your limitation on LandingTrack so nothing serious will happen. This rule will affect individually the traffic sources (DSP) connected to your Dimension / Campaign.


1*drdBhdpC2pdntbutY9YFeg.png

Add your rules and rest.
  • Global Negative Profit:Example: pause completely the DSP that has lost a total of 30$ for this specific campaign/dimension.” if you have connected 4 DSP and all got paused will mean you have lost a total of 120$ in Total"
  • Negative Profit per Day:Example: pause the DSP that has lost 10$ Today for this specific campaign/dimension.” if you have connected 4 DSP and all got paused the same day will mean you have lost a total of 40$ for today.”
  • Negative Profit per Hour: Example: pause the DSP that has lost 10$ in the last hour for this specific campaign/dimension.” if you have connected 4 DSP and all got paused within the next hour will mean you have lost a total of 40$ in the last hour.”

1*xwrkHj9XKHk-emDX5m75MA.png

This will be applied per each DSP connected to your Campaign.


4 — Pause Campaigns Rules:
More controllers need it ¡ — this function will pause those DSP that are bringing you negative profit base on hours and days.


1*NG8x_hSbGjwZZIpSphO2_w.png

You can add by Hours or Days
Keep it simple,


1*bDy3oW3bPENVHv_h_1k4Kg.png

Add as many as you want but — do not become crazy.
After adding your rules check the number 2 on the top right side of the image.


5 — Time frame:
A bit loco when you need to match your Advertiser time zone — your DSP Time zone and also your Time zone (Too many Time zones) so here we go: Let’s make it easy and add your timeframe on LandingTrack and keep it simple.


1*r0Fk2H-P4tRwwca3Ud_CSQ.png

Let it run 24 hours.
Or

1*jT-vsPIGk1AcDUq9BeGnRQ.png

Run from 4 AM till 3 PM and then from 7 PM till midnight.

How does it look when all those rules are working for you?
For this example the subject was blocking source at 0,08$, Remember that push traffic comes with delayed clicks always.

1*KqXmLYoUZFyJIQ-SDOEcJQ.png

No rush — LandingTrack is checking your rules

For more information visit our Medium channel or contact us -

Enjoy the Track¡
 
Is Time to Welcome @popcash ¡¡ One of the first integrations we had. We fully understand you love to optimize manually, block those non converting subids manually, have tons of tabs open checking the whole picture and what's best? waking up early or going late to bed because your campaign was not approved or rejected or wtf just happened?

But for those who are seeking for innovation and automation, LandingTrack. Do not be afraid :)

How to do that with @popcash and LandingTrack?
- Sign up with PopCash
- Get the API key under your Account
- Connect LandingTrack with you PopCash Account
Captura de pantalla de 2019-04-17 12-16-16.png

- Create your Dimension on LandingTrack
- Set up your optimization rules

Dimension Profile - Optimization rules.png

- Set up your Campaign on Popcash
Popcash Campaign panel.png


- And chill for the next hours

Still thinking of how automation can help? no worries, it always takes time to understand new technologies but in the meantime, keep reading us¡
 
Time for Exoclick¡
ExoClick.jpg

We are still aware of how you love manual optimization, blocking those non converting subids manually, having tons of tabs checking the whole picture and what's best? waking up early or going late to bed because your campaigns were not approved or rejected or whatever the reason.

But for those who are seeking for innovation and automation, LandingTrack. The sooner you start the better.

How to do that with Exoclick and LandingTrack?
1- Sign up with Exoclick - dismissed this step if you have an account already.
2- Get the API key under your Account
3- Connect LandingTrack with you Exoclick Account
Exoclick API Key Landingtrack.png

4- Create your Dimension on LandingTrack
5- Set up your optimization rules

ExoClick URL Landingtrack.png


- Set up your Campaign on Exoclick

Exoclick Campaign creation Landingtrack.png

- And chill for the next hours

Still thinking about how automation can help you? no worries, it always takes time to understand new technologies but in the meantime, keep reading us¡
 
Time for Active Renue¡¡ Start tracking and auto-optimizing Active Revenue traffic through LandingTrack.

We are still aware of how you love manual optimization, blocking those non converting subids manually, having tons of tabs checking the whole picture and what's best? waking up early or going late to bed because your campaigns were not approved or rejected or whatever the reason.

But for those who are seeking for innovation and automation, LandingTrack. The sooner you start the better.


activerevenue_1.jpg


How to do that with Active Revenue and LandingTrack?
1- Sign up with Active Revenue - dismissed this step if you have an account already.
2- Connect LandingTrack with you Active Revenue Account

Landingtrack_Active Revenue_Integration.png


3- Create your Dimension on LandingTrack

Active Revenue_Landingtrack_Campaign_URL.png


4- Set up your optimization rules

Landingtrack OPtimization rules slideout.png


5- Set up your Campaign on Active Revenue

Active Revenue_Landingtrack_Dashboard_Create_a_Campaign_Step2.png


- And chill for the next hours

Still thinking about how automation can help you? no worries, it always takes time to understand new technologies but in the meantime, keep reading us¡
 
Listen up, 'cause this is big!
We have teamed up with SelfAdvertiser, one of the top leading traffic source for affiliates, and now, you can fully track and Auto - Optimize all your campaigns with LandingTrack.
SelfAdvertiser-review1.png

We are still aware of how you love manual optimization, blocking those non converting subids manually, having tons of tabs checking the whole picture and what's best? waking up early or going late to bed because your campaigns were not approved or rejected or whatever the reason.

But for those who are seeking for innovation and automation, LandingTrack. The sooner you start the better.

How to do that with SelfAdvertiser and LandingTrack?
1- Sign up with SelfAdvertiser - dismissed this step if you have an account already.
2- Get the API key under your Account
3- Connect LandingTrack with you SelfAdvertiser Account

SelfAdvertiser_Landingtrack_Integration.png


4- Create your Dimension on LandingTrack

SelfAdvertiser_Landingtrack_Campaign_URL.png


5- Set up your optimization rules

Landingtrack Optimization Rules General.png


6- Set up your Campaign on SelfAdvertiser

SelfAdvertiser_Landingtrack_Pop_Campaign_Creation_Step2.png


7- And chill for the next hours

Still thinking about how automation can help you? no worries, it always takes time to understand new technologies but in the meantime, keep reading us¡
 
Thank you so much @servandosilva, you are totally right (regarding the future and present of LT), now we are only showing the edge of the iceberg but there's tons of things we will be presenting on AffiliateFix; we also invite any forum member to ask if they have any doubt or want to know more about this new generation Tracking System
 
Another BIG success this time. For everyone running Redirect / zeroclick traffic Now LandingTrack is covering one of the biggest source: @TONIC.

tonic.png


We have teamed up with @TONIC. , one of the top leading traffic sources for affiliates, and now, you can fully track and Auto - Optimize all your campaigns with LandingTrack.

We are still aware of how you love manual optimization, blocking those non-converting subids manually, having tons of tabs checking the whole picture and what's best? waking up early or going late to bed because your campaigns were not approved or rejected or whatever the reason.

But for those who are seeking for innovation and automation, LandingTrack. The sooner you start the better.

How to do that with TONIC and LandingTrack?
1- Sign up with TONIC - dismissed this step if you have an account already.
2- API is open for any Account so the integration it's even easier
3- Connect LandingTrack with you TONIC Account

LandingTrack_Tonic_Integration.png


4- Create your Dimension on LandingTrack

LandingTrack_Tonic_Creating_Campaign_URL_Generation.png


5- Set up your optimization rules. Remember, LandingTrack will check for you and apply your rules instantly.

LandingTrack_Tonic_INtegration1.png


6- Set up your Campaign on TONIC

LandingTrack_Tonic_Creating_Campaign_Step1.png


Do not forget besides your target options to add your Campaign URL:

LandingTrack_Tonic_Creating_Campaign_URL.png


7- The sooner you've saved your Campaign and synced with LandingTrack you can dedicate your time to other matters


LandingTrack_Tonic_Creating_Campaign_Sync_End.png


Still thinking about how automation can help you? no worries, it always takes time to understand new technologies but in the meantime, keep reading us¡ and SIGN UP for FREE¡
 
Here we come Again with more News, Now its time to present you one of the oldest Ad network for Pop Traffic - PopAds ;

Stop blocking non converting Sub IDs manually and start automating all the process - Control the traffic you buy at any time.

pop-ads &LandingTrack.png


Yes, you hear that right¡

So how can we Track and Auto-Optimice all the traffic coming from Popads with LandingTrack?


STEP 1 — PopAds Account Panel
If you are reading this you should be already login into your PopAds Account, so follow me in order to do this integration:

1 — Whitelisting your IP address in PopAds Account

Go to your Account Manager Section and click on > Security
1*6DFELcOHu5_ei3Tm_j_r1w.png

Go to your Account Manager Section > Security

Select IP white list option:

1*WU9RQh5wrVt43YLownBrSA.png


Add your LandingTrack IP Server in order to let PopAds know we are a Trustful user.

1*2-f-xg1H0qyf6iF77x2C1w.png

Add your LandingTrack IP Server and Save

2 — Getting the API Key:

Go to your Account Manager Section and click on > API Keys


1*cJjIuXQ3TpAbUV556ZquQA.png

Click on > API Keys
Copy your Key and paste it on your PopAds Credentials filed on LandingTrack

PopAds API Key for Landingtrack.png

Reveal your API Key, Copy and Paste it on your PopAds credential field on LandingTrack.


STEP 2— Adding PopAds as Traffic Source

Go to Traffic Source Tab and select >Connect New Source, then > Integrated DSPs and select from the list PopAds and fill the gasp with the information required and Save

PopAds API KEY Landingtrack.png

Just add your API Key in the First field and for the second one: Your PopAds user:password. Example: hellopopads@gmail.com:secretpass


Green Check¡means we are fully Integrated with PopAds and we can start automating all your Campaigns but, We will suggest you add some more steps like — URL Tokens and Outgoing Postback

PopAds_ Landingtrack_Green_Check.png


Now we are in full control of all the Traffic and Campaigns from Popads.


STEP 3 — Creating a campaign (Dimension) on LandingTrack

Go to Offers menu side and select the Active offer/s you want to send traffic to by clicking on the checkbox. Remember that you can select one or multiple ones

1*DzleBJa6O_F-j-LdLjcSxw.png

Select an Offer by clicking on its avatar


Once you have selected the ones you want to run click on> Actions button and then create a dimension. You will be redirected to its profile.

1*o4adZa3FWGk3CL7oAZ9ZyA.png

Easy, select and the > Actions + Create


You will be redirected to its profile:

1*uaookyxr0OCTnH1q9CviHw.png


Want to know everything About Dimensions? see full guide HERE


— Dimension Configuration Options:

1*bcLpNj_j2aqA_tC-f5OCuw.png

See full guide HERE

— Dimension Traffic Sources Section:

1*inqIGL0NwKGjdx40keyIxA.png

See full guide HERE


— Get Campaign URL:

1*Fh9xeNhKeLunKfD0qJAD4w.png


— Optimization Rules:

1*SBi_8fpS6AOyaE28VvCeyg.png


As you may know already, LandingTrack can optimize the traffic base on different rules, here its when automation comes into action :

1*PEp5i5iiode_IBmerEzzhw.png

You can always check our guide here— to refresh the concept.


STEP 4— Creating a campaign on PopAds
With PopAds we can create a single type of campaign in terms of traffic :

  1. Pop : Pop Under — Popup — Tabunder(Chrome Only) — Tabup.
Go to your PopAds account and create the campaign based on the target you need and do not forget to add the LandingTrack name provided for the Campaign and the URL:

1*aTDpAuDz2UeLE6sqGjqGrA.png

Do not forget to add the name and URL we provide you with.

Back on your Dimension Profile, you will see the next view :

1*_8EJP_HKXtR0st34eeK3yw.png

A dimension ca run only once with the traffic source
Everything has been set up already, our advice — Chill, relax and wait for the traffic to start.

Still thinking about how automation can help you? no worries, it always takes time to understand new technologies but in the meantime, keep reading us¡ and SIGN UP for FREE¡
 
Let' s say you have already created your Campaign at any of our Integrated API partners.

So where is the automation here? how LandingTrack can make your work more efficient and definitely easier to carry it

This is your Dimension Profile, the place where you got your Campaign URL:


landingtrack-_dimension_optimization_rules-png.5164


Click on the button > Optimization Rules to start setting Up all your traffic rules.
Remember - LandingTrack will be checking your rules every Minute for you and apply them right away.

landingtrack_optimization_rules-png.5135


These are the optimization rules that we have on LandingTrack, our bots are checking every minute all your API DSP/Ad networks that are sending traffic to the campaign. Saying that let's have a look at each Rule:

1- Blocking Sources:

landingtrack_blocking_source_rule_automation-png.5136


- Block by Cost: For the example on the screenshot LandingTRack will block any non converting Sud_ID/SIte_ID etc.. that has spent 0.5$ and it did not bring any conversion.
- Block by Clicks: For the example on the screenshot LandingTRack will block any non converting Sud_ID/SIte_ID etc.. that has sent 345 clicks (visits on your Landing Page) and it did not bring any conversion.
- Minimum Profit Guarantee: Let' say that you will get paid for each conversion/ lead 1$. "The Sud_ID/SIte_ID-12345" made a conversion/lead with a spent of: 0.15$ , so your profit for "The Sud_ID/SIte_ID-12345" is actually 0.85$ "not bad ;)". What if the "The Sud_ID/SIte_ID-12345" will not make any other conversion? probably after 4-5 hours the "The Sud_ID/SIte_ID-12345" will keep sending traffic and will spend more than 0.15$; at some point, there won't be more profit and it will actually turn into a negative one but, if you set the rule of Minimum Profit Guarantee the sooner the "The Sud_ID/SIte_ID-12345" spent 0.5$ which will mean your profit is now 0.5$ it will cut/block the source and will guarantee you a profit of 0.5$.

2- Blocking Sources Rules:

landingtrack_blocking_source_automation-png.5137


This rule was made to block those The Sud_ID/SIte_ID that for some reason are not converting any more, and you can apply it by hours or days. The example on the screenshot means
1- LandingTrack will check within the last 2 hours if the profit of any Sud_ID/SIte_ID drops 0.5$ then block it.
2- LandingTrack will check within the last 2 days if the profit of any Sud_ID/SIte_ID drops 4$ then block it.


3-Activate Campaign Next day

landingtrack_activate_campaign_newday__automation-png.5138


This rule is always base on your server Time zone, this is something that we set up before starting, meaning that no matter where you are base that Campaign will start again at 0:00 AM.


4- Pause Campaigns

landingtrack_pause_campaigns_automation-png.5139


- Global Negative Profit: For the example of the screenshot LandingTrack will completely pause your Campaign if you lose 50$ and won't let you run it again unless you increase the "budget" or you remove it.
- Negative Profit per Day: For the same example, LandingTrack will completely pause your Campaign if you have lost 5$ Today and won't let you run it again unless you increase the "budget" or you remove it.
- Negative Profit per hour: For the same example, LandingTrack will completely pause your Campaign if you have lost 5$ in an hour and won't let you run it again unless you increase the "budget" or you remove it.


5- Pause Campaigns Rules

landingtrack_pause_campaigns_rules_automation-png.5140


This rule is pretty similar to "Blocking Source Rules" but the main difference is that it will Pause your campaign instead of blocking The Sud_ID/SIte_ID.
The example on the screenshot means
1- LandingTrack will check within the last 2 hours if the profit of your campaign has dropped 2$ then paused
2- LandingTrack will check within the last 2 days if the profit of your campaign has dropped 10$ then paused.


6- Time Frame

landingtrack_time_frame_automation-png.5141


And finally Time Frame. Knowing where you are base and where you advertiser is based (or your audience) LandingTrack will active and paused your campaign base on your timeframe selected.
The example on the screenshot means: LandingTrack will start your Campaign at 00:00 AM, will pause it at 02:00 AM and will re-activate it at 5 AM.

These are all the rules that we have right now on LandingTrack to help your day to day work.
I will like to add that even if you have a delay in getting your conversion, no problem, LandingTrack will unblock the Sud_ID/SIte_ID if your rules are matching.

Hope that now everyone knows before starting a Free Trial (as we fully understand that nobody likes losing its time) some of the features we have at LandingTrack.

So if you have any doubt, please just let us know and I will be happy to assist.

Almost forgot, here it goes another screenshot of how it looks when you connect several API DSP/ Adnetworks into a campaign:


landingtrack_dimension_profile_automation-png.5142


LandingTrack - The Only Auto-Optimizer and Tracking system. Start automating your Campaigns.
 
Hello, AffiliateFix community¡ hope you had a fantastic summer.
We did had a blast one and that is why we must tell you that now:
propellerads.png


Is more than fully integrated with LandingTrack¡

STEP 1 — Getting the API KEY Access from @PropellerAds

The first thing to mention and super Great news is that PropellerAds just opened the API for everyone¡¡

Once your @PropellerAds Account has the access approved, you should see the API Access available on your Account under your Profile Menu (scroll down a bit):

PropellerAds API KEY landingtrack.png


STEP 2 — Adding PropellerAds as Traffic Source on LandingTrack

Go to Traffic Source on the Menu and click on > +Connect new Source; from the list of options, select > Integrated DPS and Look for @PropellerAds . In order to connect with them, you will need a total of 2 fields to be filled.

1- User: Your PropellerAds user

2-Password: Your PropellerAds password
PropellerAds_LandingTrack_Select_Traffic_Source.png


Just add your PropellerAds Mail and Password login and Save.


Next view after saving will be the Test API :

PropellerAds Check API Landingtrack_step2.png


Click on Check API to sync both Accounts.

Green check¡ let 's move on :)
PropellerAds Check API Landingtrack_Green_check.png


Now that we are synchronized with PropellerAds let’s have a look at > Edit button.

The following Parameters and Tokens will be provided by default for each PropellerAds URL :

  • source={zone_id} — ID of the ad zone where the ad is displayed
  • bid={cost} — Cost of click or impression.
  • pid=${SUBID} — Unique ID for tracking conversions
  • cmp={campaignid} — ID of the campaign
  • b={bannerid} — ID of the banner
If you need to add more Tokens to your Campaign URL: Simply select the parameter data1 or 2 etc.. and from the template pick the one you need > Add and Save.

PropellerAds_LandingTrack_Tokens.png


1.2— Postback (Optional):
We are missing only one thing to finish the full integration with PropellerAds, adding their postback :

http://ad.propellerads.com/conversion.php?aid=ZZZZZ&pid=AAAAAA&tid=BBBBB&visitor_id={aff_sub}

Remember to replace their Tokens for the LandingTrack ones:

. {aff_sub} by {{PID}}
PropellerAds_LandingTrack_Postback set up.png

Replace PropellerAds Tokens by the LandingTrack ones and SAVE.


STEP 3— Creating a campaign (Dimension) on LandingTrack

We just need to Select PropellerAds as Traffic Source, our Domain and finally choose between Mainstream or adult.

PropellerAds_LandingTrack_Campaign_URL.png

IMPORTANT: Copy the Full name that we provide you with and the Full URL:

— Optimization Rules:

As you may know already, LandingTrack can optimize the traffic base on different rules, here its when automation comes into action :


1*PEp5i5iiode_IBmerEzzhw.png

You can always check our guide — to refresh the concept.


STEP 4— Creating a campaign on PropellerAds
You can run four different types of campaigns with PropellerAds:

IMPORTANT: PropellerAds is still working on its API this means that the following Ad Formats won't be available to be Auto-Optimize in terms of Banners. Zoneids works perfectly.

  • Native and Push Notification.
PropellerAds_LandingTrack_Types_Of_Campaigns.png


The following ones are available to be: Auto-Optimize for zoneids.

1- OnClick (Popunder) — Pricing Model: CPM — SmartCPM — SmartCPA

2- Push Notifications — Pricing Model: CPM — CPC

3- NativeAds — Pricing Model: CPM — CPC (NOT AVAILABLE FOR AUTO-OPTIMIZATION)

4- Interstitials — Pricing Model: CPM — CPC

Each type of Ad has different prices models
CPM: Cost Per Mile (Thousand) is a fixed price you will pay for 1,000 ad impressions on any ad placements according to your targeting.

SmartCPM: Automatically defines the best possible CPM bids for each ad placement. Can optimize your campaigns according to target CPA (conversion price).

SmartCPA: Their system automatically tests numerous ad placements (zoneids). If it gets a significant number of conversions, your campaign goes on with tested zones, and you pay only for conversions (by CPA).

CPC: Сost Per Click. Spend your campaign budget only on users who clicked on your ads.


All the available formats have a pretty similar interface — in terms of campaign creation — so let's start with the process:

Click on + Create Campaign button:

PropellerAds_LandingTrack_Campaign_Creation_Step2_5.png


Once you have selected the type of Ad you will be running, add your Dimension Name and URL — the ones provided by us and set up your frequency / Capping (how many times your ad will be shown per IP)

Check on the right side of your screen, Traffic Available and estimation.

PropellerAds_LandingTrack_Campaign_Creation_Step1.png


Next step will be for your Marketing Materials:

1- Your Campaign Title: “Still optimizing Manually?”

2- Description: “ Start automation Today — LandingTrack”

3- Your images: 192x192 and 360x240 available sizes

PropellerAds_LandingTrack_Campaign_Creation_Step3.png

We can add more than one creative


Remember A/B Test — time to test both creatives and text

PropellerAds_LandingTrack_Campaign_Creation_Step4.png


Traffic Option: Basically 2 Main option: All traffic available or Premium Only

User Activity: 3 different types to be tested: High — Medium — Low

PropellerAds_LandingTrack_Campaign_Creation_Step5.png


Time to target Country and place your bid — @PropellerAds has a cool suggested tool for the bid, we recommend you to listen to them, at least the first time :) — the sooner you select Geo and Bid you will see how the Traffic estimated chart changes.

PropellerAds_LandingTrack_Campaign_Creation_Step6.png


Audience: This Section is for those who have saved an Audience before so their ads will hit only to those Audience built it

Campaign Schedule: will it be tomorrow or today?

PropellerAds_LandingTrack_Campaign_Creation_Step7.png

Remember that you can set up your campaign schedule on LandingTrack and what's even cooler: Your Negative profit per day and Globally¡
PropellerAds_LandingTrack_Campaign_Creation_Step_Timeandbudget.png


The sooner you lose 20$ per day — the campaign will be paused but if you do not lose it the campaign will keep running.


Targeting: Add your Platform — Operating System — OS Version — Browser — Browser Language — Connection Type: ALL or 3G — Mobile ISP: specific IPs — Zone Limitation: white or blacklist.
PropellerAds_LandingTrack_Campaign_Creation_Step8.png


Once you have saved your Campaign, check the ID, copy and let's go to LandingTrack so we can sync both platforms.
PropellerAds_LandingTrack_Campaign_ID.png

Copy PropelleAds Campaign ID


Back on your Dimension Profile click on Sync button and select PropellerAds Traffic Source and paste its Campaign ID:
PropellerAds_LandingTrack_Campaign_ID_SYnc.png

Paste your PropellerAds Campaign ID and click on >Search


You will see the following view :

PropellerAds_LandingTrack_Campaign_ID_SYnc_Final_view.png

Sorry is just a Draft :(
Everything has been set up already, our advice — Chill, relax and wait for the traffic to start.

These are the benefits of automation and how it can help your daily activity.

Still thinking about how automation can help you? no worries, it always takes time to understand new technologies but in the meantime, keep reading us¡ and SIGN UP for FREE¡
 

Attachments

  • LandingTrack_PropellerAds.png
    LandingTrack_PropellerAds.png
    5.2 KB · Views: 14
We did it Again¡
We can say now that LandingTrack is now Tracking and Auto-optimizing: NATIVE ADS¡


landingtrack_nativeads_automation-png.6002


Soon we will be explaining how this works and all the new features around it.

If you did enjoy with Pop/redirect - wait to see what we can do with Native Ads.

Still thinking about how automation can help you? What do you think will be the future?

SIGN UP for FREE¡
 
More News coming from @LandingTrack !!
A big welcome to our New integrated partner: UngAds and a special mention to @Oleg Evtushenko who helps us a lot on the integration.
Logo_new_UngAds.PNG

A bit of UngAds background:

UngAds - is an advertising network with its own self-service platform. In which you can create your advertising campaign and manage it from your account. Easy to create and customize campaigns. Statistics and high-quality user support.
GEO - WW. 4 media formats. Various options for customizing the target.

UngAds available Formats:

- Video (CPM);
- Banners (CPM, CPC, SmartCPA);
- PopUnders (CPM, SmartCPA);
- Push Notifications (CPM, CPC, SmartCPA);
- Native (CPM, CPC, SmartCPA).

For those who want to work on the CPA / CPI / CPL - SmartCPA test!!!

So ¿what it is so special about this new integration with @LandingTrack ?
Prett simple - Track and Auto-Optimice more than 16.000 UngAgs direct Publisher.
How? Only with us.

STEP 1 — Adding UngAds as Traffic Source
Go to Traffic Source Tab and click on > +Connect new Source; from the list of options select > Integrated DSPs


0*j6Xi-ctaQmHHbmIN.png

Look for UngAds. In order to connect with them, you will need a total of 1 field to be filled.

1- Your UngAds Api Key

1*QoGaPWxcxNQE2UdBEGcqKQ.png


We can easily find your API Key on your UngAds Account. Once you have logged in to your UngAds Account click on > Advertisers and select the option: API on the left side of the screen.

LandingTrack_Ungads_Getting_Api_Key_1.png


Just click on it to see your API key


1*yBQJnywFzWKziIVVuBtNMQ.png


Copy your API Key and let’s get back to LandingTrack, and finish the integration.


1*QHDFucRhbpsLhDMQhbQ5jw.png


After click on the button > Connect we have an extra step — Check API , click on it.


1*Be7XRiDW3ngfjtos3XpRbQ.png


Green Check¡
means we are fully Integrated with UngAds and we can start automating all your Campaigns

SETP 2 - Getting the URL for UngAds:

Click on button > + Get Campaign URL and select UngAds as your traffic source, then select your Domain and your Traffic Segment; Finally, copy the name and URL we provide you with:

IMPORTANT: Copy the Full name that we provide you with and the Full URL:


1*By0BbLjM-rmxGzQzhekkrg.png


REMEMBER:
Use the Dimension name on UngAds Campaign Name and LandingTrack URL for the Campaign URL.


STEP 3 — Creating a campaign on UngAds
REMEMBER: UngAds did not finish their API yet so it means: You won’t be able to PAUSE their BANNERS for — VIDEO — PUSH and NATIVE.


Let’s login to your UngAds Account and go straight to + CREATE CAMPAIGN button.


1*owshkL9Fs-6II0YUULG3aQ.png


Settings: IMPORTANT use LandingTrack Dimension name here. Then choose your Ad format: BANNER — VIDEO — PUSH and NATIVE


1*TO0nWG3twJTcPCF626ItUA.png

IMPORTANT: Use LandingTrack Dimension for Campaign name


Select your Connection Type — Carriers if need it and the following options.


1*C98XJ6O4fxpw8kWUqh9b9w.png


Time for blacklisting IP and sources.


1*TO0dAl8jyAg3EQnZ5PIRkg.png


After Saving you will be redirected to your Dashboard where you will see your new dimension created, next to it you will have to copy the Campaign ID that UngAds provide to the Campaign


1*HG9RA9y6mQn8SxI9aOmn7w.png


Back on LandingTrack — Dimension — Profile. We are going to sync your UngAds Campaign with LandingTrack Platform. Click on button > Sync. Select UngAds from your Traffic Source and Paste the Campaign ID < click on Search.


1*LN_qaa8PMwnF2Pru7UNAQA.png


The next view will be:


1*molaGGcI1qG3OVHYCSjVJA.png


Everything has been set up already, our advice — Chill, relax and wait for the traffic to start.

Do not forget to set up your Optimization Rules


landingtrack-optimization-rules-general-png.14574


IMPORTANT
: If you would like to SYNC all your UngAds Campaigns with LandingTrack then Go to Traffic Sources, Menu entry and click on UngAds name and then> Refresh button (this action is literally calling UngAds API to look for your All your Campaigns)

ALL GOOD¡

Still thinking about how automation can help you? no worries, it always takes time to understand new technologies but in the meantime, keep reading us¡
 
Last edited:
Is it Friday for everyone?
We did it again AffLift marketers! a BIg welcome to our new integrated partner: Clickadu !!
logo_clickadu_bw_vertical-01-300x300-png.6333


Yes, you read that right! Although at this moment due to Clickadu API we can only Track +Auto-optimise Pop Campaign on CPM and SCPM we still believe it has been a great success.


STEP 1 — Adding Clickadu as Traffic Source
Go to Traffic Source, Menu side and click on > +Connect new Source; from the list of options select > Integrated DPSs

1*pZ08xAwUJbklpQZVHPbHww.png


From the list displayed look for Clickadu. In order to connect with them, you will need to provide only two fields.


1*zO9hS6QUs-2EXqh7q7xhWA.png


1- API Key: Your Clickadu API Key

Where to get your API Key from Clickadu?

Easy, log in to Clickadu and look at the left side Menu the option > API, click on it and you will see it. Copy and go back to LandingTrack to paste that value on the field: APIKEY


1*-ZDxLWwTljDl3PZ8uUqmuw.png

Back on LandingTrack, paste your API Key

1*yYwizbyuhngUnDpVO4LzYw.png


After clicking on the button > Connect we have an extra step — Check API, click on it.
The slide-out will show to you your credentials, check them and if all looks good click on orange button> Check API

1*BWxxj4Cavf_NyTEXvLgxiQ.png


Green Check¡ means we are fully Integrated with Clickadu and we can start automating all your Campaigns but, We will suggest you add some more steps like — URL Tokens and Outgoing Postback
Now that we are synchronized with Clickadu let’s have a look on > Edit button.
The following Parameters and Tokens will be provided by default for each Clickadu URL :
  • source={zoneid} — (the one need it in order to track the site)
  • bid={cost} — how much you gonna pay for 1 impression (working for pop’s = 1 click)
  • cmp={campaignid} — Campaign ID, as registered in their system
  • b=[ban] - Your banner ID


STEP 2 — Creating a campaign (Dimension) on LandingTrack

Go to Offers menu side and select the Active offer/s you want to send traffic to by clicking on the checkbox. Remember that you can select one or multiple ones

1*DzleBJa6O_F-j-LdLjcSxw.png


Select an Offer by clicking on its avatar

Once you have selected the ones you want to run click on> Actions button and then create a dimension. You will be redirected to its profile.

1*o4adZa3FWGk3CL7oAZ9ZyA.png


Easy, select and the > Actions + Create


You will be redirected to its profile:


1*uaookyxr0OCTnH1q9CviHw.png

Want to know everything About Dimensions? see full guide HERE


— Dimension Configuration Options:


1*bcLpNj_j2aqA_tC-f5OCuw.png

See full guide HERE


— Dimension Traffic Sources Section:


1*inqIGL0NwKGjdx40keyIxA.png

See full guide HERE


— Getting the URL for Clickadu:

Click on button > + Add Campaign and select Clickadu as your traffic source, then select your Domain and your Traffic Segment; Finally, copy the name and URL we provide you with:
IMPORTANT: Copy the Full name that we provide you with and the Full URL:


1*Xsoi7YQiyHTfQtCerEEOGg.png

REMEMBER: Use the Dimension name on Clickadu Campaign Name and LandingTrack URL for the Campaign URL.


— Optimization Rules:


1*SBi_8fpS6AOyaE28VvCeyg.png

As you may know already, LandingTrack can optimize the traffic base on different rules, here its when automation comes into action :

1*PEp5i5iiode_IBmerEzzhw.png


You can always check our guide here — to refresh the concept.


STEP 3 — Creating a campaign on Clickadu


With Clickadu we can create four types of campaigns in terms of traffic: OnClick (Popunder) — DIalog Ads/Push Up — Video & SKim
IMPORTANT: “Clickadu did not finish their API yet so it means: You can only Track and Aut
upload_2019-10-25_17-57-53.gif
ptimice OnClick (PopUnder Campaigns with them) on CPM and SCPM mode only.


The following Ad formats can be tracked but you cannot Aut
upload_2019-10-25_17-57-53.gif
o-Optimice:
Push-Notifications — Dialog Ads — Video And Skim
“Talk to them to speed up the process
upload_2019-10-25_17-57-53.gif

  • Push notifications (Mobile & Desktop)
  • Pop (Mobile & Desktop)
  • Video
  • Skim

Push notifications & Pop (Mobile & Desktop)

Go to your Clickadu account and create the campaign based on the target you need and do not forget to add the LandingTrack name provided for the Campaign and the URL:
Click on the left side of the MENU on Campaigns.
  • Campaign Name: Remember — always the one LandingTrack provide you with
  • Pricing Model: CPM: Cost per Mil impressions /SmartcCPM: dynamic CPM / SmartCPA: with a CPA Goal.
  • Ad Format: On click (Popunder) — Push — Video — Skim (Direct Link Ads)
  • Targeting URL: always the one LandingTrack provide you with
  • Country and Bid.


1*1pbbIbi2C4IzsLX-IahmpQ.png


Let’ s move to Budget — no need as you can set it up on LandingTrack & Targeting option.


1*mti4dDwtQbO6-nmM3TRIVQ.png


Right after adding your targeting options is time for you to decide if you want to get traffic from Anti-Adblock zones — slow connection and 3rd party traffic sources.


1*RBlE67XfhexMmz1dWQGYCA.png


After submitting the Campaign just it for its approval (usually takes a few minutes), copy the Campaign ID provided by Clickadu and come back to LandingTrack


1*klRyu_hdl7h9yLVc5nhG2g.png


Once you have saved your campaign we should get back to LandingTrack, specifically to your Dimension — Profile and click the button sync in order to connect both sides with the Campaign ID you just copied before.


1*4F2Da31AcUM9OAmPWqQoHQ.png


This will be your next view :


1*uSaJxgDnRvNG9VpG0k0xhg.png

Everything has been set up already, our advice — Chill, relax and wait for the traffic to start.
These are the benefits of automation and how it can help your daily activity.

When will you start automating your Campaigns?
 
MI
Back