Install the app
How to install the app on iOS
Follow along with the video below to see how to install our site as a web app on your home screen.

Note: this_feature_currently_requires_accessing_site_using_safari


You are using an out of date browser. It may not display this or other websites correctly.
You should upgrade or use an alternative browser.
You should upgrade or use an alternative browser.
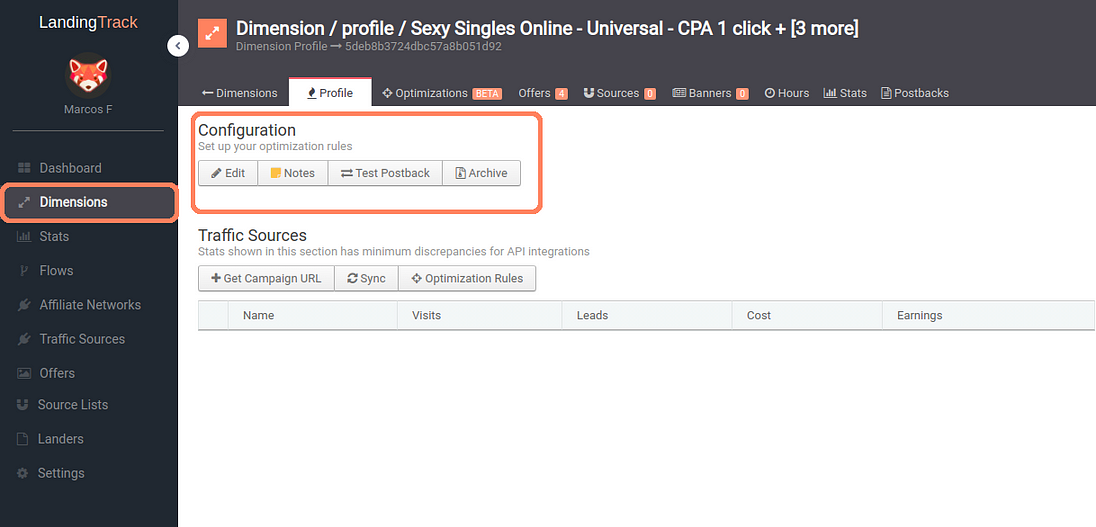
Official LandingTrack - Track + Auto-Optimization.
- Thread starter LandingTrack
- Start date

Thank you @azgold , in fact, we have some guides that perhaps we can post here, the whole idea would be to have like a ref site were to check the whole workflow - how to create a Campaign URL? - how to pass back information to your Aff. network/advertiser or your own platform? , how to master the tokens? etc... could it be relevant to create something like this?
Well Well Well - This one is a huge MIlestone for LandingTrack!!
A Big Welcome to.......: MGID!!

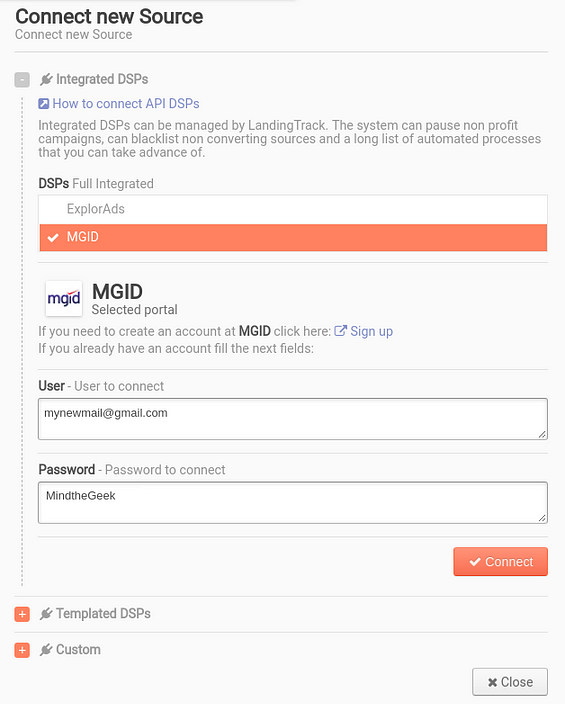
STEP 1 — Adding MGID as Traffic Source
Go to Traffic Source Tab and click on > +Connect new Source; from the list of options select > Integrated DPS
Look for MGID. In order to connect with them, you will need a total of 2 fields to be filled.
1- Your MGID email for the field Users
2- Your MGID Password for the field Password
Now that we are synchronized with MGID let’s have a look on > Edit button.
The following Parameters and Tokens will be provided by default for each MGID URL :
Since you will need to add Banners no worries, this option comes later on, Once we generate the Campaign URL.
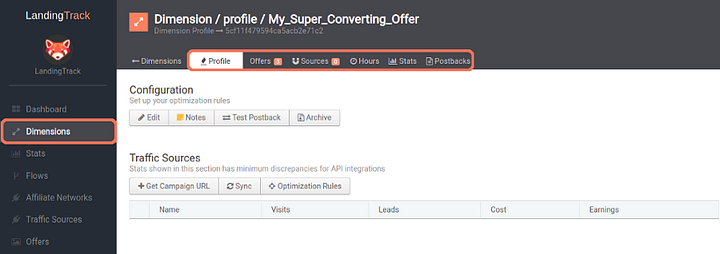
STEP 2 — Creating a Dimension on LandingTrack
Your DImension Profile:
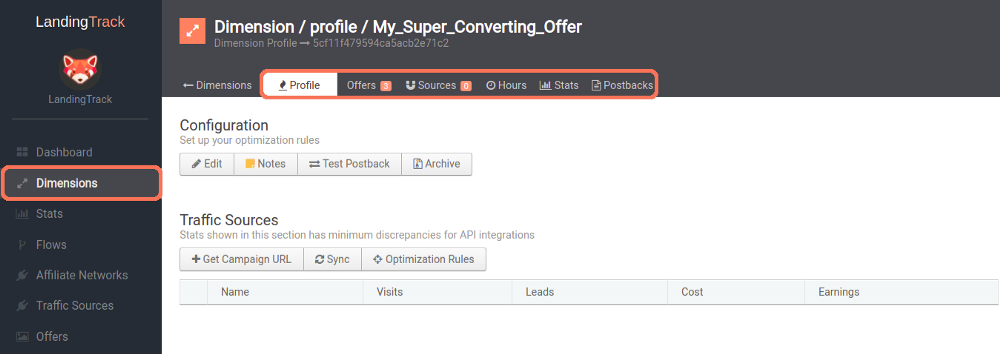
Want to know everything About Dimensions? see full guide HERE
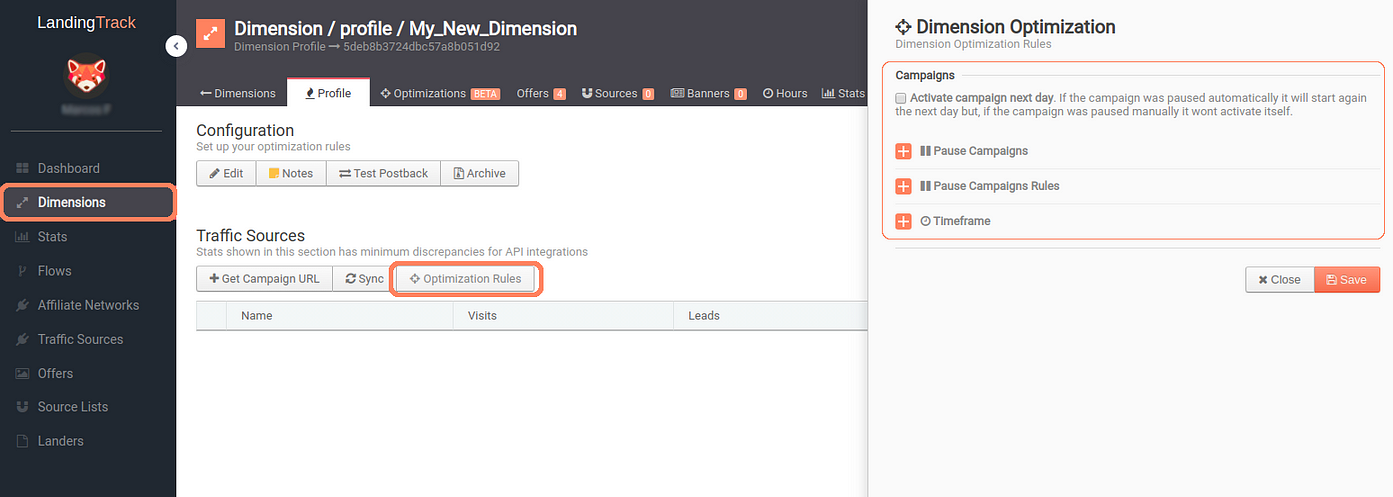
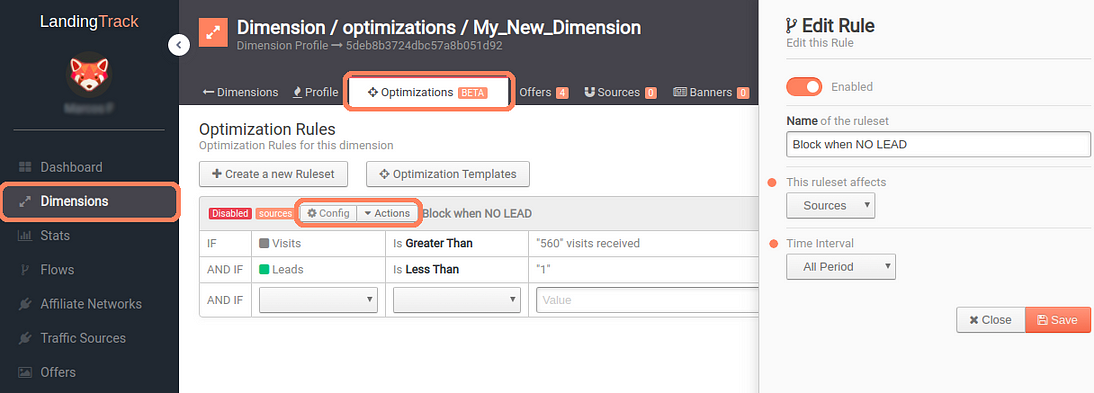
— Optimization Rules:
As you may know already, LandingTrack can optimize the traffic base on different rules and NOW even more!, here its when automation comes into action :
You can start working on your Optimization rules, remember that LandingTrack will automatize your banners and source, every minute.
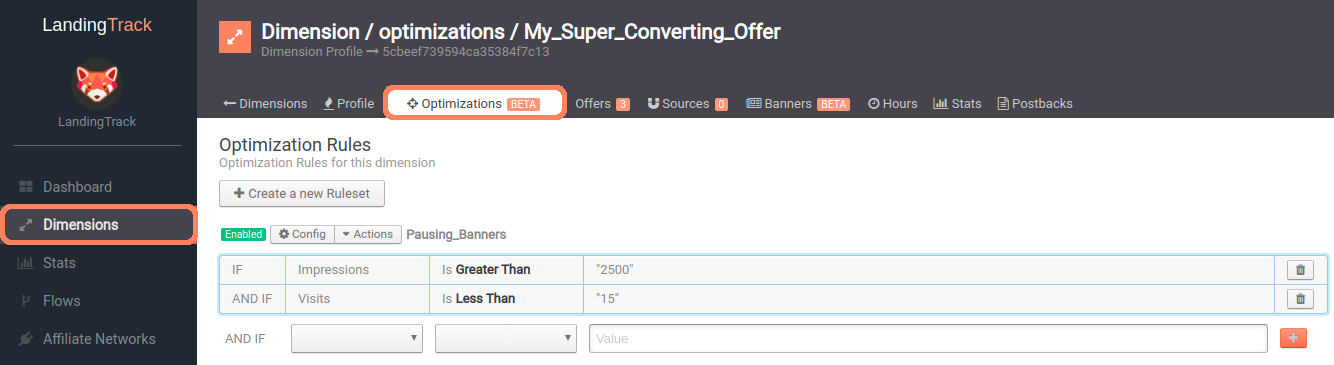
We have selected the option Banners, meaning that LandingTrack for the example above will pause/block your banner if the impressions receive are higher than 2.500 and the Visits (Clicks) on your banner are less than 15.
You can always check our guide here — to refresh the concept.
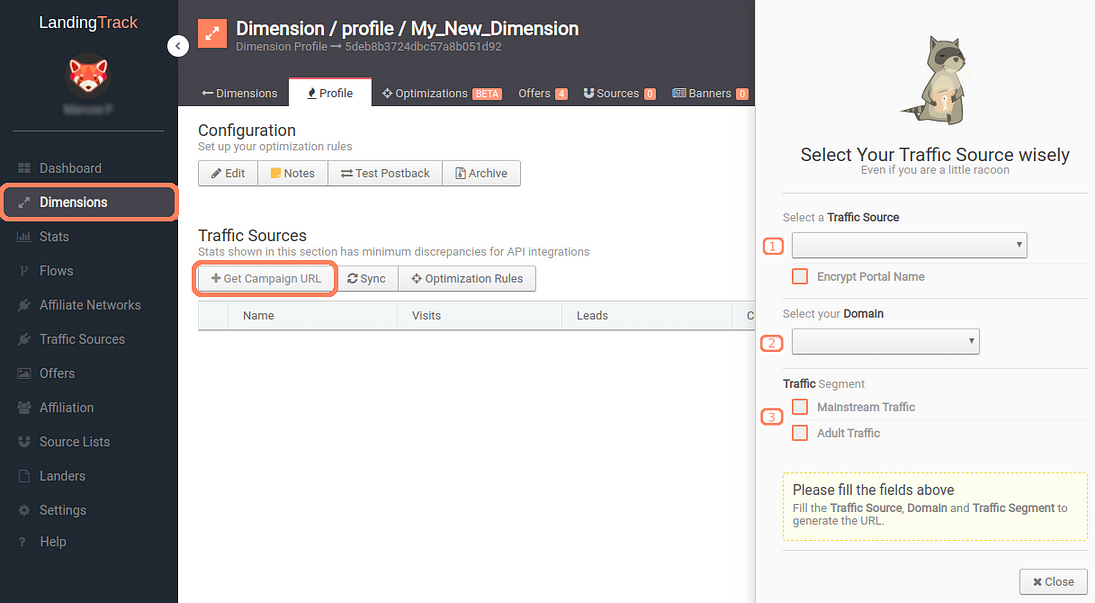
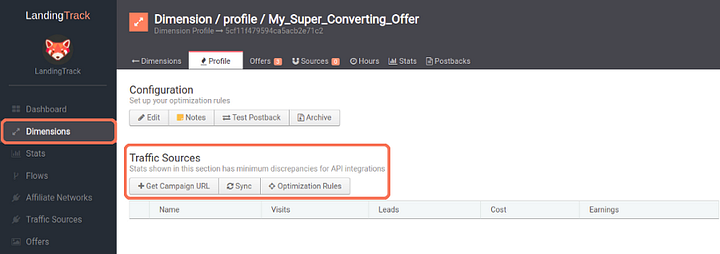
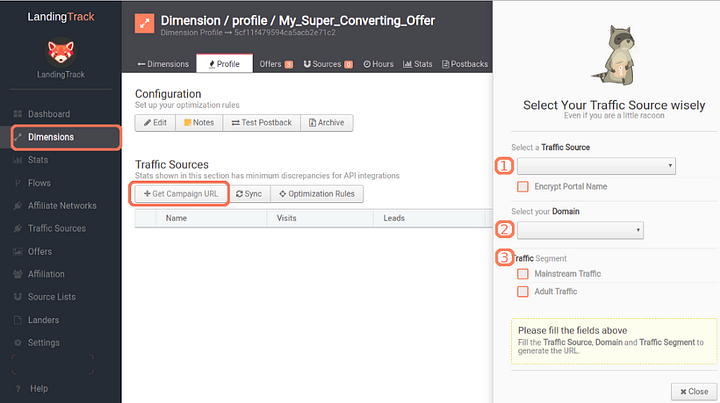
— Getting the URL for MGID:
Click on button > + Add Campaign and select MGID as your traffic source, then select your Domain and your Traffic Segment; Finally, copy the name and URL we provide you with:
IMPORTANT: Copy the Full name that we provide you with and the Full URL:

REMEMBER: Use the Dimension name on MGID Campaign Name and LandingTrack URL for the Campaign URL.
STEP 3 — Creating a campaign on MGID
Once you have log in to your MGID Account click on > ADD campaign

Remember we are Advertiser for MGID. (Buying Traffic from them)
The first thing to do will be adding your Campaign name — Do not forget to copy/paste the whole name LandingTrack provide you with. IE: Dimension 5d7251….
Select your Campaign type:
1- NOT DEFINED
2- PRODUCT PROMOTIONS
3- CONTENT PROMOTIONS
4- PUSH
And right after that, your Campaign Category and Campaign Language. This will be basically where you would like to advertise your advertiser materials.
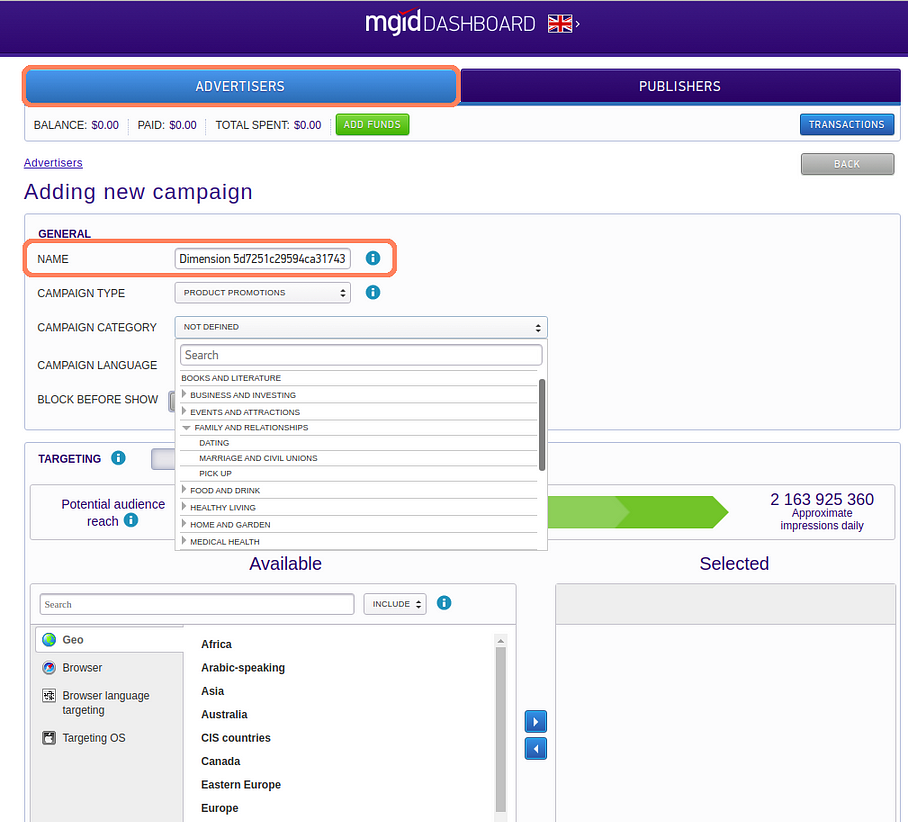
We have selected the option — Block before shown (ON) which means that after the campaign has been approved by the MGID team, it will not start, instead it will be paused.
Next move will be for TARGETING:
Select your country/geo where you would like to promote your advertiser materials
The browser and Browser language Targeting
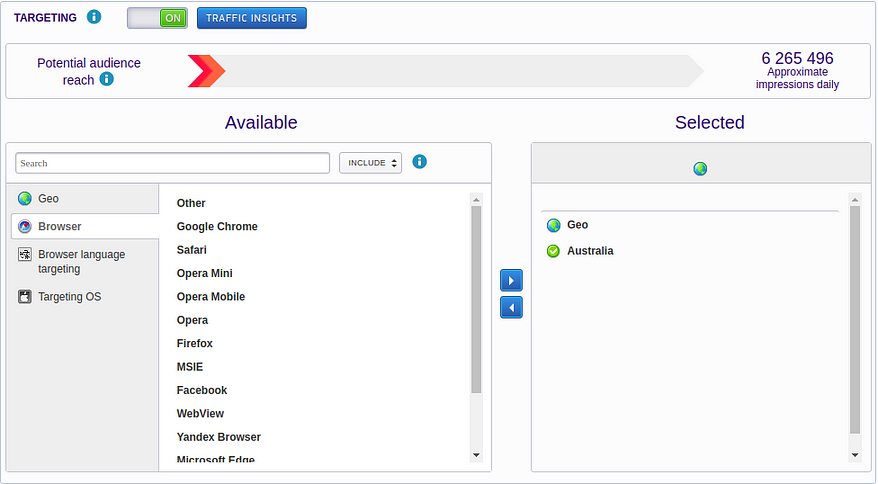
And finally Targeting OS
If you notice we will always have the “Approximate impressions Daily” on your right side of the screen
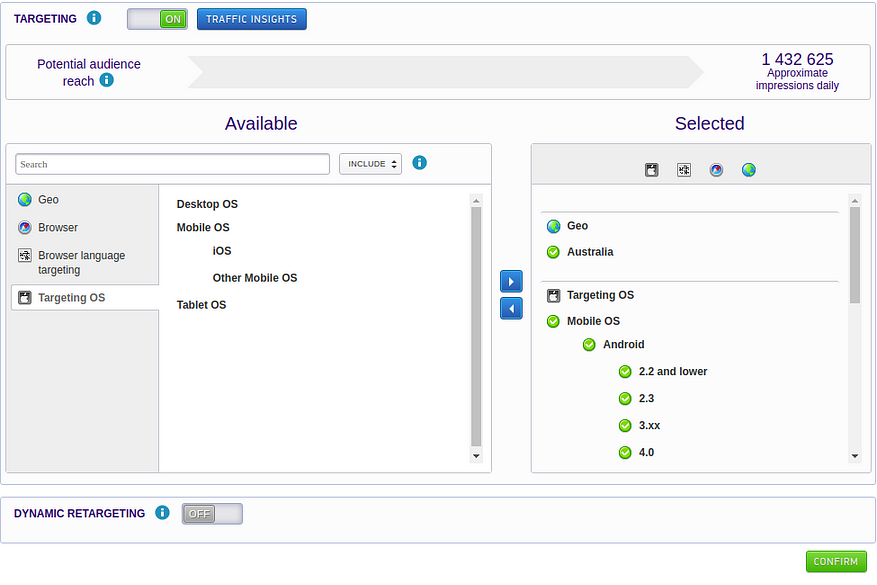
After filling your Targeting options click on button > CONFIRM to keep setting up your Campaign at MGID.
Next step will be Schedule, you can either set it up on MGID :

Or start using all the automation that LandingTrack can offer to you > Optimization Rules:
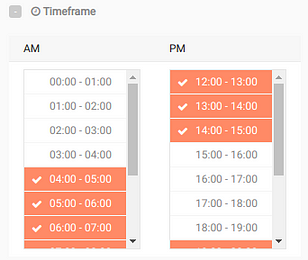
Once you have decided when you would like to be running your Advertising materials with MGID it is time to move to the following options:
1- LIMITS: set caps for your campaign base on Clicks / Budget or Conversions. But again, it is time for you to set up all those rules on LandingTRack to start working with automation.
2- TRACKING TAGS: You can set up UTM or any custom tracking tags.If you need to add any custom tracking instead of Google Analytics you need to use this option:
Allowed characters: 0–9, A-Z, a-z, -, _, =, +, &, /, :, ^ . The following macros tags are also allowed: {widget_id}, {teaser_id}, {campaign_id}, {geo}, {geo_region}, {ifa}, {click_id}. {click_id}- When you use these macros, please pay attention (take into account) that click status might be reconsidered as non-relevant after the fact. If you are not sure — seek assistance

Once you have finished we should look at the next step: CONVERSION SENSOR:
This section is for you to send conversions back to MGID platform so you can check your stats also with them.
This is the Postback from MGID: http://a.mgid.com/postback?c={{PID}}&e=interest312290&r={{PAYOUT}}
Just copy-paste yours, and let’s set it up on LandingTrack. Menu side click on > Traffic Sources and select Adskeeper, then click on Outgoing Postback and Paste it.
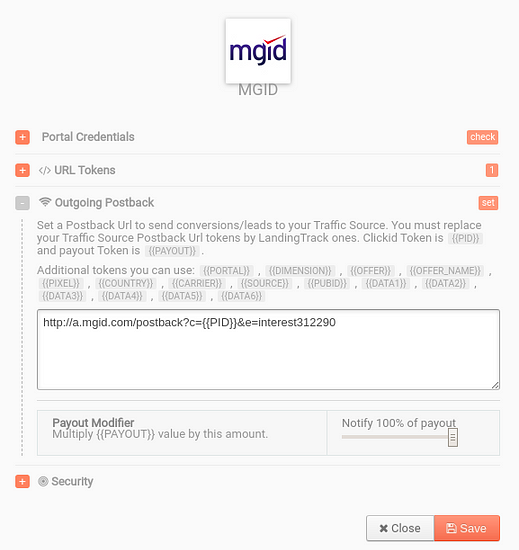
EASY¡
Time to create your Teaser Campaign, remember we are running Native Ads and would be needing an image, headline and body text for your advertiser material.
Click on the button > + right below ADS to start adding your Teaser materials.
Now we should be adding all our Teaser Materials an also our Campaign URL that we will find of LandingTrack .
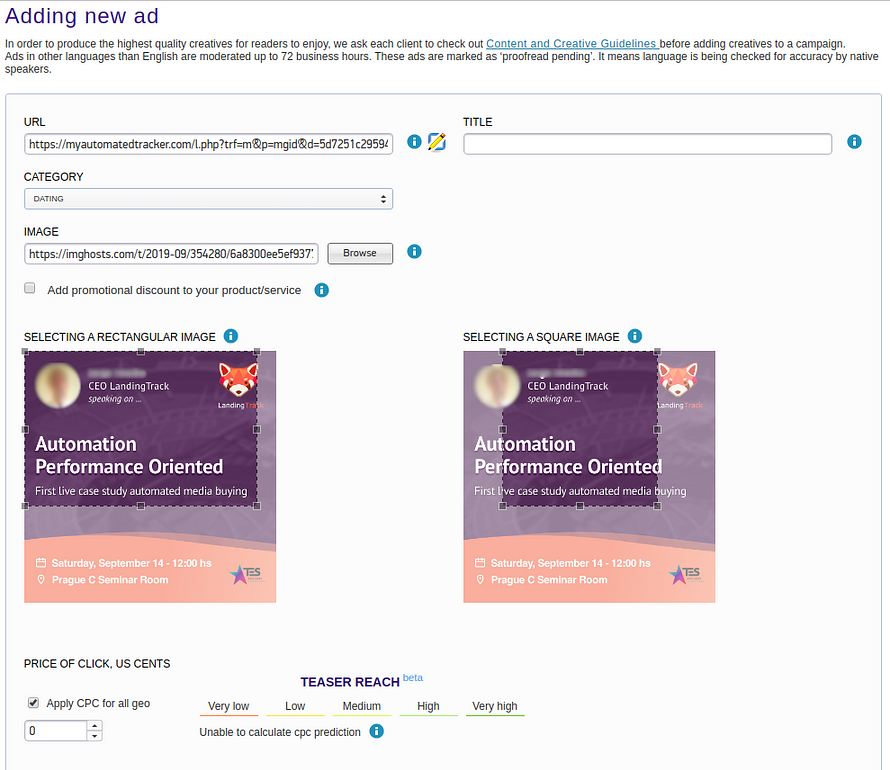
Add your LandingTrack Campaign URL, write your Teaser Title, select your category and finally upload your image.
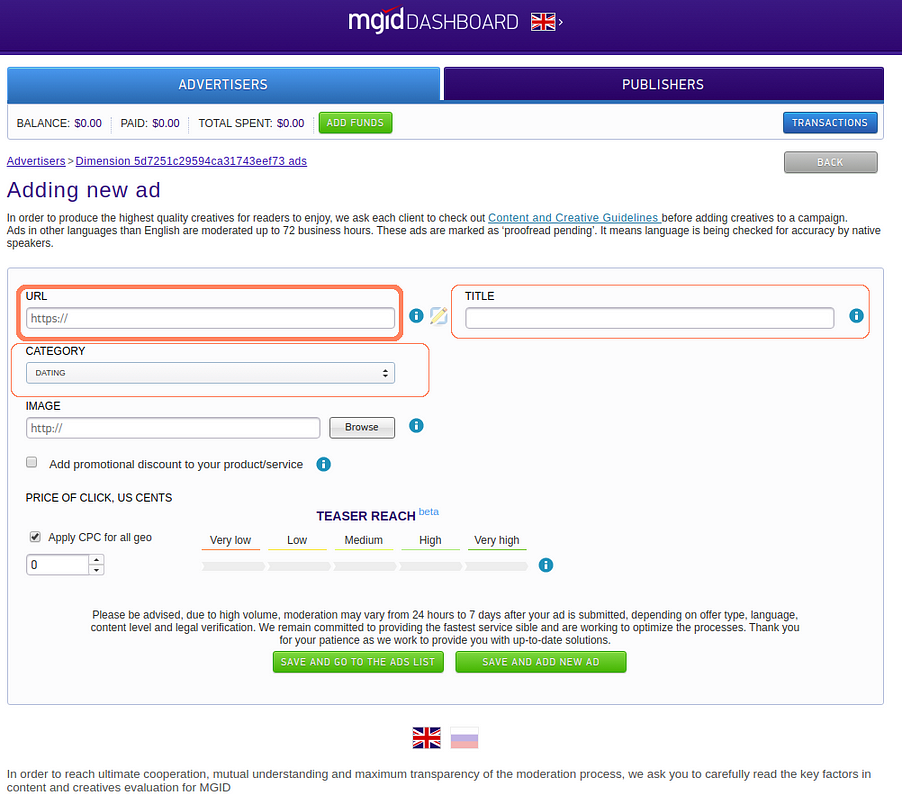
MGID has a cool Feature to crop your image, use it wisely.
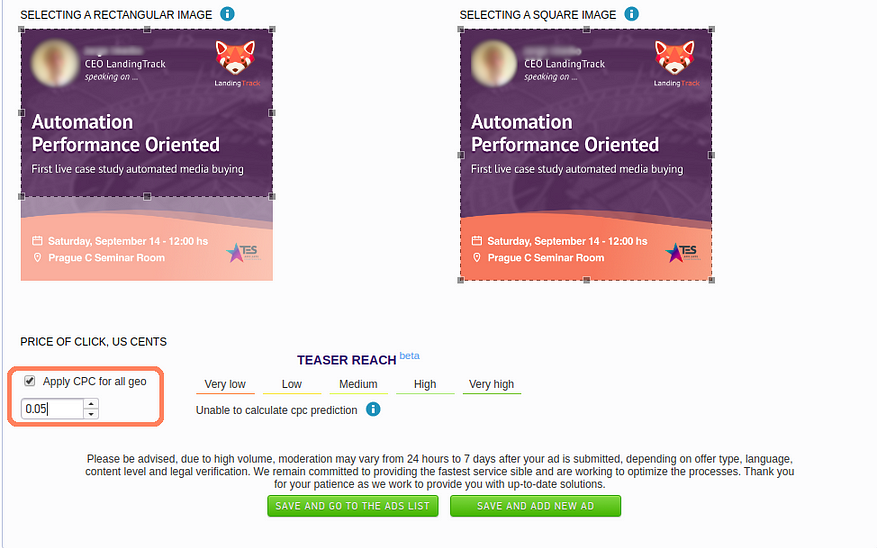
Finally after adding your image and crop it, select the CPC price for all your Teaser Materials.
Congrats¡ as MGID says — try to add at l east 10 teasers then you can auto optimize them through LandingTrack; one of the main benefits of Automation.
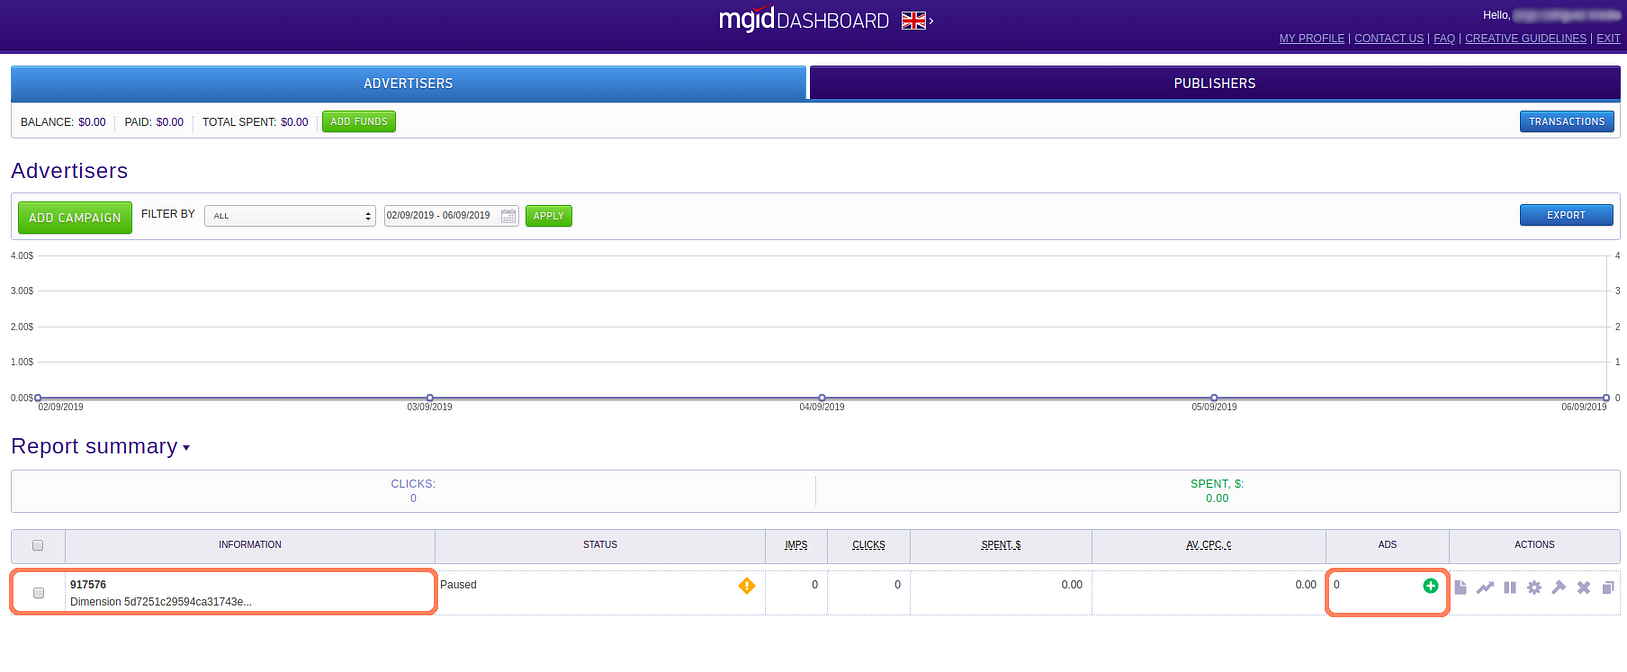
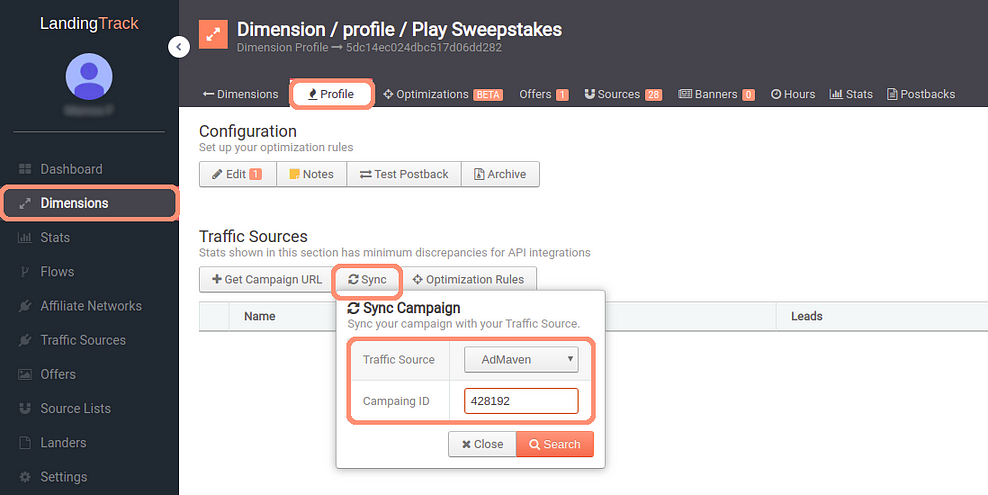
Back to your MGID Dashboard, you will see your new Campaign listed. We recommend you to COPY the campaign ID — IE: 917576 and Paste it on your DImension > button Sync.
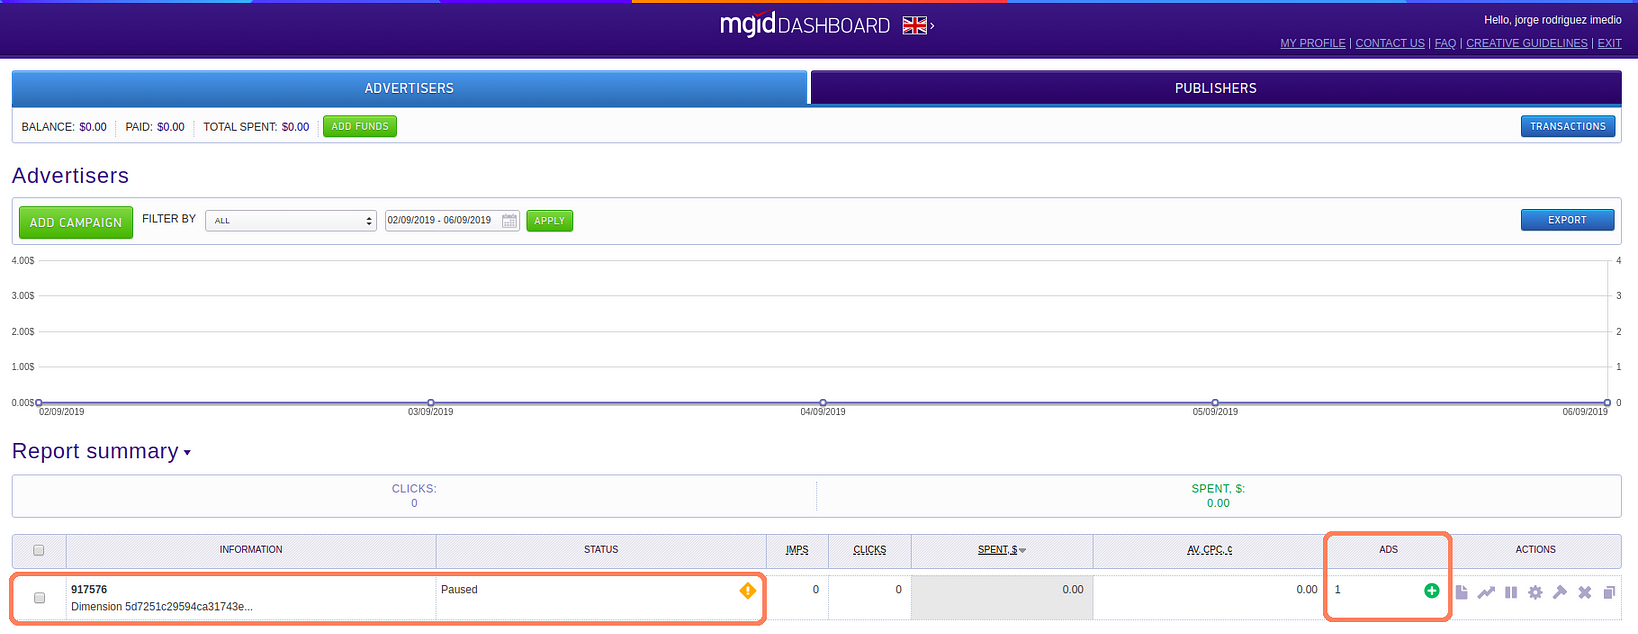
COPY CAMPAIGN ID — Paste on DImension LandingTrack to sync campaign.
And this is the view from our Ad on MGID dashboard:

IMPORTANT — once you have created your campaign on MGID — copy the Campaign ID and back on your Dimension profile click on button > SYNC — select MGID and paste the ID. This action will make LandingTrack go and look for your Campaign.

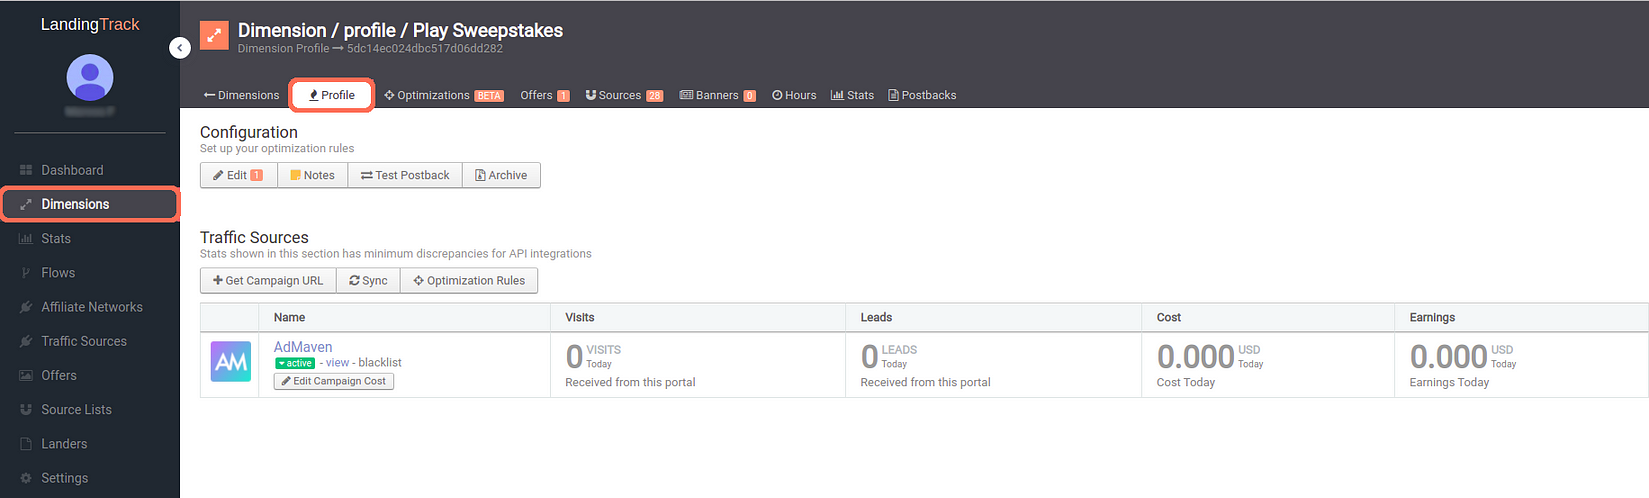
Our New Banners TAB — in action: control all your MGID Teaser from here, block or unblock them.

Click on the banner Status to know the reason why -
Everything has been set up already, our advice — Chill, relax and wait for the traffic to start.
These are the benefits of automation and how it can help your daily activity. What are you waiting for to start with LandingTrack?
These are the benefits of automation and how it can help your daily activity with MGID. What are you waiting for to start with LandingTrack?
A Big Welcome to.......: MGID!!
STEP 1 — Adding MGID as Traffic Source
Go to Traffic Source Tab and click on > +Connect new Source; from the list of options select > Integrated DPS
Look for MGID. In order to connect with them, you will need a total of 2 fields to be filled.
1- Your MGID email for the field Users
2- Your MGID Password for the field Password
Now that we are synchronized with MGID let’s have a look on > Edit button.
The following Parameters and Tokens will be provided by default for each MGID URL :
- s={widget_id} — (the one need it in order to track the site)
- bid={click_price} — The cost of the visit (how much you pay for a click)
- cmp={campaign_id} — Campaign ID, as registered in their system
- Keyword={category_id} — Category where your ad will be displayed.
- b={teaser_id} — ID of the banner displayed.
Since you will need to add Banners no worries, this option comes later on, Once we generate the Campaign URL.
STEP 2 — Creating a Dimension on LandingTrack
Your DImension Profile:
Want to know everything About Dimensions? see full guide HERE
— Optimization Rules:
As you may know already, LandingTrack can optimize the traffic base on different rules and NOW even more!, here its when automation comes into action :
You can start working on your Optimization rules, remember that LandingTrack will automatize your banners and source, every minute.
We have selected the option Banners, meaning that LandingTrack for the example above will pause/block your banner if the impressions receive are higher than 2.500 and the Visits (Clicks) on your banner are less than 15.
You can always check our guide here — to refresh the concept.
— Getting the URL for MGID:
Click on button > + Add Campaign and select MGID as your traffic source, then select your Domain and your Traffic Segment; Finally, copy the name and URL we provide you with:
IMPORTANT: Copy the Full name that we provide you with and the Full URL:
REMEMBER: Use the Dimension name on MGID Campaign Name and LandingTrack URL for the Campaign URL.
STEP 3 — Creating a campaign on MGID
Once you have log in to your MGID Account click on > ADD campaign
Remember we are Advertiser for MGID. (Buying Traffic from them)
The first thing to do will be adding your Campaign name — Do not forget to copy/paste the whole name LandingTrack provide you with. IE: Dimension 5d7251….
Select your Campaign type:
1- NOT DEFINED
2- PRODUCT PROMOTIONS
3- CONTENT PROMOTIONS
4- PUSH
And right after that, your Campaign Category and Campaign Language. This will be basically where you would like to advertise your advertiser materials.
We have selected the option — Block before shown (ON) which means that after the campaign has been approved by the MGID team, it will not start, instead it will be paused.
Next move will be for TARGETING:
Select your country/geo where you would like to promote your advertiser materials
The browser and Browser language Targeting
And finally Targeting OS
If you notice we will always have the “Approximate impressions Daily” on your right side of the screen
After filling your Targeting options click on button > CONFIRM to keep setting up your Campaign at MGID.
Next step will be Schedule, you can either set it up on MGID :
Or start using all the automation that LandingTrack can offer to you > Optimization Rules:
Once you have decided when you would like to be running your Advertising materials with MGID it is time to move to the following options:
1- LIMITS: set caps for your campaign base on Clicks / Budget or Conversions. But again, it is time for you to set up all those rules on LandingTRack to start working with automation.
2- TRACKING TAGS: You can set up UTM or any custom tracking tags.If you need to add any custom tracking instead of Google Analytics you need to use this option:
Allowed characters: 0–9, A-Z, a-z, -, _, =, +, &, /, :, ^ . The following macros tags are also allowed: {widget_id}, {teaser_id}, {campaign_id}, {geo}, {geo_region}, {ifa}, {click_id}. {click_id}- When you use these macros, please pay attention (take into account) that click status might be reconsidered as non-relevant after the fact. If you are not sure — seek assistance
Once you have finished we should look at the next step: CONVERSION SENSOR:
This section is for you to send conversions back to MGID platform so you can check your stats also with them.
This is the Postback from MGID: http://a.mgid.com/postback?c={{PID}}&e=interest312290&r={{PAYOUT}}
Just copy-paste yours, and let’s set it up on LandingTrack. Menu side click on > Traffic Sources and select Adskeeper, then click on Outgoing Postback and Paste it.
EASY¡
Time to create your Teaser Campaign, remember we are running Native Ads and would be needing an image, headline and body text for your advertiser material.
Click on the button > + right below ADS to start adding your Teaser materials.
Now we should be adding all our Teaser Materials an also our Campaign URL that we will find of LandingTrack .
Add your LandingTrack Campaign URL, write your Teaser Title, select your category and finally upload your image.
MGID has a cool Feature to crop your image, use it wisely.
Finally after adding your image and crop it, select the CPC price for all your Teaser Materials.
Congrats¡ as MGID says — try to add at l east 10 teasers then you can auto optimize them through LandingTrack; one of the main benefits of Automation.
Back to your MGID Dashboard, you will see your new Campaign listed. We recommend you to COPY the campaign ID — IE: 917576 and Paste it on your DImension > button Sync.
COPY CAMPAIGN ID — Paste on DImension LandingTrack to sync campaign.
And this is the view from our Ad on MGID dashboard:
IMPORTANT — once you have created your campaign on MGID — copy the Campaign ID and back on your Dimension profile click on button > SYNC — select MGID and paste the ID. This action will make LandingTrack go and look for your Campaign.
Our New Banners TAB — in action: control all your MGID Teaser from here, block or unblock them.
Click on the banner Status to know the reason why -
Everything has been set up already, our advice — Chill, relax and wait for the traffic to start.
These are the benefits of automation and how it can help your daily activity. What are you waiting for to start with LandingTrack?
These are the benefits of automation and how it can help your daily activity with MGID. What are you waiting for to start with LandingTrack?
It is Friday again!! and LandingTrack team never stop working.
A huge Welcome this time for a DIrect Advertiser integration!!

That's right! ¿Did you think for instance that automation is only on the Ad Network side?
Not at all, Affiliate Network should have automation and bring things easier to any affiliate and that is why now - Traffic Company is fully integrated on LandingTrack!
What does this mean?
1- SIgn up with Traffic Company as an Affiliate - Why? In house Offers - Mobile content (click and Pin Flow) own Smartlinks and world Wide Offers.. need more?
2- Once Your LandingTrack Account is connected to your Traffic Company one - start the game!
3- Automatically upload all the Traffic Company offers into your LandingTrack Account.
4- All links will be already set for you and check the Postback section - The team made it super easy to connect.
Step 1. Setting up your Postback:
The first thing we need to do for the integration is being sure our postback has been set on the Advertiser Account, for this case: Traffic Company.
To do so let’s go to the Menu click on > Settings and go for the TAB Domains.
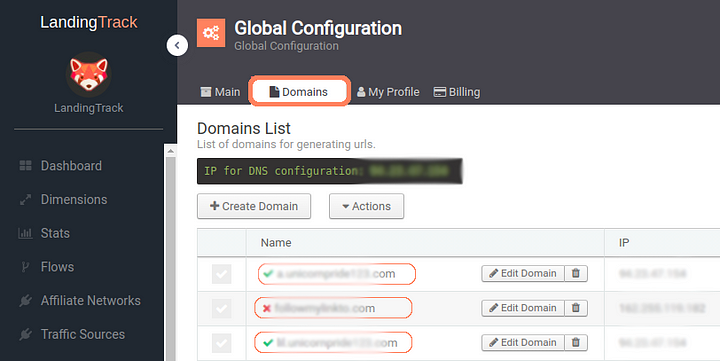
Copy the domain you would like to use for your Postback
Step 2. Adding your Domain into your Traffic Company Account:
Log in into your Traffic Company Account and click on the right side of the Menu > Your Name > Account
From the Menu side, tick the option Status > Enable
From the selected platforms, select > LandingTrack
Choose your Currency
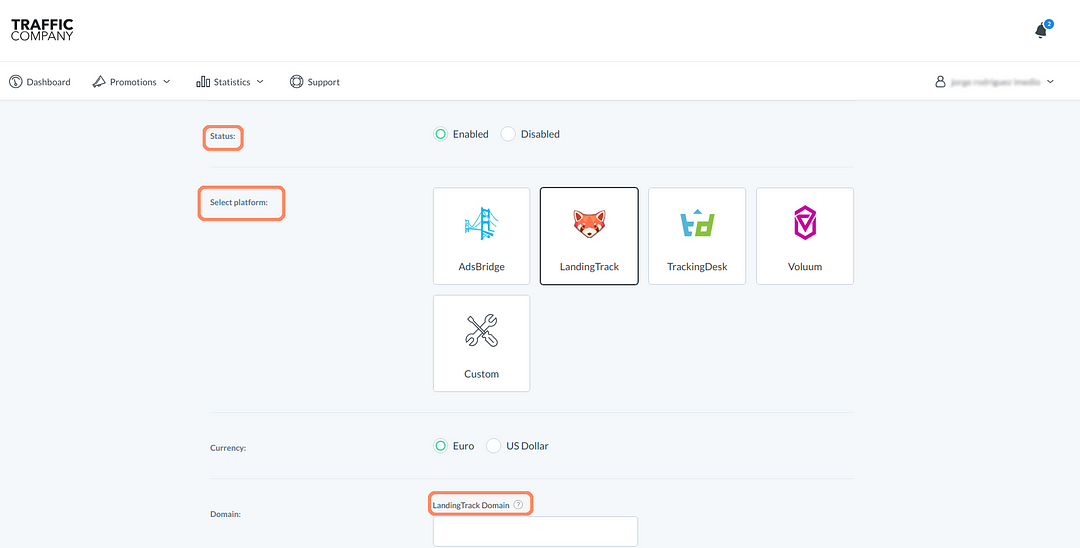
For the Part Domain, Click on > the question mark “?” next to LandingTrack Domain, they will show to you how easy is the process.
In case you do not manage to make it, follow the next steps:
Change from your postback the following Tokens
&sid={clickid}&payout={payout}
to
&sid={unique_id}&payout={reward}
And this will be your Postback set up:
Example: http://soloandroid.com/postback.php?sid={unique_id}&payout={reward}
— — — — — — — — — — — — — — — — — — — — — — — — — — — — — — —
Step 3. Adding Traffic Company Affiliate Network
It is always good to test your postback before start delivering traffic, ask your AM for it.
We can now move on with Traffic Company integration. To do so, login into your LandingTrack Account and click on > Affiliate Networks > +Activate a new Network
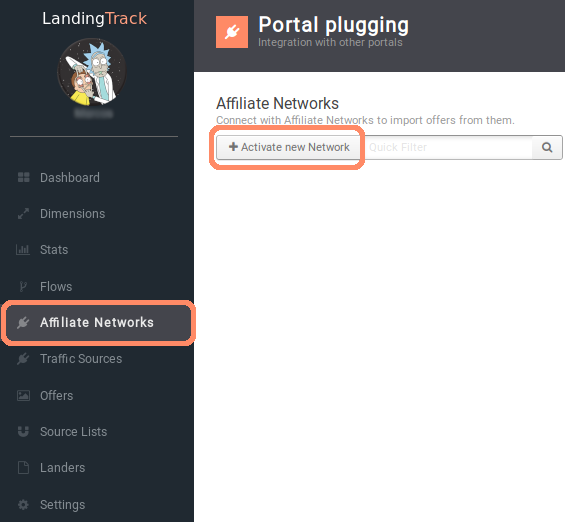
Pretty Simple
Select from the Partner List Traffic Company
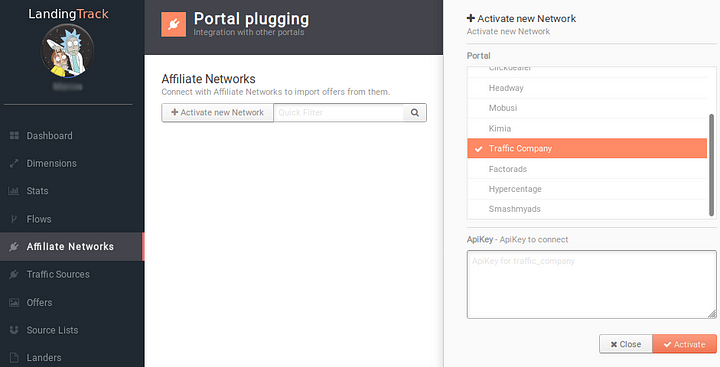
We should check now your Traffic Company Account.
¿You do not know where to find your credentials?
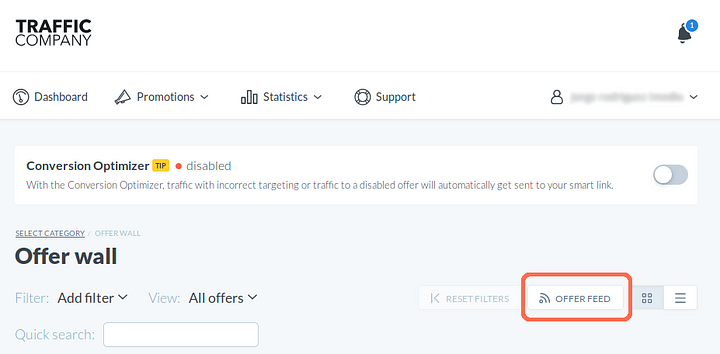
Step 4. Getting Traffic Company API Key:
Back to your Traffic Company Account click on > Promotions > Offer Wall and select All categories, from the new panel click on > OFFER FEED (now called OFFER API)
You will see your API Token, simply copy the code between the following values: “token=” and “&format=json” and paste it into your on LandingTrack Credentials ApiKey field.
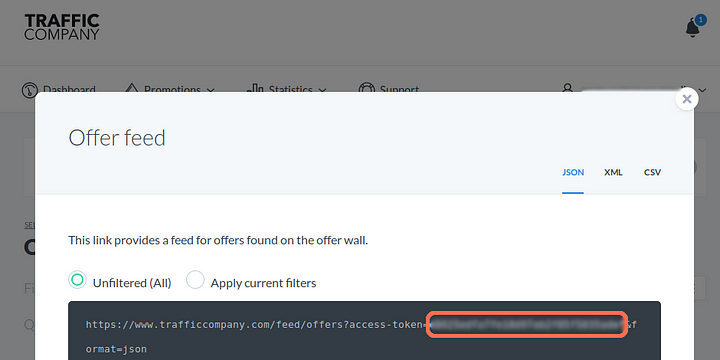
Copy from the value: token= until the &.
Right after adding your Credentials click on > Save and click on > Check API to synchronize your LandingTrack Account with your Traffic Company one.
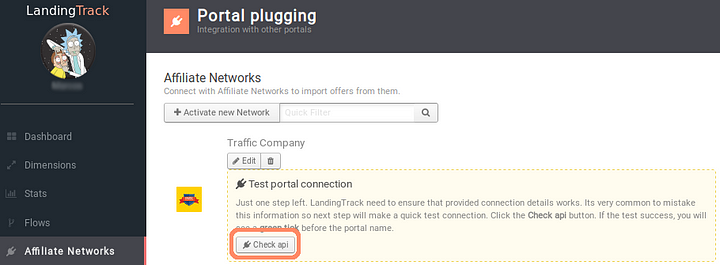
Check API
Green check¡ we are now totally integrated with Traffic Company but we will suggest to also check the following step by clicking on> Edit button:
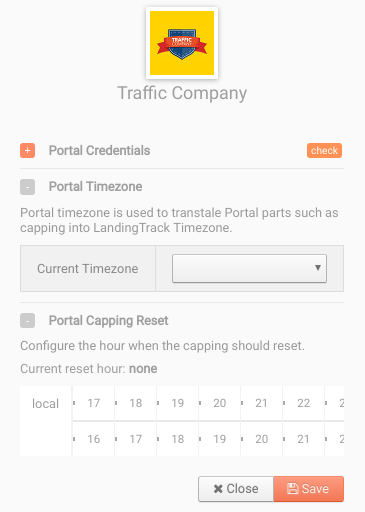
Set up Traffic Company Time zone and time for reset the caps. This way all the offers that belong to Traffic Company and have an Offer Cap, will be reset at the right time.
To check your approved offers click on > Traffic Company name
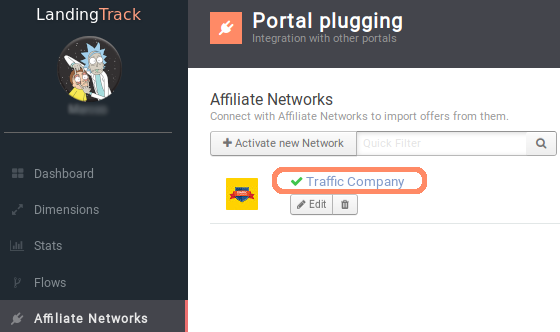
The Green check guarantees you that the connection was successful.
After clicking on Traffic Company name we will have an intermediate step, by clicking on > Check available offers we will be redirected to their market place.
Although both Accounts are already sync we need to make the last call to Traffic Company and ask them to share with us all the Approved offers, click on > Update Offers
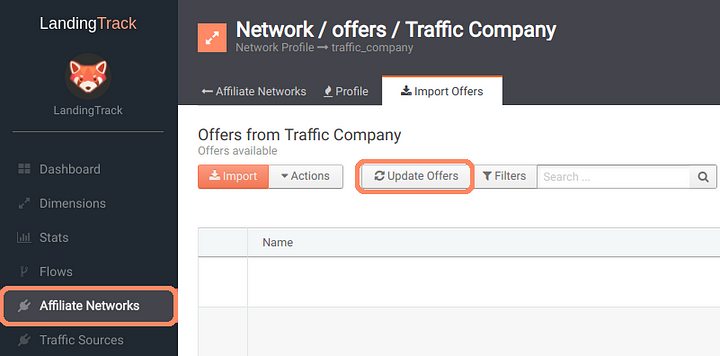
There is no magic behind, we should click on > Update Offers to get Traffic Company Data
It might take some minutes but the wait is worth it,
Now we have all our Traffic Company approved Offers on LandingTrack , so we just need to set them up.
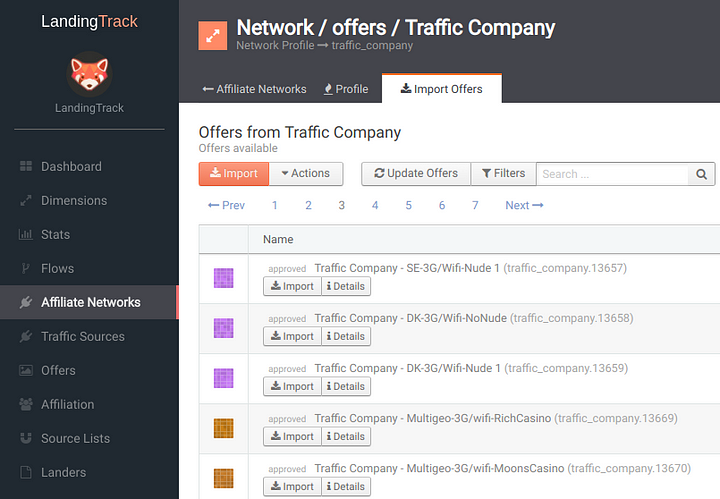
¿How do I set those offers on LandingTrack?
Before integrating any offer you can check all Traffic Company Offers detail — “all information belongs to Traffic Company, we are only asking for it”.
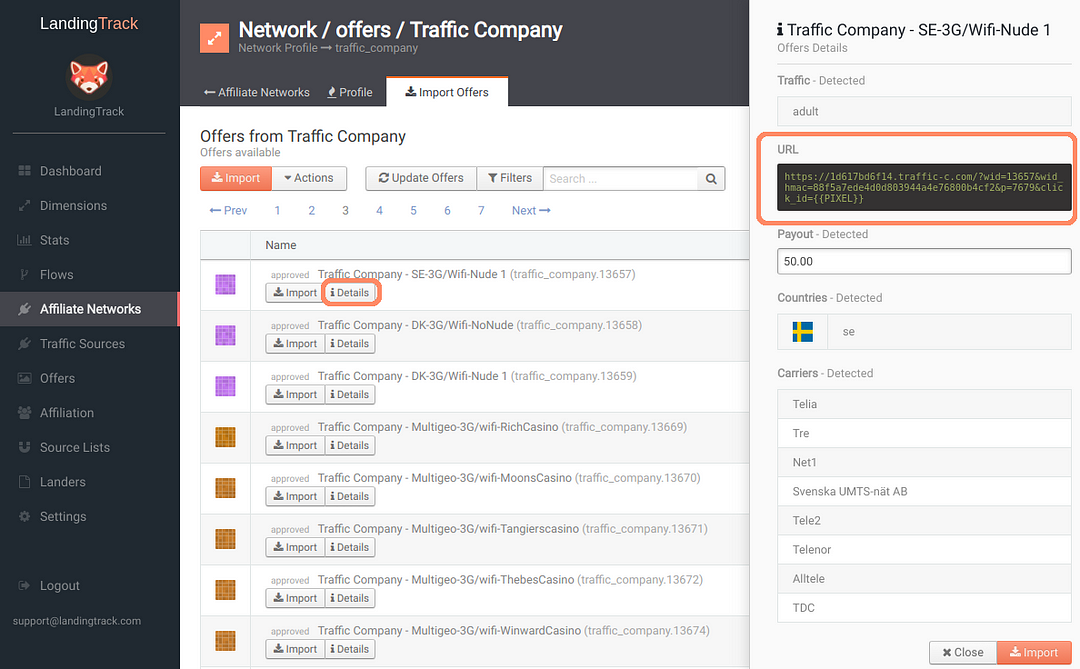
Tick > the Square avatar next to the offer to select it (you can select as many as you want) right after that click on > Action > Add to List and all the offers will be listed on your right side of the screen. Once you have finished adding offers to the List click on > Import
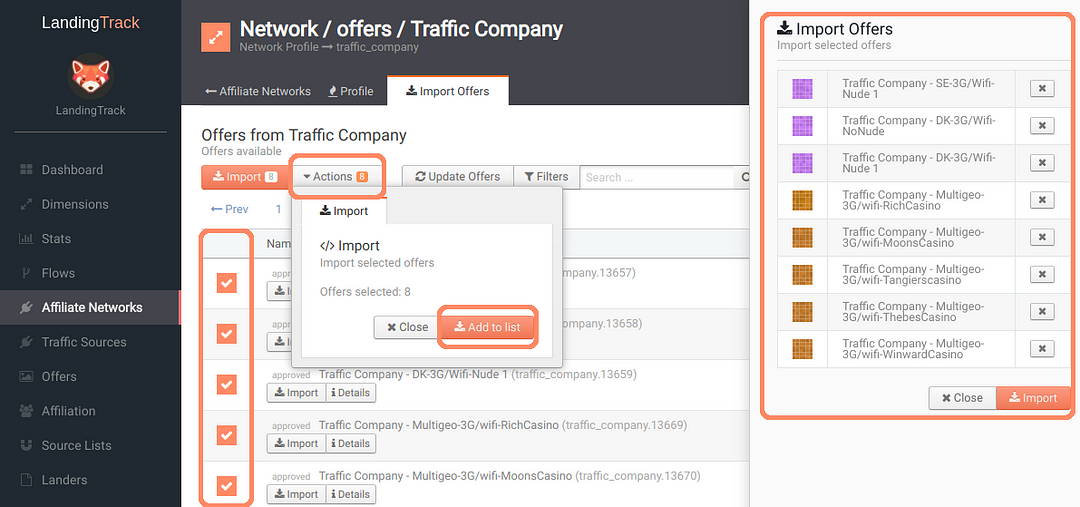
Select as many as you want, add them to the list and click on > Import
All the offers selected will be already on your Offers Menu, click on Menu side > Offers and you will see them there.
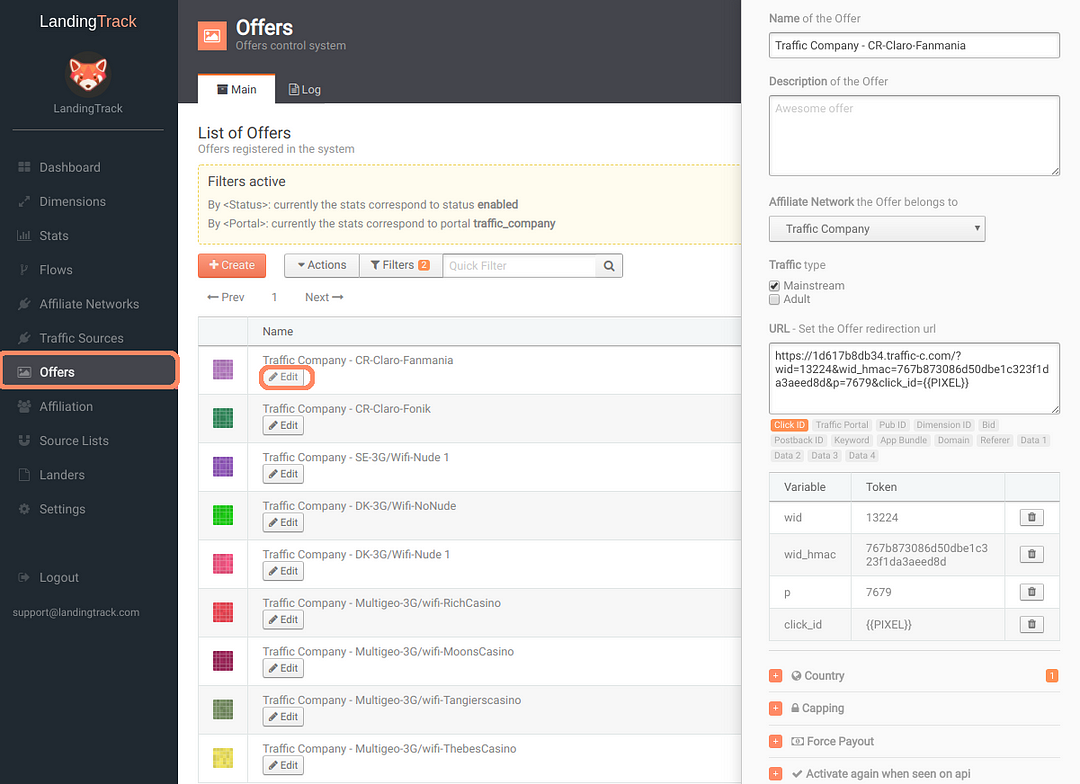
Job done!
If you would like to add more Parameters and Tokens to your Offer URL check
— How to add Tokens to your Offer URL.
Now you can start Creating Dimension for Traffic Company Offers.
— Creating a Dimension
Everything has been set up already, our advice — Chill, relax and wait for the traffic to start.
These are the benefits of automation and how it can help your daily activity with Traffic Company.
¿What are you waiting for to start with LandingTrack?
A huge Welcome this time for a DIrect Advertiser integration!!
That's right! ¿Did you think for instance that automation is only on the Ad Network side?
Not at all, Affiliate Network should have automation and bring things easier to any affiliate and that is why now - Traffic Company is fully integrated on LandingTrack!
What does this mean?
1- SIgn up with Traffic Company as an Affiliate - Why? In house Offers - Mobile content (click and Pin Flow) own Smartlinks and world Wide Offers.. need more?
2- Once Your LandingTrack Account is connected to your Traffic Company one - start the game!
3- Automatically upload all the Traffic Company offers into your LandingTrack Account.
4- All links will be already set for you and check the Postback section - The team made it super easy to connect.
Step 1. Setting up your Postback:
The first thing we need to do for the integration is being sure our postback has been set on the Advertiser Account, for this case: Traffic Company.
To do so let’s go to the Menu click on > Settings and go for the TAB Domains.
Copy the domain you would like to use for your Postback
Step 2. Adding your Domain into your Traffic Company Account:
Log in into your Traffic Company Account and click on the right side of the Menu > Your Name > Account
From the Menu side, tick the option Status > Enable
From the selected platforms, select > LandingTrack
Choose your Currency
For the Part Domain, Click on > the question mark “?” next to LandingTrack Domain, they will show to you how easy is the process.
In case you do not manage to make it, follow the next steps:
Change from your postback the following Tokens
&sid={clickid}&payout={payout}
to
&sid={unique_id}&payout={reward}
And this will be your Postback set up:
Example: http://soloandroid.com/postback.php?sid={unique_id}&payout={reward}
— — — — — — — — — — — — — — — — — — — — — — — — — — — — — — —
Step 3. Adding Traffic Company Affiliate Network
It is always good to test your postback before start delivering traffic, ask your AM for it.
We can now move on with Traffic Company integration. To do so, login into your LandingTrack Account and click on > Affiliate Networks > +Activate a new Network
Pretty Simple
Select from the Partner List Traffic Company
We should check now your Traffic Company Account.
¿You do not know where to find your credentials?
Step 4. Getting Traffic Company API Key:
Back to your Traffic Company Account click on > Promotions > Offer Wall and select All categories, from the new panel click on > OFFER FEED (now called OFFER API)
You will see your API Token, simply copy the code between the following values: “token=” and “&format=json” and paste it into your on LandingTrack Credentials ApiKey field.
Copy from the value: token= until the &.
Right after adding your Credentials click on > Save and click on > Check API to synchronize your LandingTrack Account with your Traffic Company one.
Check API
Green check¡ we are now totally integrated with Traffic Company but we will suggest to also check the following step by clicking on> Edit button:
Set up Traffic Company Time zone and time for reset the caps. This way all the offers that belong to Traffic Company and have an Offer Cap, will be reset at the right time.
To check your approved offers click on > Traffic Company name
The Green check guarantees you that the connection was successful.
After clicking on Traffic Company name we will have an intermediate step, by clicking on > Check available offers we will be redirected to their market place.
Although both Accounts are already sync we need to make the last call to Traffic Company and ask them to share with us all the Approved offers, click on > Update Offers
There is no magic behind, we should click on > Update Offers to get Traffic Company Data
It might take some minutes but the wait is worth it,
Now we have all our Traffic Company approved Offers on LandingTrack , so we just need to set them up.
¿How do I set those offers on LandingTrack?
Before integrating any offer you can check all Traffic Company Offers detail — “all information belongs to Traffic Company, we are only asking for it”.
Tick > the Square avatar next to the offer to select it (you can select as many as you want) right after that click on > Action > Add to List and all the offers will be listed on your right side of the screen. Once you have finished adding offers to the List click on > Import
Select as many as you want, add them to the list and click on > Import
All the offers selected will be already on your Offers Menu, click on Menu side > Offers and you will see them there.
Job done!
If you would like to add more Parameters and Tokens to your Offer URL check
— How to add Tokens to your Offer URL.
Now you can start Creating Dimension for Traffic Company Offers.
— Creating a Dimension
Everything has been set up already, our advice — Chill, relax and wait for the traffic to start.
These are the benefits of automation and how it can help your daily activity with Traffic Company.
¿What are you waiting for to start with LandingTrack?
Well well well - 2020 is here already and it's coming with new integrations! Yes!!
This time is for Yeesshh, a Mobile and Desktop Ad network focus on pop traffic.

STEP 1 — Adding Yeesshh as Traffic Source
Go to Traffic Source, Menu side and click on > +Connect new Source; from the list of options select > Integrated DPSs — Yeesshh.
Just fill the following fields with your Yeesshh credentials.
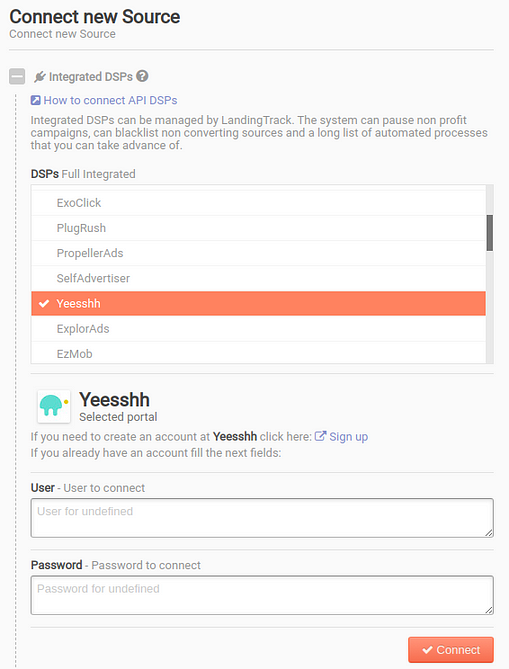
Just add your Email address and Yeesshh password to connect with.
After clicking on the button > Connect we have an extra step — Check API, click on it.
The slide-out will show to you your credentials, check them and if all looks good click on orange button> Check API
Green Check¡ means we are fully Integrated with Yeesshh and we can start automating all your Campaigns but, We will suggest you add some more steps like — URL Tokens and Outgoing Postback
Now that LandingTrack is synchronized with Yeesshh let’s have a look on > Edit button.
The following Parameters and Tokens will be provided by default for each Yeesshh URL :
1.2 — Postback (Optional):
We are missing only one thing to finish the full integration with Yeesshh, adding their postback :
https://xml.yeesshh.com/conversion?c={clickid}&value={value}
Remember to replace their Tokens for the LandingTrack ones:
. {clickid} by {{PID}}
. {value} by {{PAYOUT}}
Replace Yeesshh Tokens by the LandingTrack ones and SAVE.
STEP 2 — Creating a campaign (Dimension) on LandingTrack
Go to Offers menu side and select the Active offer/s you want to send traffic to by clicking on the checkbox. Remember that you can select one or multiple ones
Select an offer by clicking on the attached box
Once you have selected the ones you want to run click on> Actions button and then create a dimension.
You will be redirected to its profile.
Pretty easy right?
Want to know everything About Dimensions? see full guide HERE
— Dimension, Configuration Options:
See full guide HERE
— Dimension Traffic Sources Section:

See full guide HERE
— Get Campaign URL:
— Optimization Rules:
As you may know already, LandingTrack can optimize the traffic base on different rules, here its when automation comes into action :
Pausing Campaigns
Blocking SubIds and Banners.
You can always check our guide here — to refresh the concept.
— Getting the URL for Yeesshh:
Click on button > Add and select Yeesshh as your traffic source. Copy the name and URL we provide you with:
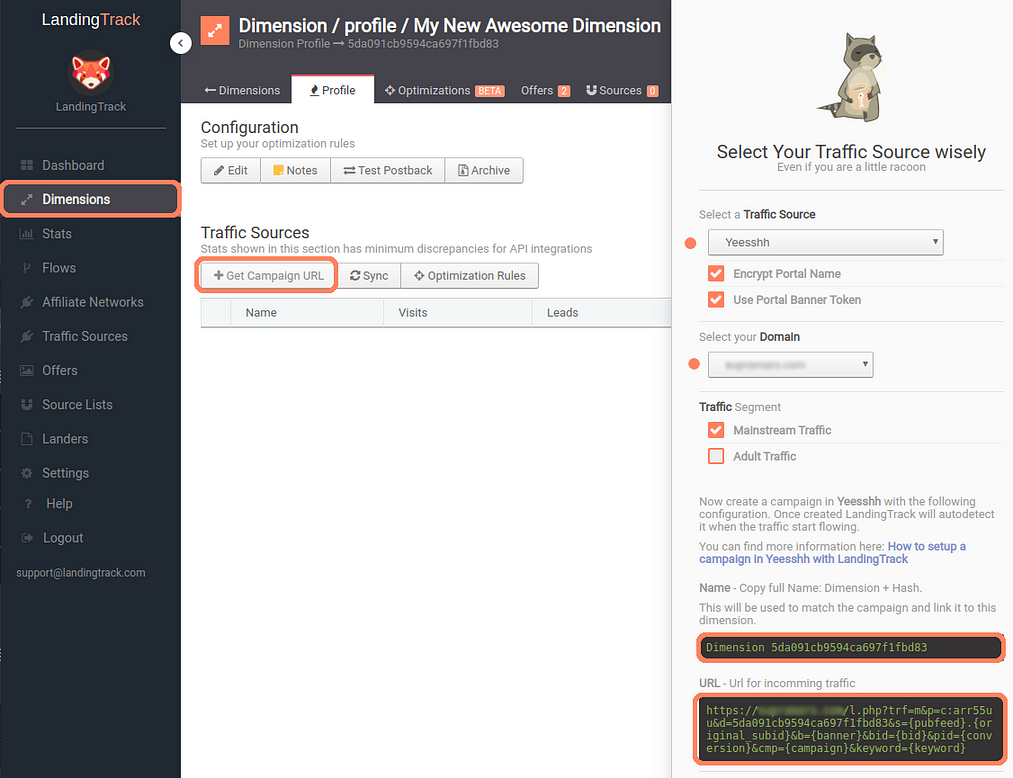
IMPORTANT: Copy LandingTrack Full Campaign name and Tracking URL.
STEP 3 — Creating a campaign on Yeesshh
With Yeesshh we can create a single type of campaign in terms of traffic: Pop for Mobile and Desktop.
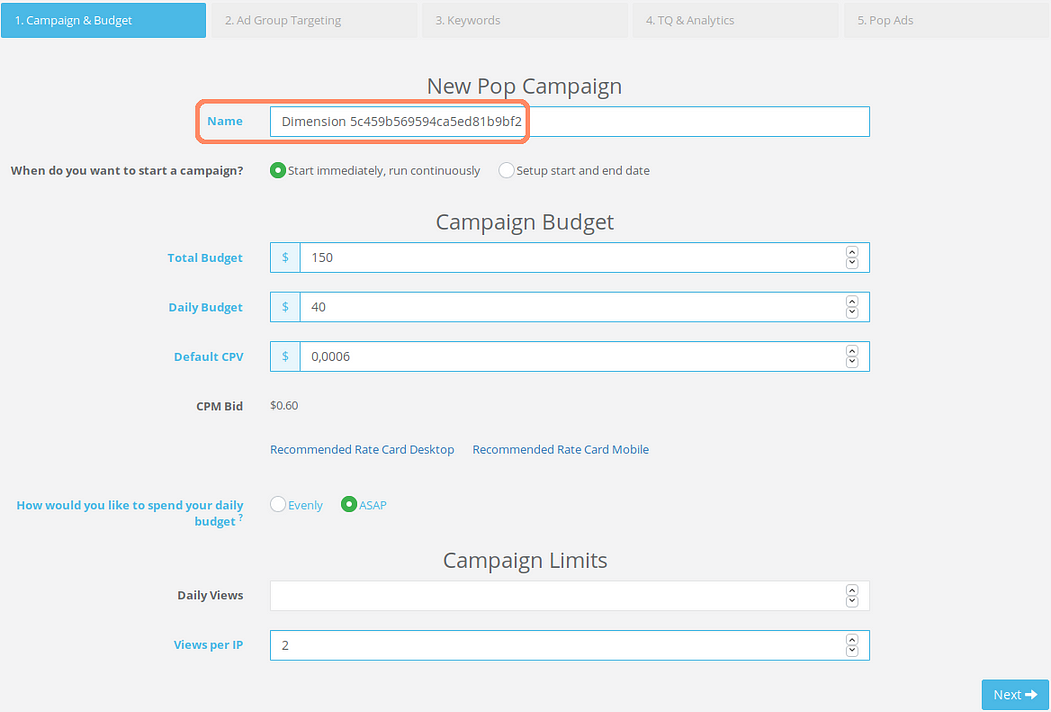
Add per Campaign Name, LandingTrack one and keep with your campaign settings
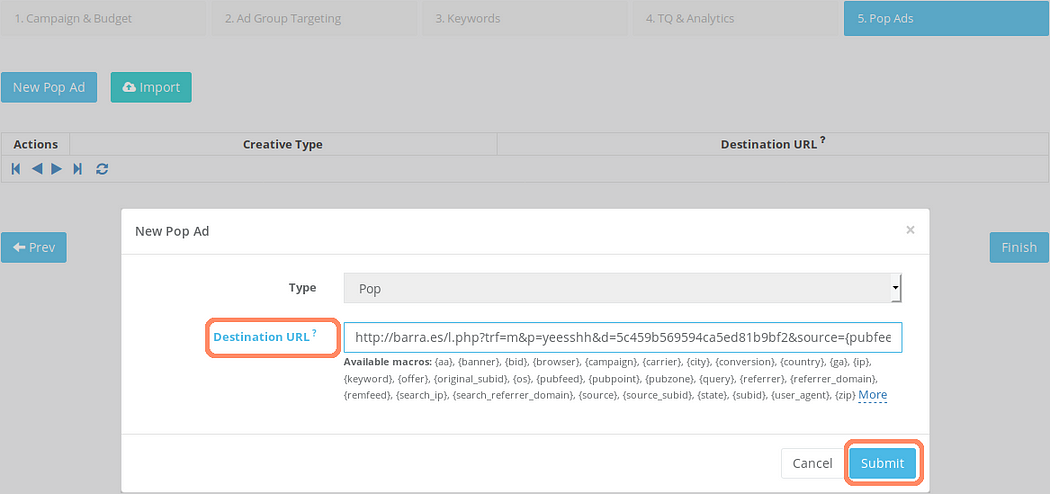 Submit your Pop campaign
After saving the Campaign just wait for its approval (usually takes a few minutes), copy the Campaign ID provided by Yeesshh and come back to LandingTrack
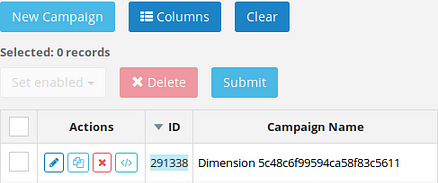
Copy the Campaign ID from Yeesshh Platform
Go back to your Dimension Profile and Sync the campaign with Yeesshh by clicking on > Sync button and selecting Yeesshh, paste the Campaign ID:
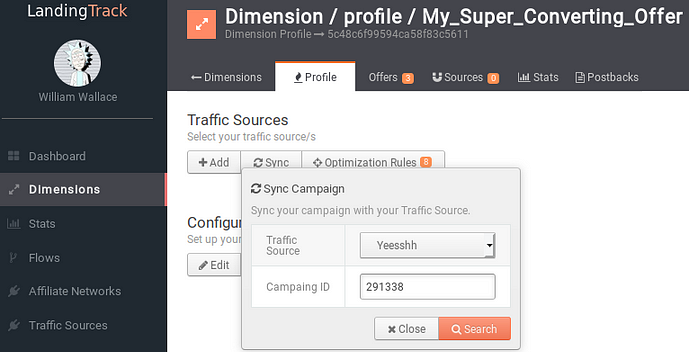
Paste your Yeesshh Campaign ID and click on >Search
This will be your next view :

Bravo¡
Everything has been set up already, our advice — Chill, relax and wait for the traffic to start.
These are the benefits of automation and how it can help your daily activity with YEESSHH. What are you waiting for to start with LandingTrack?
This time is for Yeesshh, a Mobile and Desktop Ad network focus on pop traffic.
STEP 1 — Adding Yeesshh as Traffic Source
Go to Traffic Source, Menu side and click on > +Connect new Source; from the list of options select > Integrated DPSs — Yeesshh.
Just fill the following fields with your Yeesshh credentials.
Just add your Email address and Yeesshh password to connect with.
After clicking on the button > Connect we have an extra step — Check API, click on it.
The slide-out will show to you your credentials, check them and if all looks good click on orange button> Check API
Green Check¡ means we are fully Integrated with Yeesshh and we can start automating all your Campaigns but, We will suggest you add some more steps like — URL Tokens and Outgoing Postback
Now that LandingTrack is synchronized with Yeesshh let’s have a look on > Edit button.
The following Parameters and Tokens will be provided by default for each Yeesshh URL :
- source={pubfeed}.{original_subid} — Publisher Feed ID & Source subid (those are the ones need it in order to track the siteid)
- bid={bid} — The cost of the visit (how much you pay for a click)
- pid={conversion} — The unique ID used for conversion tracking
- cmp={campaign} — Campaign ID, as registered in their system
- keyword={keyword} — Keyword matched on campaign
- b={banner} — Ad ID
1.2 — Postback (Optional):
We are missing only one thing to finish the full integration with Yeesshh, adding their postback :
https://xml.yeesshh.com/conversion?c={clickid}&value={value}
Remember to replace their Tokens for the LandingTrack ones:
. {clickid} by {{PID}}
. {value} by {{PAYOUT}}
Replace Yeesshh Tokens by the LandingTrack ones and SAVE.
STEP 2 — Creating a campaign (Dimension) on LandingTrack
Go to Offers menu side and select the Active offer/s you want to send traffic to by clicking on the checkbox. Remember that you can select one or multiple ones
Select an offer by clicking on the attached box
Once you have selected the ones you want to run click on> Actions button and then create a dimension.
You will be redirected to its profile.
Pretty easy right?
Want to know everything About Dimensions? see full guide HERE
— Dimension, Configuration Options:
See full guide HERE
— Dimension Traffic Sources Section:
See full guide HERE
— Get Campaign URL:
— Optimization Rules:
As you may know already, LandingTrack can optimize the traffic base on different rules, here its when automation comes into action :
Pausing Campaigns
Blocking SubIds and Banners.
You can always check our guide here — to refresh the concept.
— Getting the URL for Yeesshh:
Click on button > Add and select Yeesshh as your traffic source. Copy the name and URL we provide you with:
IMPORTANT: Copy LandingTrack Full Campaign name and Tracking URL.
STEP 3 — Creating a campaign on Yeesshh
With Yeesshh we can create a single type of campaign in terms of traffic: Pop for Mobile and Desktop.
- Pop (Mobile & Desktop)
Add per Campaign Name, LandingTrack one and keep with your campaign settings
After saving the Campaign just wait for its approval (usually takes a few minutes), copy the Campaign ID provided by Yeesshh and come back to LandingTrack
Copy the Campaign ID from Yeesshh Platform
Go back to your Dimension Profile and Sync the campaign with Yeesshh by clicking on > Sync button and selecting Yeesshh, paste the Campaign ID:
Paste your Yeesshh Campaign ID and click on >Search
This will be your next view :
Bravo¡
Everything has been set up already, our advice — Chill, relax and wait for the traffic to start.
These are the benefits of automation and how it can help your daily activity with YEESSHH. What are you waiting for to start with LandingTrack?
!Monday¡ A perfect day for new Integrations with PROMO inside!
Top UP 150$ and get 20$ FREE traffic
This time is for Eureekka a new Push Advertising Network! They just came back from the Affiliate Summit in Vegas.

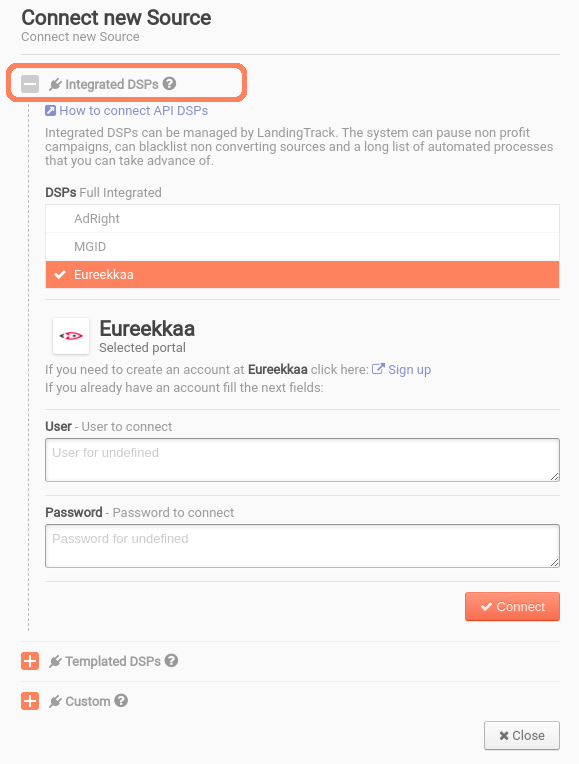
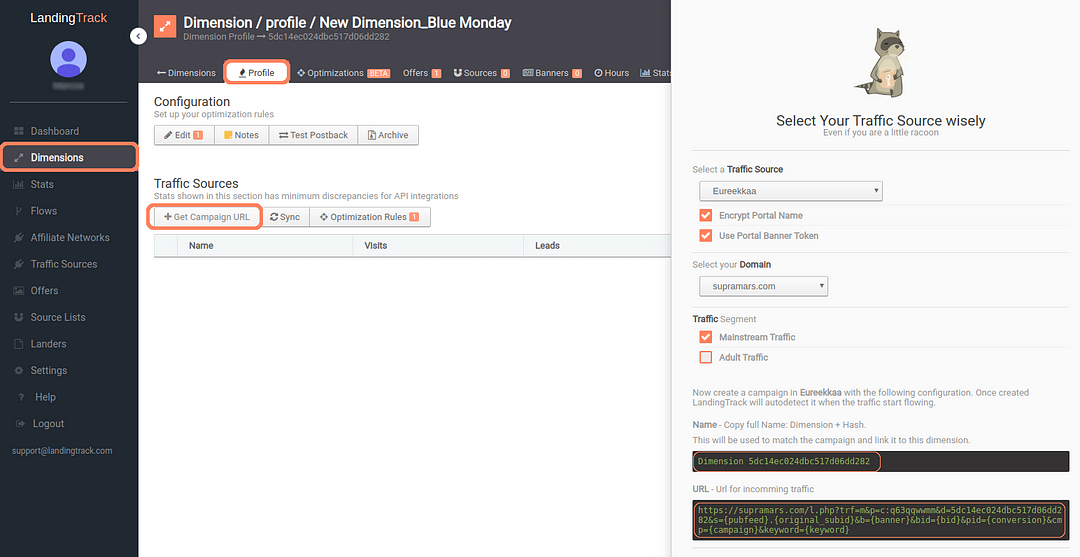
STEP 1 — Adding Eureekkaa as Traffic Source
Go to Traffic Source Tab and click on > +Connect new Source; from the list of options select > Integrated DPSs

Look for Eureekkaa. In order to connect with them, you will need a total of 2 fields to be filled.
1- Your Eureekkaa User (email) for the field Users
2- Your Eureekkaa Password for the field Password
After saving LandingTrack will ask you to double-check your credentials, just Click on Check API button and confirm
Green Check¡ means we are fully Integrated with Eureekkaa but, We will suggest you add some more steps such us — URL Tokens and Outgoing Postback
Now that we are synchronized with Eureekkaa let’s have a look on > Edit button.
The following Parameters and Tokens will be provided by default for each Eureekkaa URL :
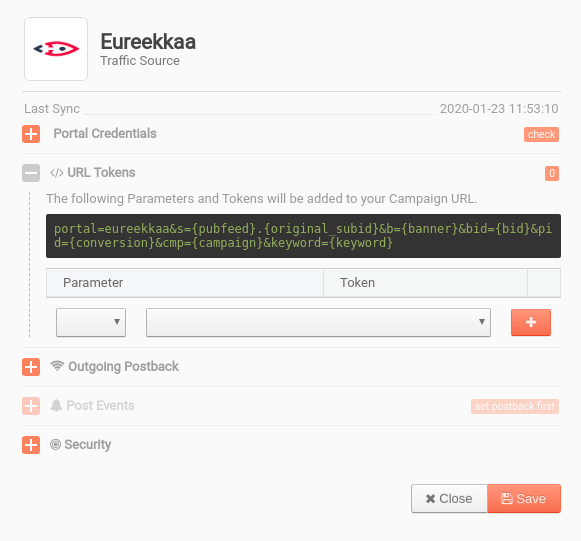
Since you will need to add Banners no worries, this option comes later on, Once we generate the Campaign URL.
STEP 2 — Creating a campaign (Dimension) on LandingTrack
Remember you have three different ways to create a dimension.
1- From an existing Flow — see how
2- From Menu side > Offer — see how
3- From Dimension Menu: see bellow
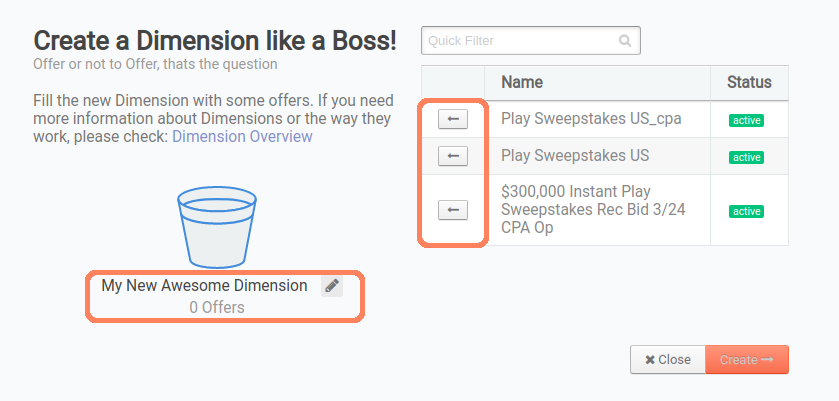
Click on button > New Dimension

You will be redirected to our Dimension creator.

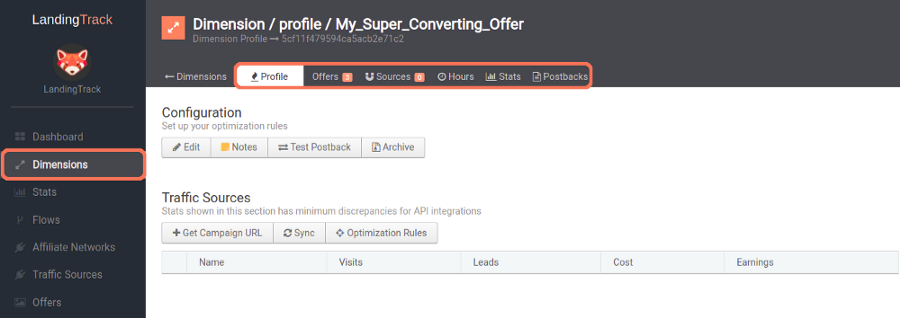
First, we will recommend you to click on the pencil right bellow the bucket to add your Campaign Name, at the same time you will see displayed all your offers with the name and status (right side), click on the left arrow button to add them to your Dimension.
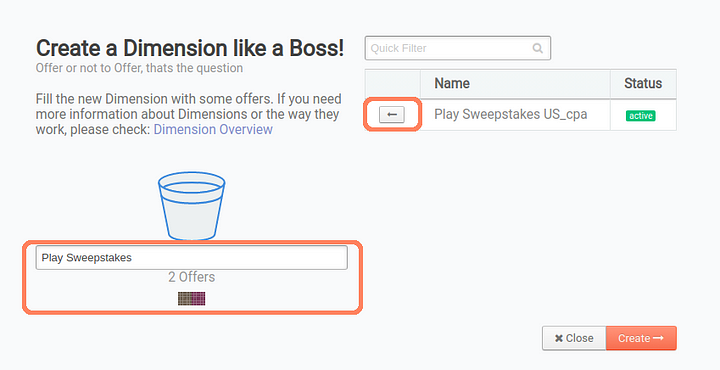
As you can see, now we have added two offer on our dimension and if we like to add more we just need to click on the left arrow next to the offer “Play Sweeptakes US_cpa”
You will be redirected to its profile:
Want to know everything About Dimensions? see full guide HERE
— Dimension Configuration Options:

See full guide HERE
— Dimension Traffic Sources Section:
See full guide HERE
— Get Campaign URL:
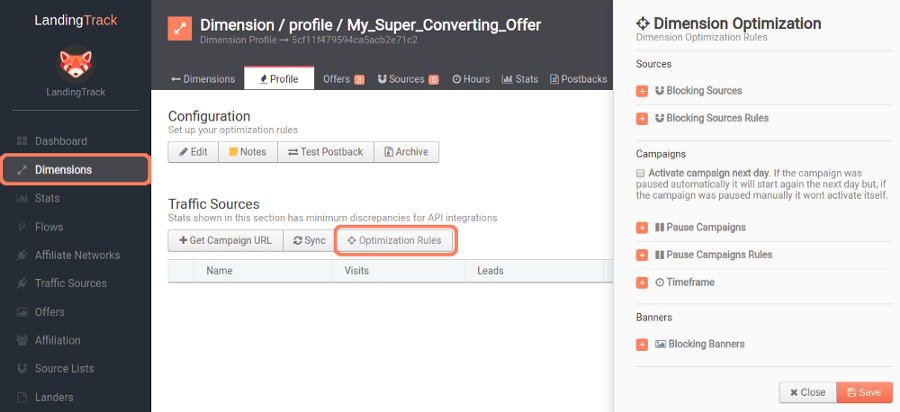
— Optimization Rules:

As you may know already, LandingTrack can optimize the traffic base on different rules, here its when automation comes into action.
You can always check our guide here — to refresh the concept.
— Getting the URL for Eureekkaa:
Click on button > + Get Campaign URL and select Eureekkaa as your traffic source, then select your Domain and your Traffic Segment; Finally, copy the FULL name and URL we provide you with:
IMPORTANT: Copy the Full name that we provide you with and the Full URL:
STEP 3 — Creating a campaign on Eureekkaa
With Eureekkaa we can create a single type of campaign in terms of traffic: Push Notification.
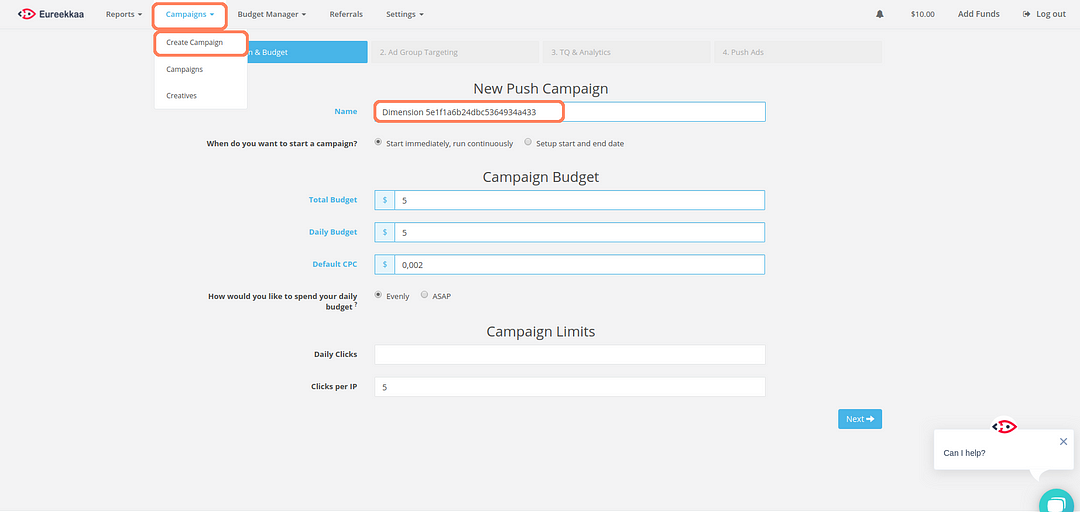
Click on Campaigns and select > Create Campaign.
We still need to complete 3 more steps.
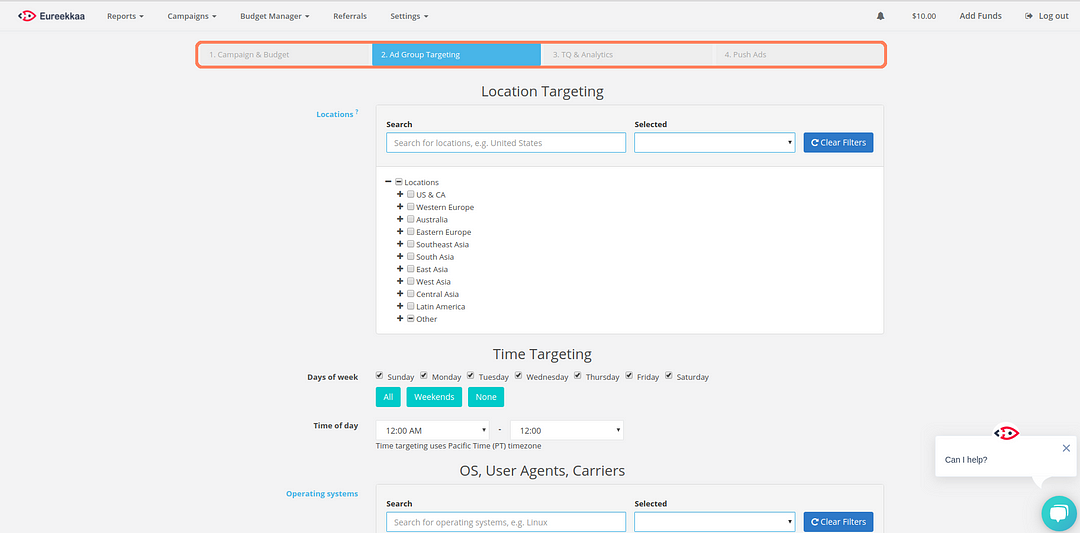
2. Ad Group Targeting where you will need to add your Country, Time targeting, Time of the day (if it needs it) OS, Carrier, etc..
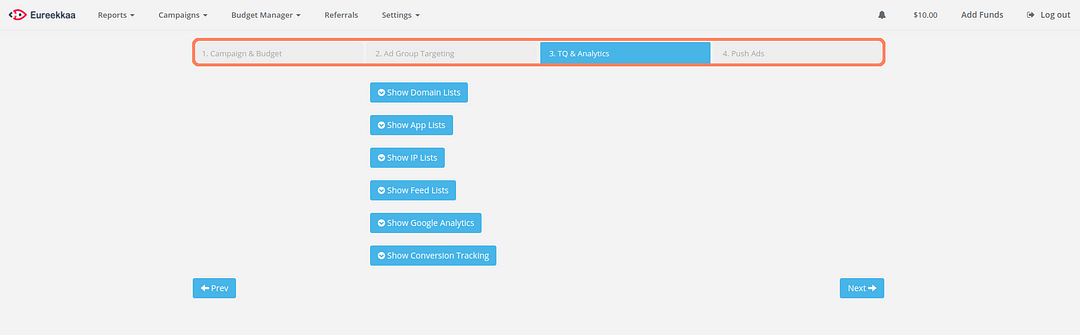
3. It is dedicated to creating your Domain List, Your Apps, white or blacklist sources etc.
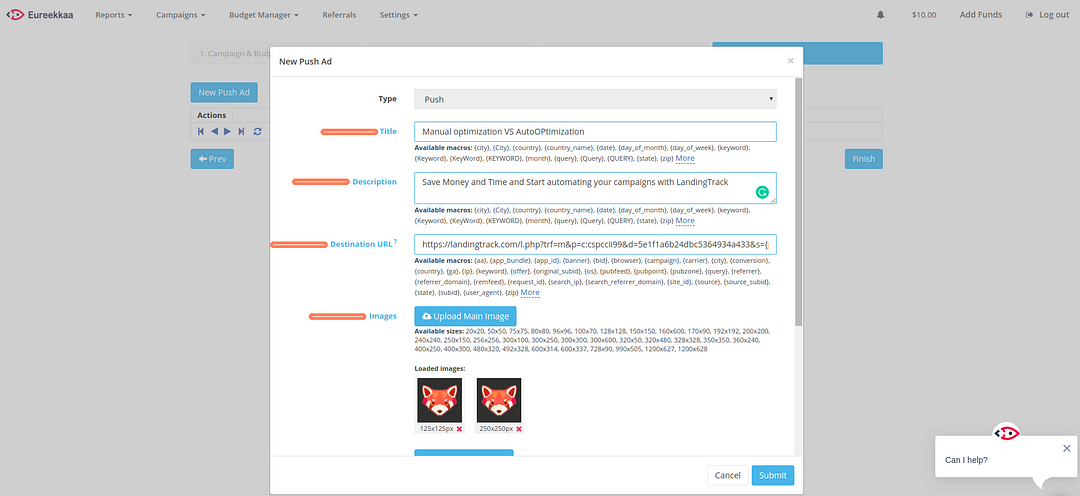
4. Time for you to be creative by adding your Title and Description for your Push Ad along with your Banner/image/creativity
After saving the Campaign just wait for its approval (usually takes a few minutes), copy the Campaign ID provided by Eureekkaa and come back to LandingTrack
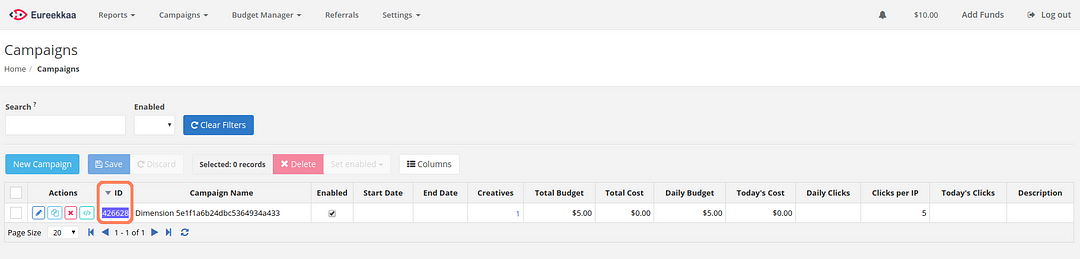
Copy the Campaign ID from Eureekkaa Platform
Go back to your Dimension Profile and Sync the campaign your Campaign. Click on button > Sync , select Eureekkaa and paste the Campaign ID the button Search:
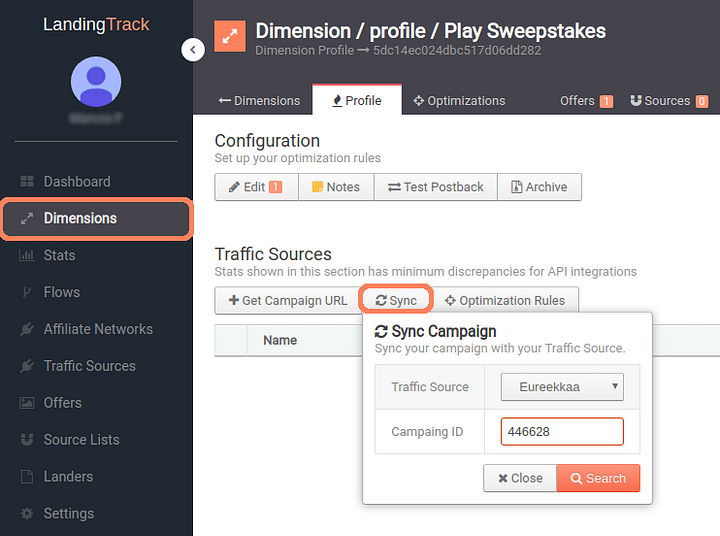
This will be your next view :

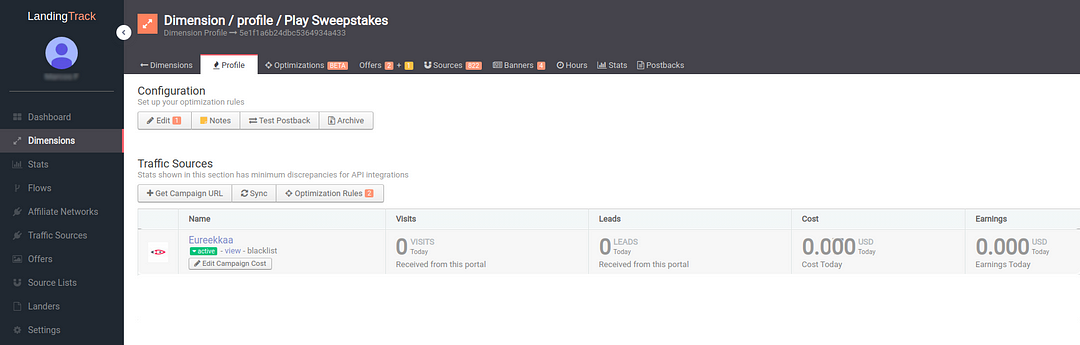
Bravo¡
Everything has been set up already, our advice — Chill, relax and wait for the traffic to start.
These are the benefits of automation and how it can help your daily activity with Eureekkaa. ¿What are you waiting for automation?
Top UP 150$ and get 20$ FREE traffic
This time is for Eureekka a new Push Advertising Network! They just came back from the Affiliate Summit in Vegas.
STEP 1 — Adding Eureekkaa as Traffic Source
Go to Traffic Source Tab and click on > +Connect new Source; from the list of options select > Integrated DPSs
Look for Eureekkaa. In order to connect with them, you will need a total of 2 fields to be filled.
1- Your Eureekkaa User (email) for the field Users
2- Your Eureekkaa Password for the field Password
After saving LandingTrack will ask you to double-check your credentials, just Click on Check API button and confirm
Green Check¡ means we are fully Integrated with Eureekkaa but, We will suggest you add some more steps such us — URL Tokens and Outgoing Postback
Now that we are synchronized with Eureekkaa let’s have a look on > Edit button.
The following Parameters and Tokens will be provided by default for each Eureekkaa URL :
- s={pubfeed}.{original_subid} — (the one need it in order to track the site)
- bid={bid} — The cost of the visit (how much you pay for a click)
- cmp={campaign} — Campaign ID, as registered in their system
- Keyword={keyword} — Category where your ad will be displayed.
- b={banner} — ID of the banner displayed.
- pid={conversion} — Clickid for the postback
Since you will need to add Banners no worries, this option comes later on, Once we generate the Campaign URL.
STEP 2 — Creating a campaign (Dimension) on LandingTrack
Remember you have three different ways to create a dimension.
1- From an existing Flow — see how
2- From Menu side > Offer — see how
3- From Dimension Menu: see bellow
Click on button > New Dimension
You will be redirected to our Dimension creator.
First, we will recommend you to click on the pencil right bellow the bucket to add your Campaign Name, at the same time you will see displayed all your offers with the name and status (right side), click on the left arrow button to add them to your Dimension.
As you can see, now we have added two offer on our dimension and if we like to add more we just need to click on the left arrow next to the offer “Play Sweeptakes US_cpa”
You will be redirected to its profile:
Want to know everything About Dimensions? see full guide HERE
— Dimension Configuration Options:
See full guide HERE
— Dimension Traffic Sources Section:
See full guide HERE
— Get Campaign URL:
— Optimization Rules:
As you may know already, LandingTrack can optimize the traffic base on different rules, here its when automation comes into action.
You can always check our guide here — to refresh the concept.
— Getting the URL for Eureekkaa:
Click on button > + Get Campaign URL and select Eureekkaa as your traffic source, then select your Domain and your Traffic Segment; Finally, copy the FULL name and URL we provide you with:
IMPORTANT: Copy the Full name that we provide you with and the Full URL:
STEP 3 — Creating a campaign on Eureekkaa
With Eureekkaa we can create a single type of campaign in terms of traffic: Push Notification.
- Push Notification Campaign for Mobile or Desktop
Click on Campaigns and select > Create Campaign.
- Add your Campaign name (Do not forget about our naming ) followed by your Total budget and daily (Remember this is something LandingTrack can manage for you) and your Bid price (Default CPC)
We still need to complete 3 more steps.
2. Ad Group Targeting where you will need to add your Country, Time targeting, Time of the day (if it needs it) OS, Carrier, etc..
3. It is dedicated to creating your Domain List, Your Apps, white or blacklist sources etc.
4. Time for you to be creative by adding your Title and Description for your Push Ad along with your Banner/image/creativity
After saving the Campaign just wait for its approval (usually takes a few minutes), copy the Campaign ID provided by Eureekkaa and come back to LandingTrack
Copy the Campaign ID from Eureekkaa Platform
Go back to your Dimension Profile and Sync the campaign your Campaign. Click on button > Sync , select Eureekkaa and paste the Campaign ID the button Search:
This will be your next view :
Bravo¡
Everything has been set up already, our advice — Chill, relax and wait for the traffic to start.
These are the benefits of automation and how it can help your daily activity with Eureekkaa. ¿What are you waiting for automation?
Chrome should not stop us. So it has come the time for Admaven !!
Now you can Track and Auto-optimize all its Push Traffic through us!
STEP 1 — Adding AdMaven as Traffic Source
Go to Traffic Source, Menu side and click on > +Connect new Source; from the list of options select > Integrated DPSs
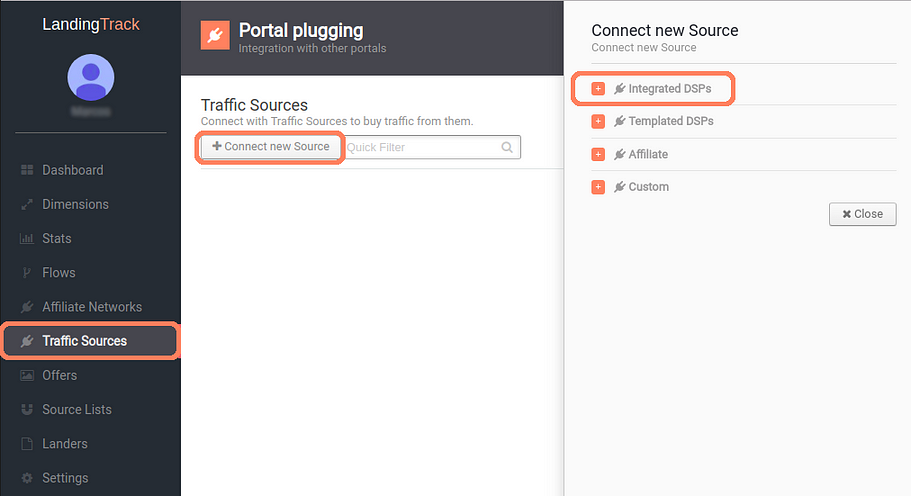
From the list displayed look for AdMaven. In order to connect with them, you will need to provide only two fields.
1- User: Your AdMaven login
2- Password: Your AdMaven Password
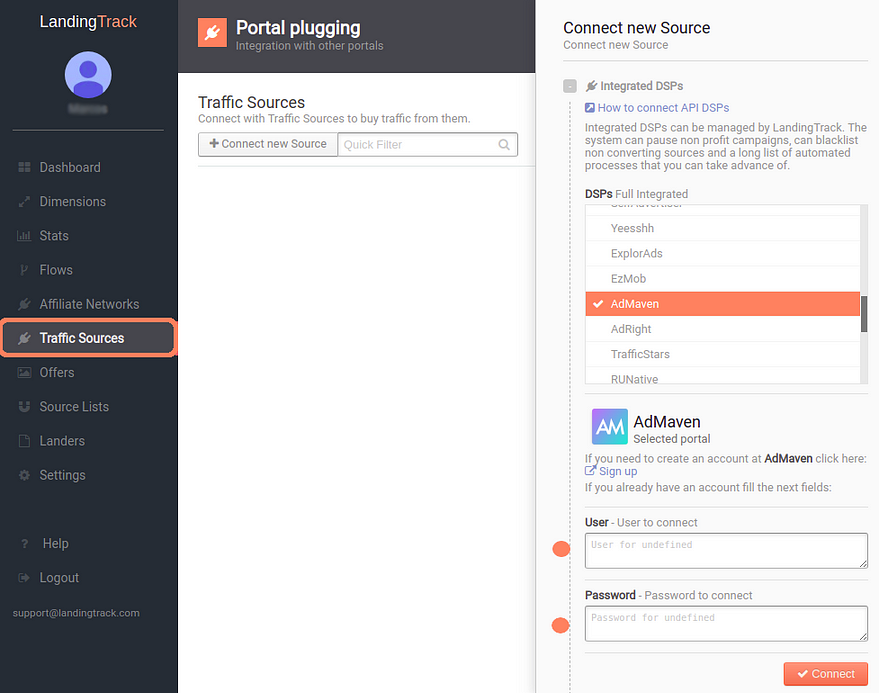
Just add your AdMaven User and password to connect with.
Right after that click on the button > Connect we have an extra step — Check API, click on it.
The slide-out will show to you your credentials, check them and if all looks good click on orange button > Check API
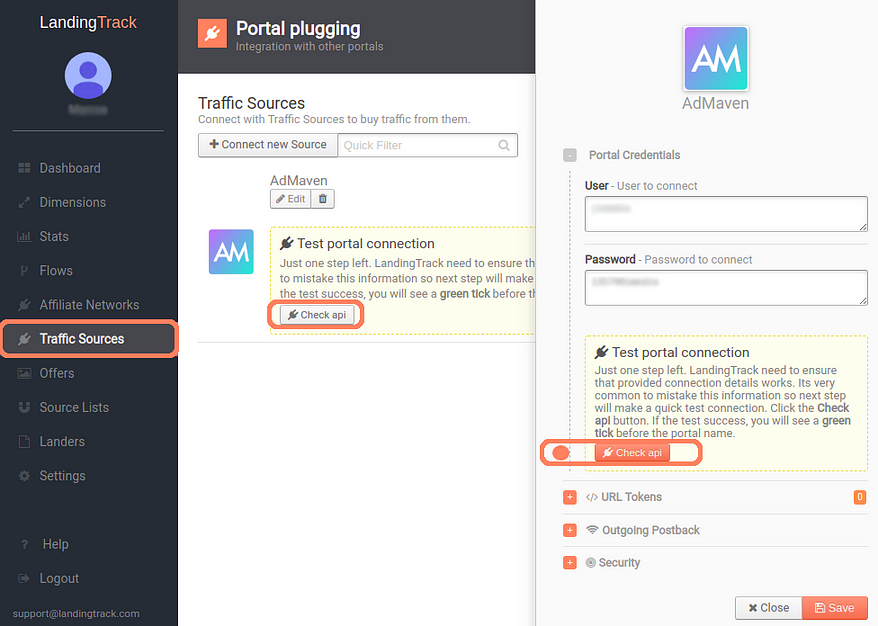
Green Check¡means we are fully Integrated with AdMaven and we can start automating all your Campaigns but, We will suggest you add some more steps like — URL Tokens and Outgoing Postback
Now that we are synchronized with AdMaven let’s have a look on > Edit button.
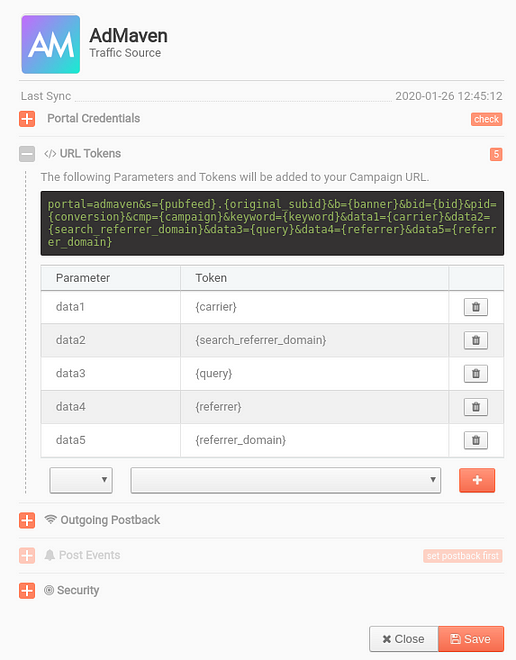
The following Parameters and Tokens will be provided by default for each AdMaven URL :
1.1— Adding some Extra Tokens:
I am sure you are familiar with AdMaven Tokens but it is always good to show /explain them here for you:
Adding Extra Tokens to your URL’s, do not forget to save after adding them.
1.2— Postback (Optional):
We are missing only one thing to finish the full integration with AdMaven, adding their postback :
http://xml.realtime-bid.com,pop.rtb-passthrough.com,xml.ad-maven.com/conversion?c={conversion}&count={count}&value={value}
Remember to replace their Tokens for the LandingTrack ones:
. {conversion} ={{PID}}
. {value} = {{PAYOUT}}
. {count}= 1 (you can leave that value by default)
You can copy the following one and set it up on LandingTrack: http://xml.realtime-bid.com,pop.rtb-passthrough.com,xml.ad-maven.com/conversion?c={{PID}}&count=1&value={{PAYOUT}}
STEP 2 — Creating a campaign (Dimension) on LandingTrack
Remember you have three different ways to create a dimension.
1- From an existing FLow — see how
2- From Menu side > Offer — see how
3- From Dimension Menu: see bellow
Click on button > New Dimension

You will be redirected to our Dimension creator.

First, we will recommend you to click on the pencil right bellow the bucket to add your Campaign Name, at the same time you will see displayed all your offers with the name and status (right side), click on the left arrow button to add them to your Dimension.
Once you have finish click on > Create
You will be redirected to its profile:

Want to know everything About Dimensions? see full guide HERE
Pretty easy right?
— Dimension Configuration Options:
See full guide HERE
— Dimension Traffic Sources Section:
See full guide HERE
— Optimization Rules:
As you may know already, LandingTrack can optimize the traffic base on different rules, here its when automation comes into action :
Pausing Campaigns
Blocking SubIds and Banners.
You can always check our guide here — to refresh the concept.
— Getting the URL for AdMaven:
On your Dimension Profile click on button > + Add Campaign and select AdMaven as your traffic source, then select your Domain and your Traffic Segment; Finally, copy the name and URL we provide you with:
IMPORTANT: Copy the Full name that we provide you with and the Full URL:
REMEMBER: Use the Dimension name on AdMaven Campaign Name and LandingTrack URL for the Campaign URL.
STEP 3— Creating a campaign on AdMaven
With AdMaven we can create three types of campaigns in terms of traffic: Push notifications, Floating Push & Pop for Mobile and Desktop.
Push notifications & Pop (Mobile & Desktop)
Interface speaking, all formats are pretty much the same, we will see Push notifications as you have to add more details at the end of the campaign configuration.
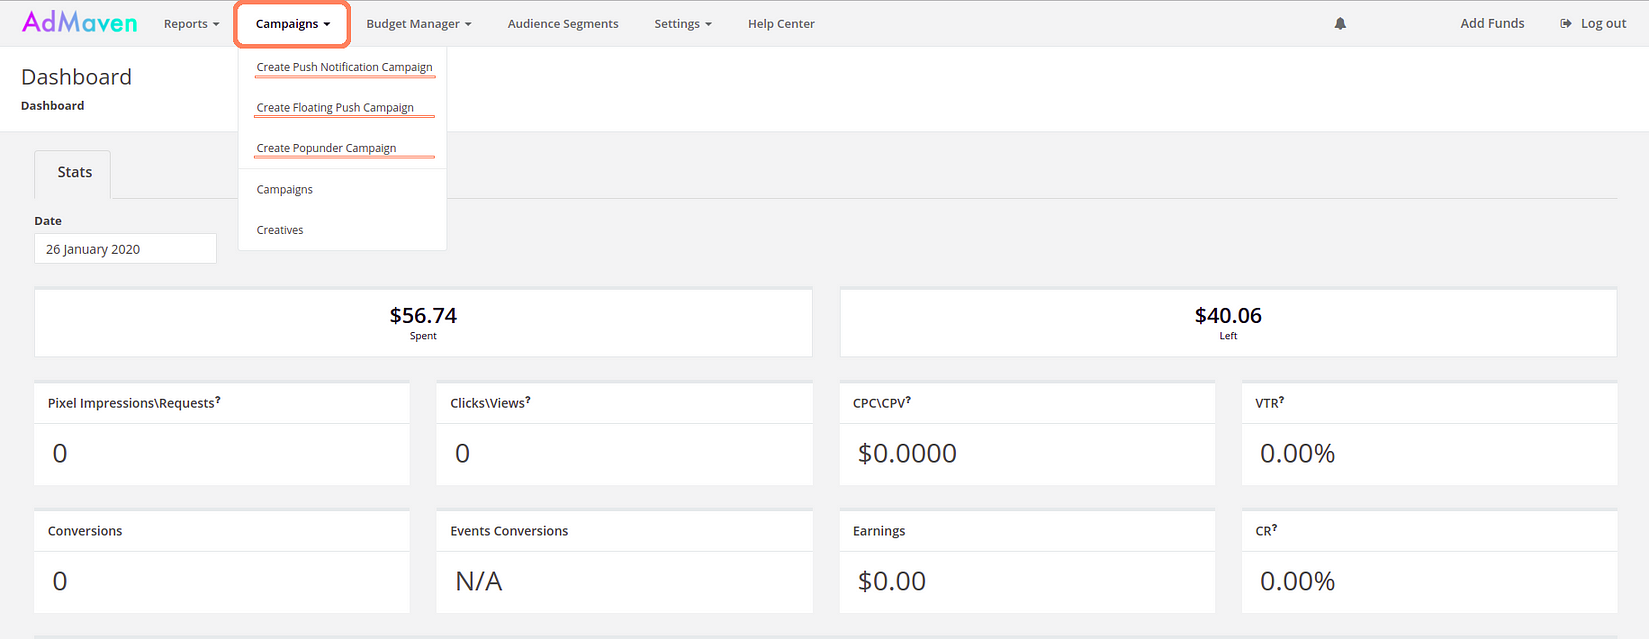
Go to your AdMaven account and create the campaign based on the target you need. Click on Campaigns and select the Ad format you want.
Once you have selected the Ad type, you will see four different steps
1- Campaign & Budget: Remember to add LandingTracks name on your Campaign Name.
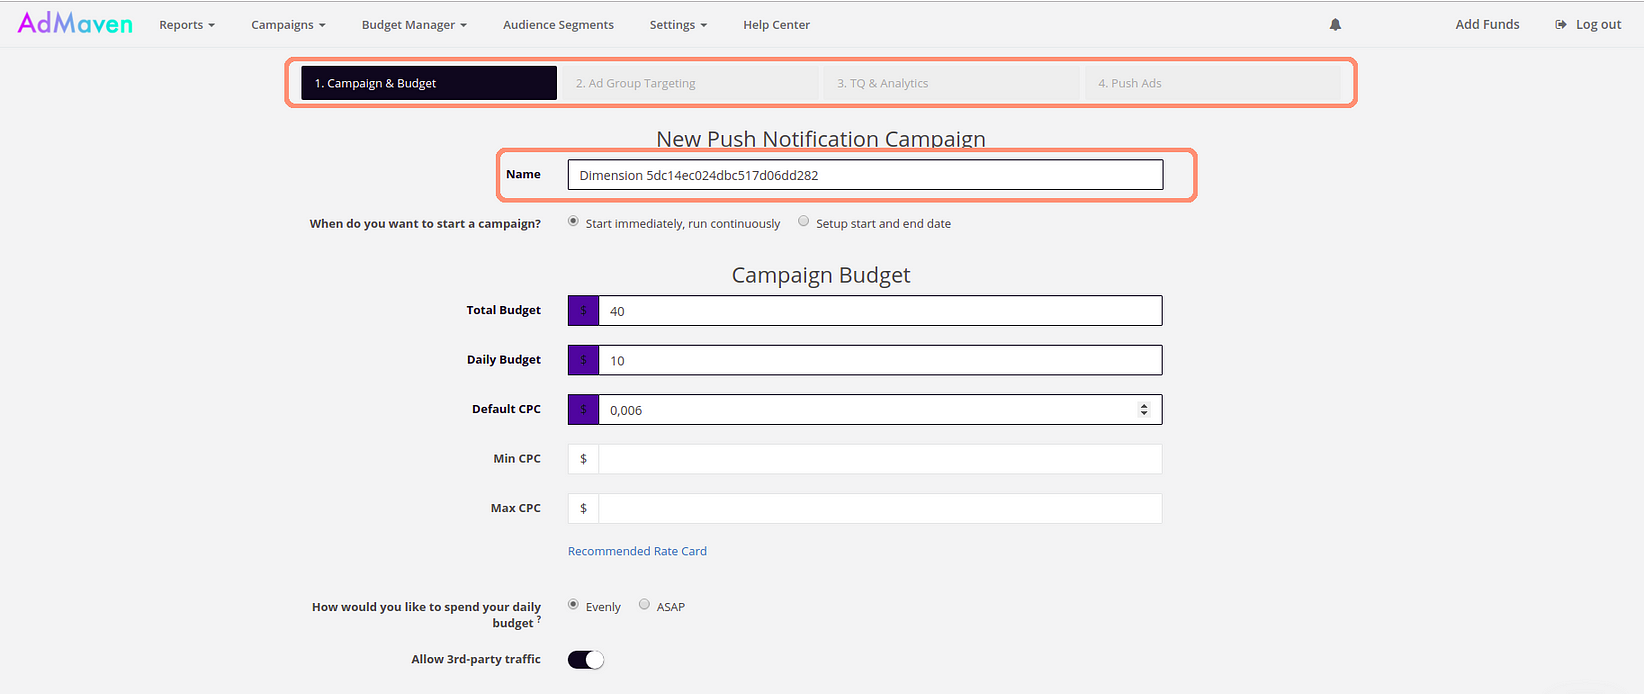
Also, LandingTrack can manage your budget, by setting up on Dimension Profile > Optimizations.
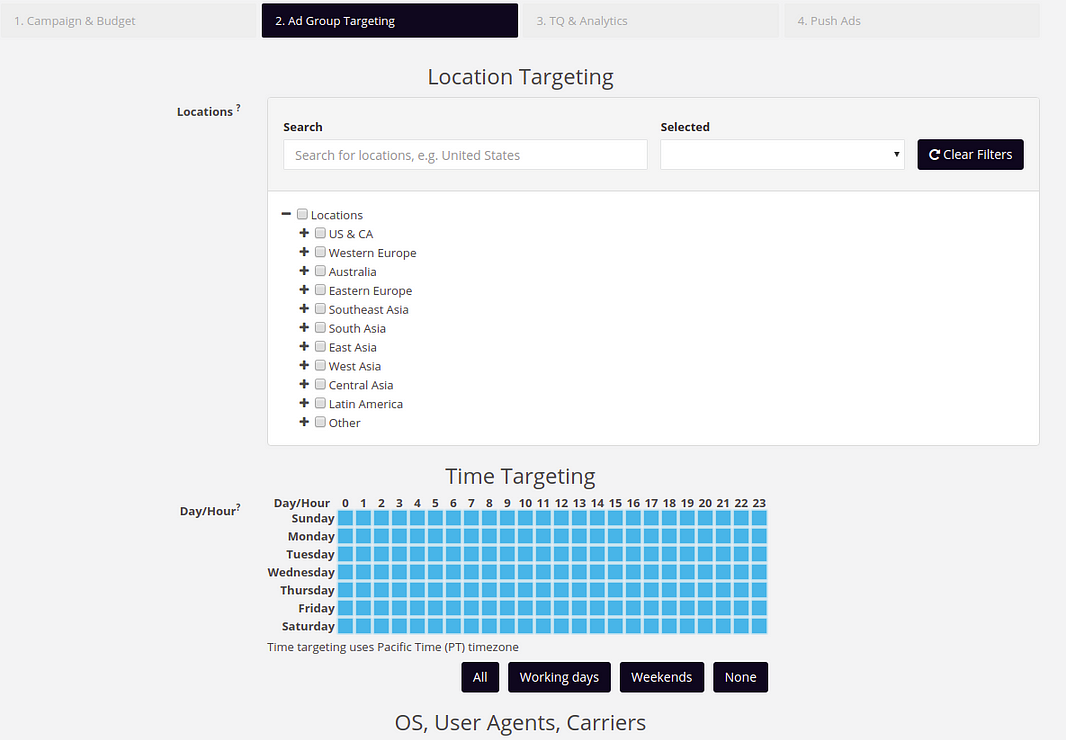
2- Ad Grouping: Here you can select all your campaign targets
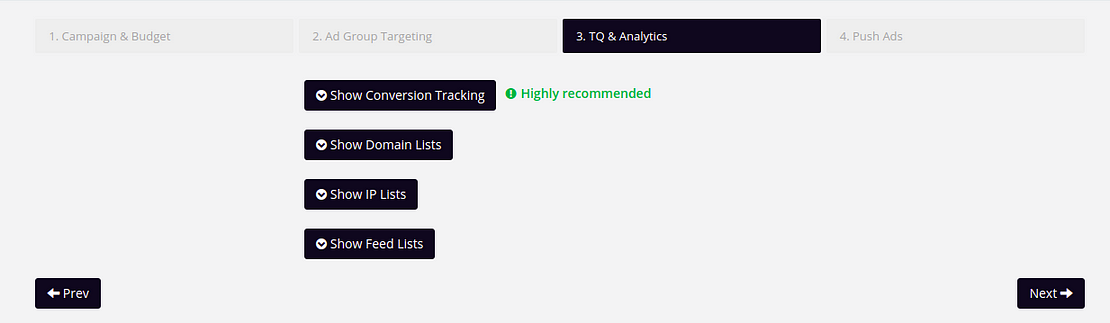
3- TQ & Analytics: Add your white/blacklist and track your campaigns
4- Push Ads: Time for you to work on your creativity!
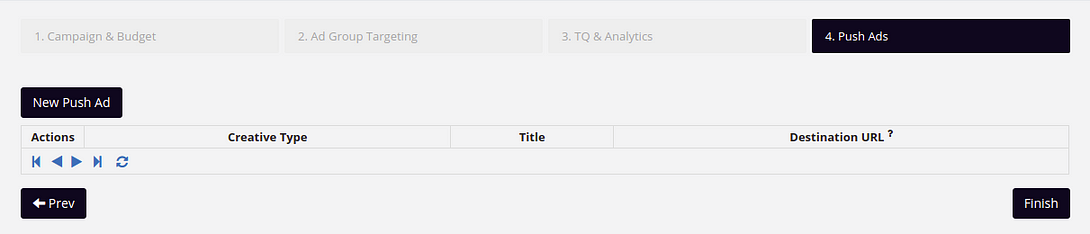
Remember to add your Title — Description and Images then Save.
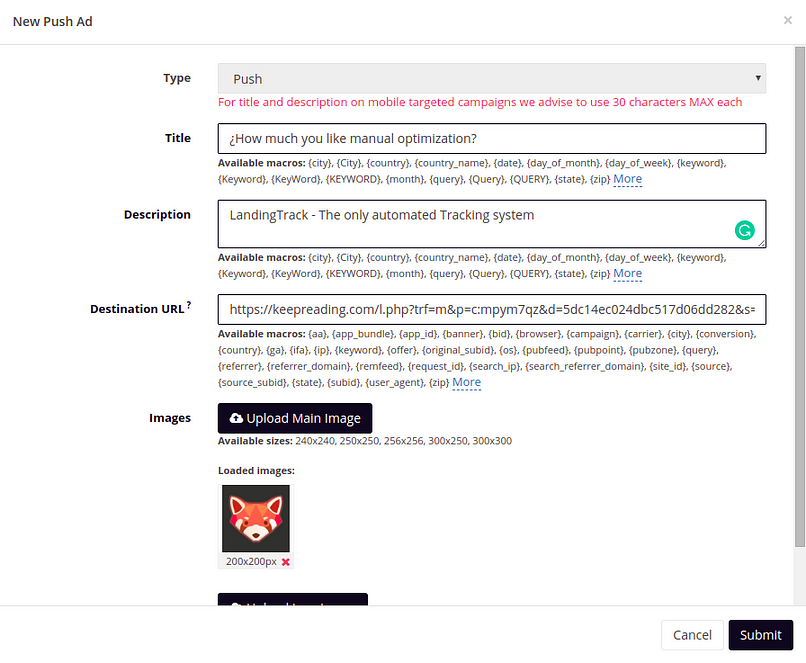
Submit your Push Notification campaign
After submitting the Campaign just wait for its approval (usually takes a few minutes), copy the Campaign ID provided by AdMaven and come back to LandingTrack
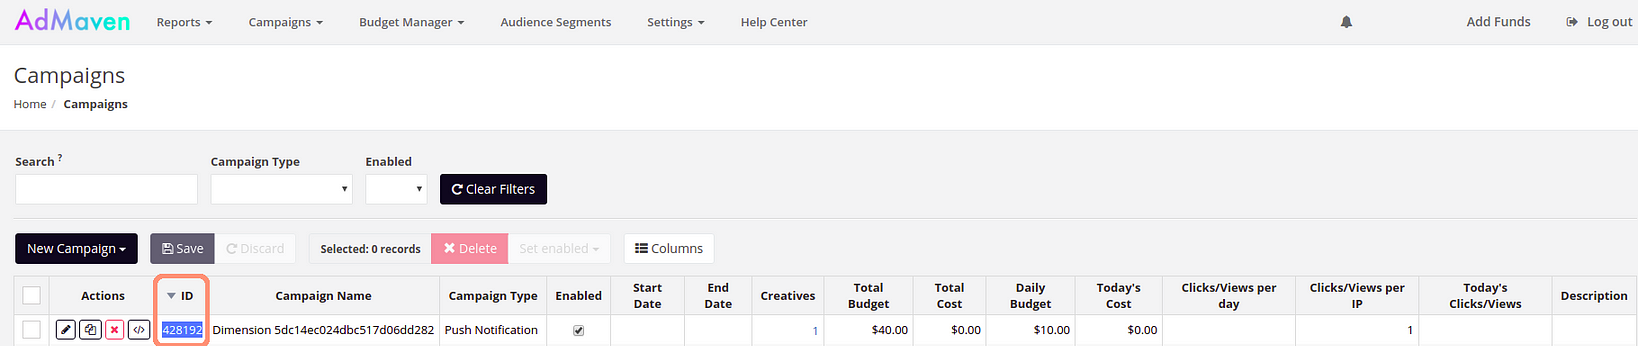
Back on your Dimension Profile click on > Sync button and select Admaven as Traffic Source and Paste your Campaign ID then > Search
Click on > Search button
This will be your next view :
Everything has been set up already, our advice — Chill, relax and wait for the traffic to start.
Automation is the key for any Affiliate to become more effective, save time and money and keep reading us
 .
.
These are the benefits and how it can help your daily activity Admaven. What are you waiting for to start with LandingTrack?
Now you can Track and Auto-optimize all its Push Traffic through us!
STEP 1 — Adding AdMaven as Traffic Source
Go to Traffic Source, Menu side and click on > +Connect new Source; from the list of options select > Integrated DPSs
From the list displayed look for AdMaven. In order to connect with them, you will need to provide only two fields.
1- User: Your AdMaven login
2- Password: Your AdMaven Password
Just add your AdMaven User and password to connect with.
Right after that click on the button > Connect we have an extra step — Check API, click on it.
The slide-out will show to you your credentials, check them and if all looks good click on orange button > Check API
Green Check¡means we are fully Integrated with AdMaven and we can start automating all your Campaigns but, We will suggest you add some more steps like — URL Tokens and Outgoing Postback
Now that we are synchronized with AdMaven let’s have a look on > Edit button.
The following Parameters and Tokens will be provided by default for each AdMaven URL :
- source={subid}.{pubfeed}— Subid & Pubfeed (those are the ones need it in order to track the siteid)
- bid={bid} — The cost of the visit (how much you pay for a click)
- cmp={campaign} — Campaign ID, as registered in their system
- keyword={keyword} — Keyword matched on campaign
- b={banner}
1.1— Adding some Extra Tokens:
I am sure you are familiar with AdMaven Tokens but it is always good to show /explain them here for you:
- {query} — publisher search keyword
- {banner} — ad id
- {remfeed} — remote feed id
- {ga} — required for Google Analytics statistics
- {aa} — required for Event Tracking
- {conversion} — conversion tracking
- {referrer} — referrer url (urlencoded)
- {referrer_domain} — referrer domain
- {country} — two-letter visitor’s country
- {state} — visitor’s state
- {city} — visitor’s city
Adding Extra Tokens to your URL’s, do not forget to save after adding them.
1.2— Postback (Optional):
We are missing only one thing to finish the full integration with AdMaven, adding their postback :
http://xml.realtime-bid.com,pop.rtb-passthrough.com,xml.ad-maven.com/conversion?c={conversion}&count={count}&value={value}
Remember to replace their Tokens for the LandingTrack ones:
. {conversion} ={{PID}}
. {value} = {{PAYOUT}}
. {count}= 1 (you can leave that value by default)
You can copy the following one and set it up on LandingTrack: http://xml.realtime-bid.com,pop.rtb-passthrough.com,xml.ad-maven.com/conversion?c={{PID}}&count=1&value={{PAYOUT}}
STEP 2 — Creating a campaign (Dimension) on LandingTrack
Remember you have three different ways to create a dimension.
1- From an existing FLow — see how
2- From Menu side > Offer — see how
3- From Dimension Menu: see bellow
Click on button > New Dimension
You will be redirected to our Dimension creator.
First, we will recommend you to click on the pencil right bellow the bucket to add your Campaign Name, at the same time you will see displayed all your offers with the name and status (right side), click on the left arrow button to add them to your Dimension.
Once you have finish click on > Create
You will be redirected to its profile:
Want to know everything About Dimensions? see full guide HERE
Pretty easy right?
— Dimension Configuration Options:
See full guide HERE
— Dimension Traffic Sources Section:
See full guide HERE
— Optimization Rules:
As you may know already, LandingTrack can optimize the traffic base on different rules, here its when automation comes into action :
Pausing Campaigns
Blocking SubIds and Banners.
You can always check our guide here — to refresh the concept.
— Getting the URL for AdMaven:
On your Dimension Profile click on button > + Add Campaign and select AdMaven as your traffic source, then select your Domain and your Traffic Segment; Finally, copy the name and URL we provide you with:
IMPORTANT: Copy the Full name that we provide you with and the Full URL:
REMEMBER: Use the Dimension name on AdMaven Campaign Name and LandingTrack URL for the Campaign URL.
STEP 3— Creating a campaign on AdMaven
With AdMaven we can create three types of campaigns in terms of traffic: Push notifications, Floating Push & Pop for Mobile and Desktop.
- Push notifications (Mobile & Desktop)
- Floating Push (Mobile & Desktop)
- Pop (Mobile & Desktop)
Push notifications & Pop (Mobile & Desktop)
Interface speaking, all formats are pretty much the same, we will see Push notifications as you have to add more details at the end of the campaign configuration.
Go to your AdMaven account and create the campaign based on the target you need. Click on Campaigns and select the Ad format you want.
Once you have selected the Ad type, you will see four different steps
1- Campaign & Budget: Remember to add LandingTracks name on your Campaign Name.
Also, LandingTrack can manage your budget, by setting up on Dimension Profile > Optimizations.
2- Ad Grouping: Here you can select all your campaign targets
3- TQ & Analytics: Add your white/blacklist and track your campaigns
4- Push Ads: Time for you to work on your creativity!
Remember to add your Title — Description and Images then Save.
Submit your Push Notification campaign
After submitting the Campaign just wait for its approval (usually takes a few minutes), copy the Campaign ID provided by AdMaven and come back to LandingTrack
Back on your Dimension Profile click on > Sync button and select Admaven as Traffic Source and Paste your Campaign ID then > Search
Click on > Search button
This will be your next view :
Everything has been set up already, our advice — Chill, relax and wait for the traffic to start.
Automation is the key for any Affiliate to become more effective, save time and money and keep reading us
These are the benefits and how it can help your daily activity Admaven. What are you waiting for to start with LandingTrack?
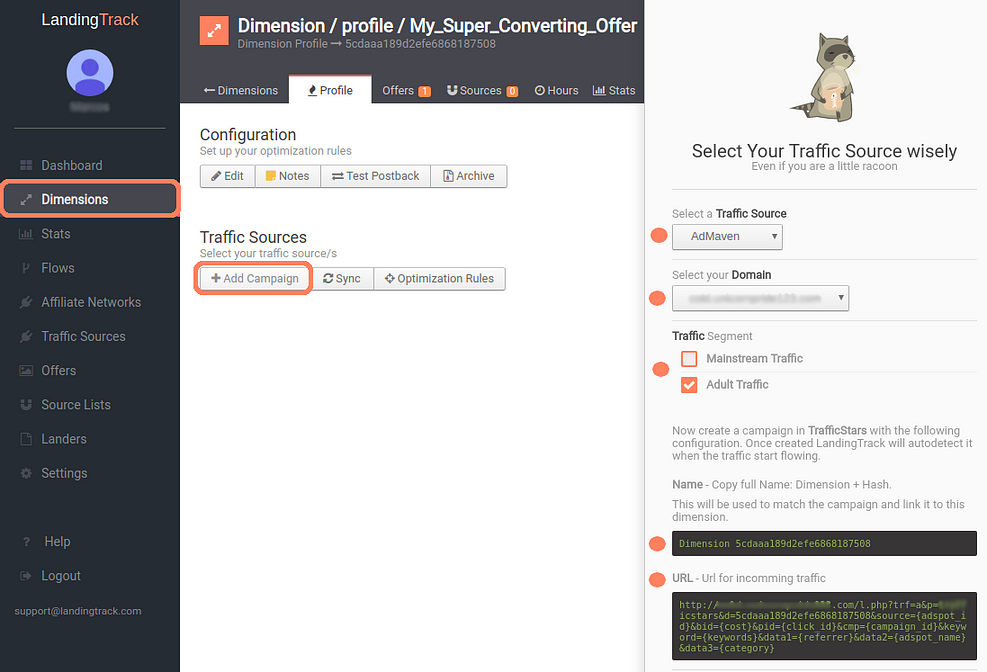
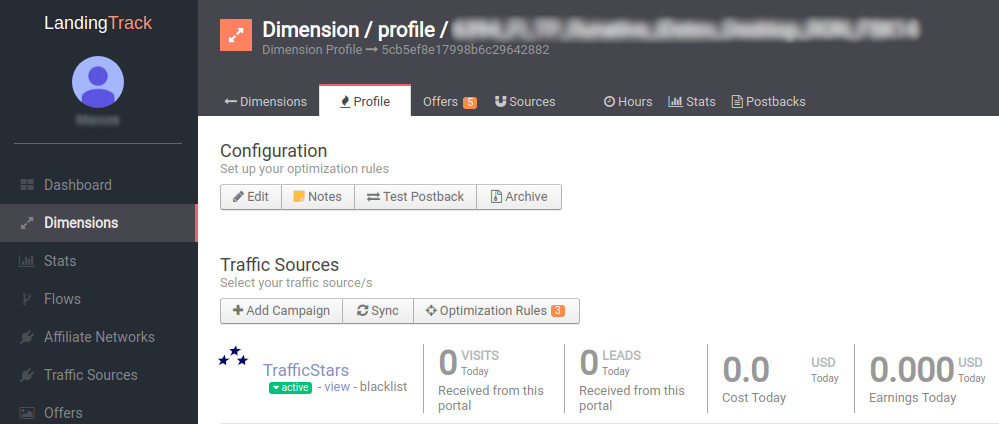
A big welcome to... TrafficStars!
For all of you looking for Adult/dating Traffic, now you can Track and auto-optimice all Trafficstars with LandingTrack
STEP 1 — Adding TrafficStars as Traffic Source
Go to Traffic Source Tab and click on > +Connect new Source; from the list of options select > Integrated DSPs

Look for TrafficStars. In order to connect with them, you will need a total of 4 fields to be filled.
1- Your TrafficStars Email address
2- Your TrafficStars Password
3- Client ID
4- Client Secret
Check full guide here: LandingTrack & TrafficStars
After getting the green Check we will suggest you add some more steps like — URL Tokens and Outgoing Postback
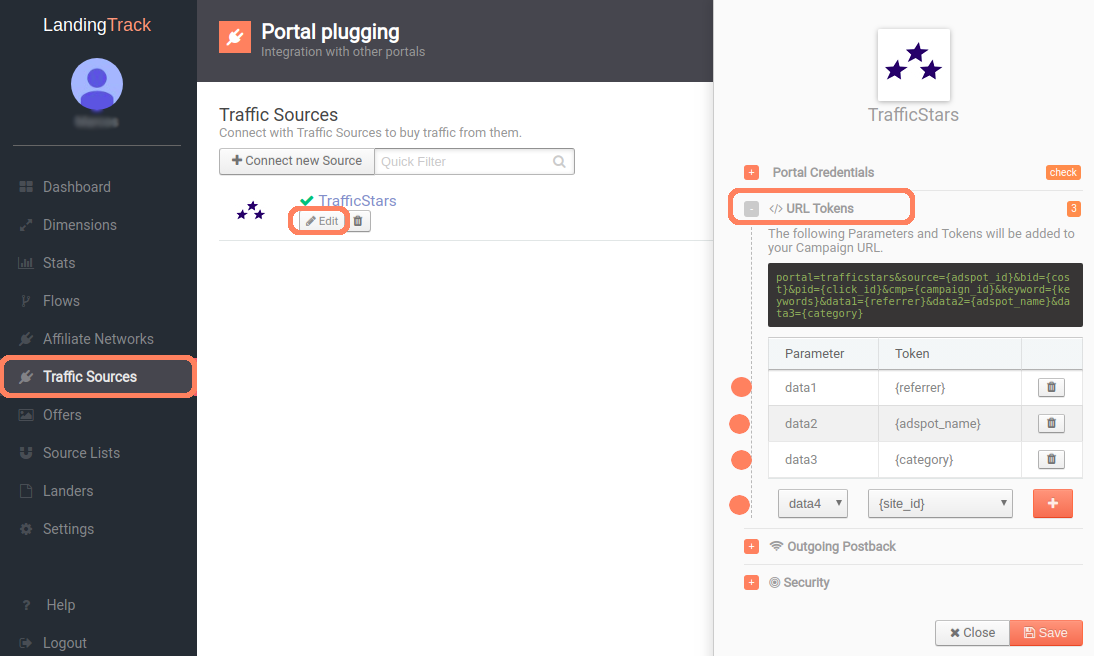
We are about to set up some extra Tokens for TrafficStars URL.To do so we just need to click on the button > Edit and from the slideout select the option > URL Tokens.
Each time you want to generate a URL for TrafficStars we will be provided to you by default the following URL:
portal=trafficstars&source={adspot_id}&bid={price}&pid={click_id}&cmp={campaign_id}&keyword={keywords}
1.2 — Postback (Optional):
We are missing only one thing to finish the full integration with TrafficStars, adding their postback :
https://tsyndicate.com/api/v1/cpa/action/{yourclickid}
Remember to replace their Tokens for the LandingTrack ones:
. {yourclickid}={{PID}}
You can Copy the following Postback and place it on > Outgoing Postback: https://tsyndicate.com/api/v1/cpa/action/{{PID}}
Replace TrafficStars Tokens by the LandingTrack ones and SAVE.
And that’s all, remember to SAVE after all your changes.
STEP 2 — Creating a campaign (Dimension) on LandingTrack
Remember you have three different ways to create a dimension.
1- From an existing FLow — see how
2- From Menu side > Offer — see how
3- From Dimension Menu: see bellow
Click on button > New Dimension

You will be redirected to our Dimension creator.
After Creating it you will be redirected to it's profile
Want to know everything About Dimensions? see full guide HERE
— Dimension Configuration Options:
See full guide HERE
— Dimension Traffic Sources Section:
See full guide HERE
— Optimization Rules:
As you may know already, LandingTrack can optimize the traffic base on different rules, here its when automation comes into action :

You can always check our guide here — to refresh the concept.
— Getting the URL for TrafficStars:
Click on button > + Add Campaign and select TrafficStars as your traffic source, then select your Domain and your Traffic Segment; Finally, copy the name and URL we provide you with:
IMPORTANT: Copy the Full name that we provide you with and the Full URL:

REMEMBER: Use the Dimension name on TrafficStars Campaign Name and LandingTrack URL for the Campaign URL.
STEP 3— Creating a campaign on TrafficStars
Let’s login to your TrafficStars Account and go straight to +CREATE CAMPAIGN button.
Next, be will present to you all the different steps and target for your new Campaign;
Settings: IMPORTANT — use LandingTrack DImension name here. Then choose your Ad format: Native or Push. Select your Country and your Ad group.
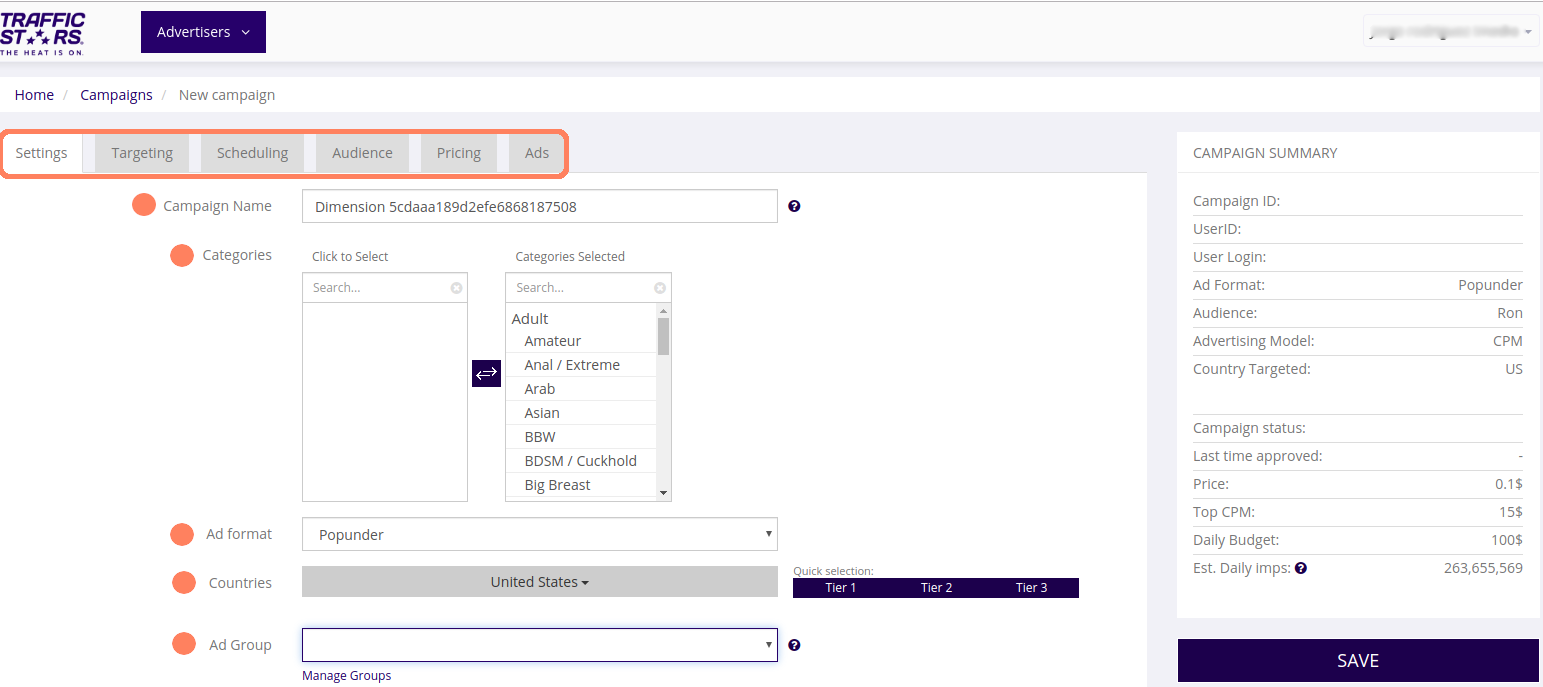
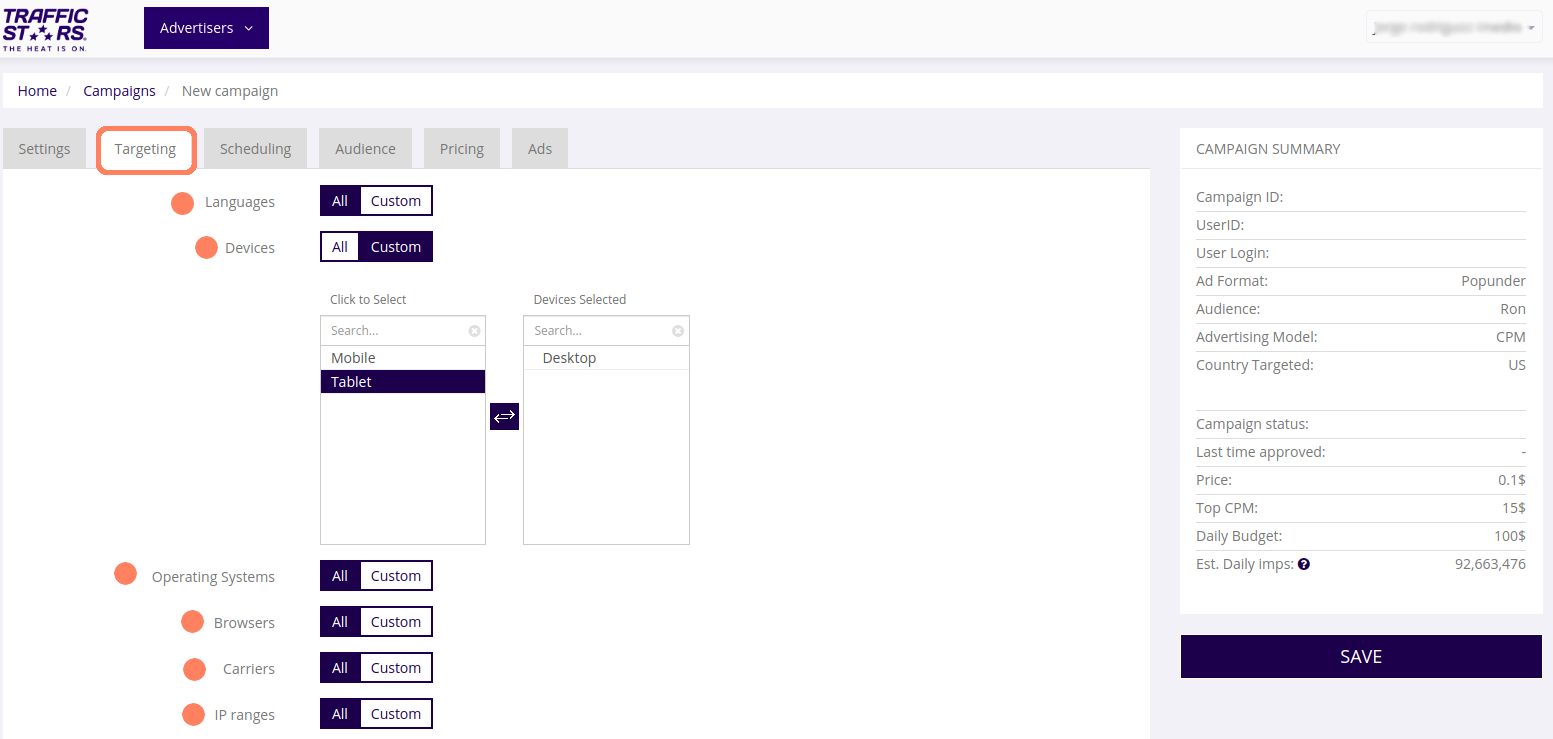
Targeting: Select your Language, your Devices and OS, Browser if you need it and Carrier. Check that TrafficStars has a cool option to Target by IP ranges. And you have them all in LandingTrack")
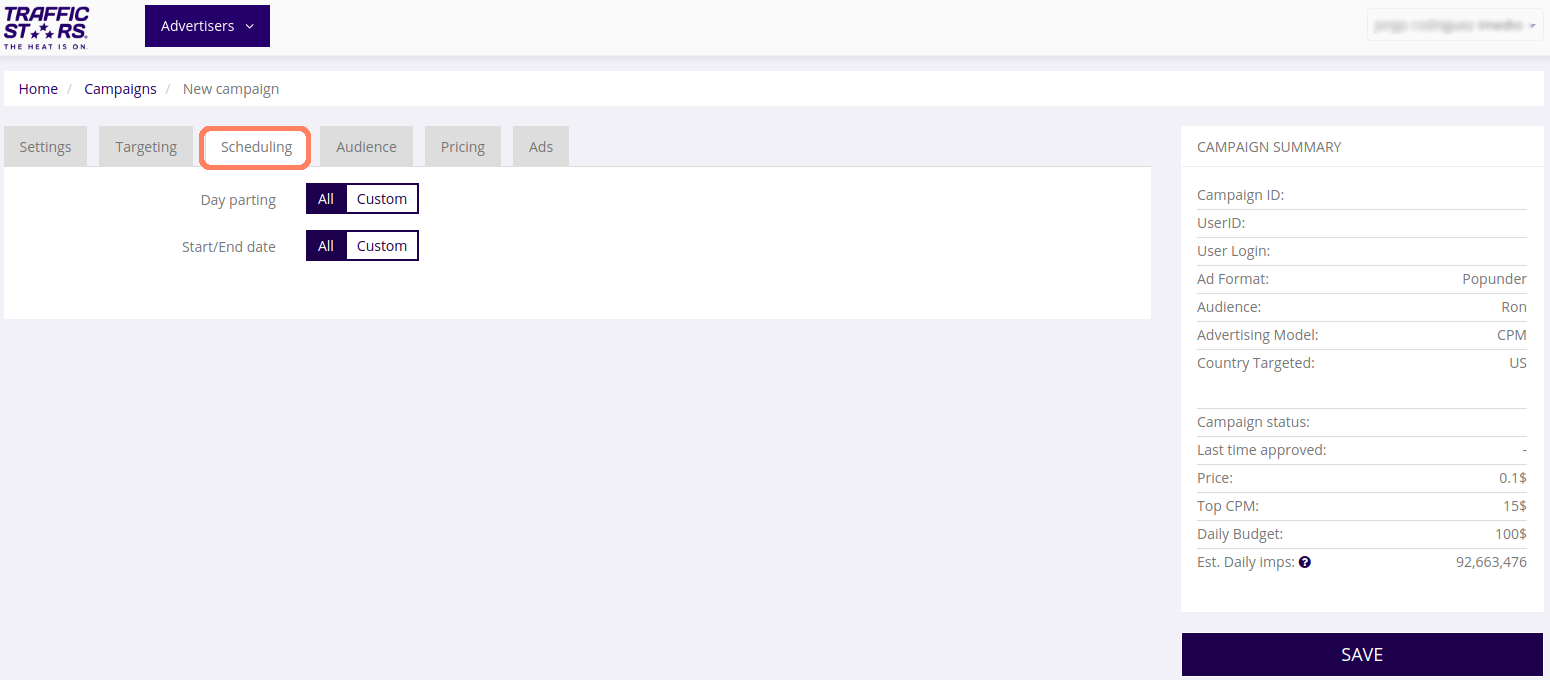
Scheduling: Which day and time should we start the Campaign?
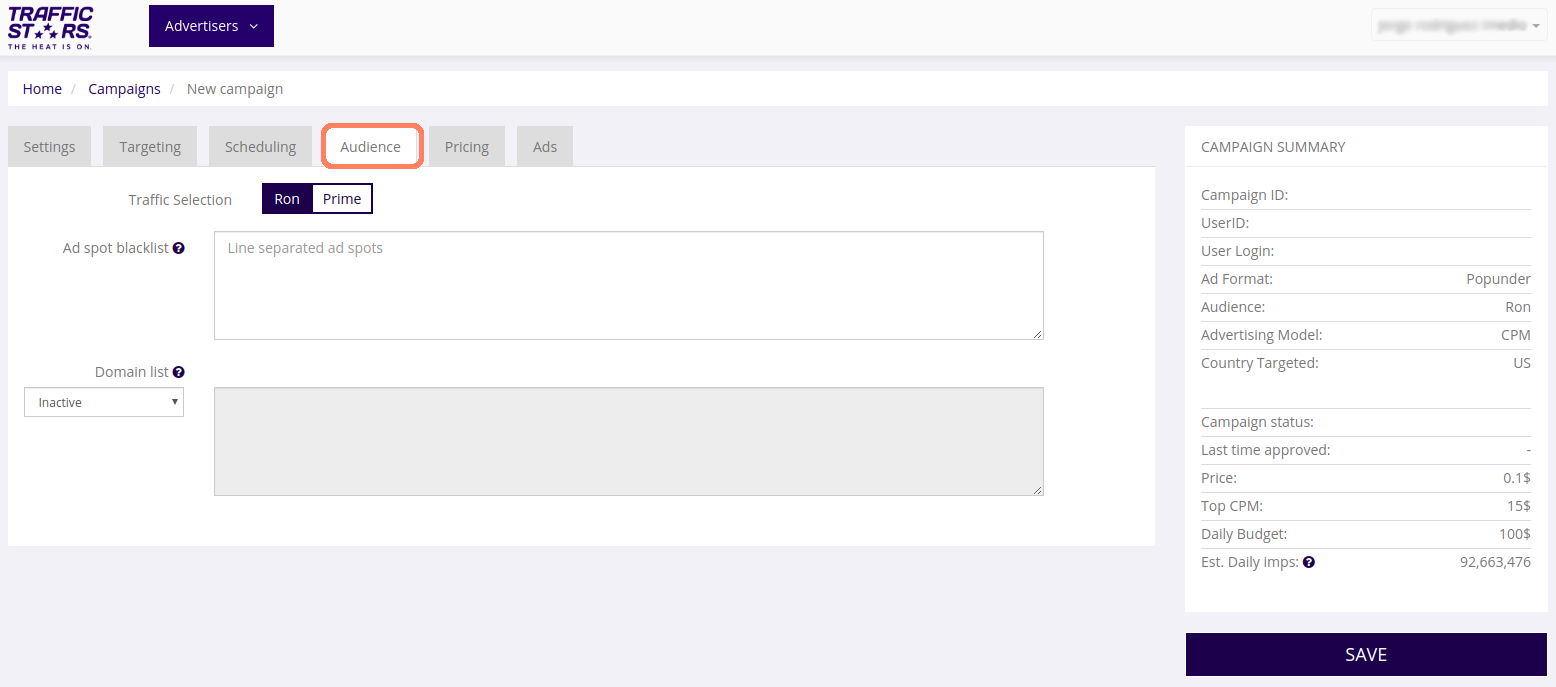
Audience: Time to be picky or go for all — Add your white/blacklist here.
Pricing: choose between CPM and CPC — be wise and run a few tests to find the right bid. You can also choose between Standards and Dinamic CPM.
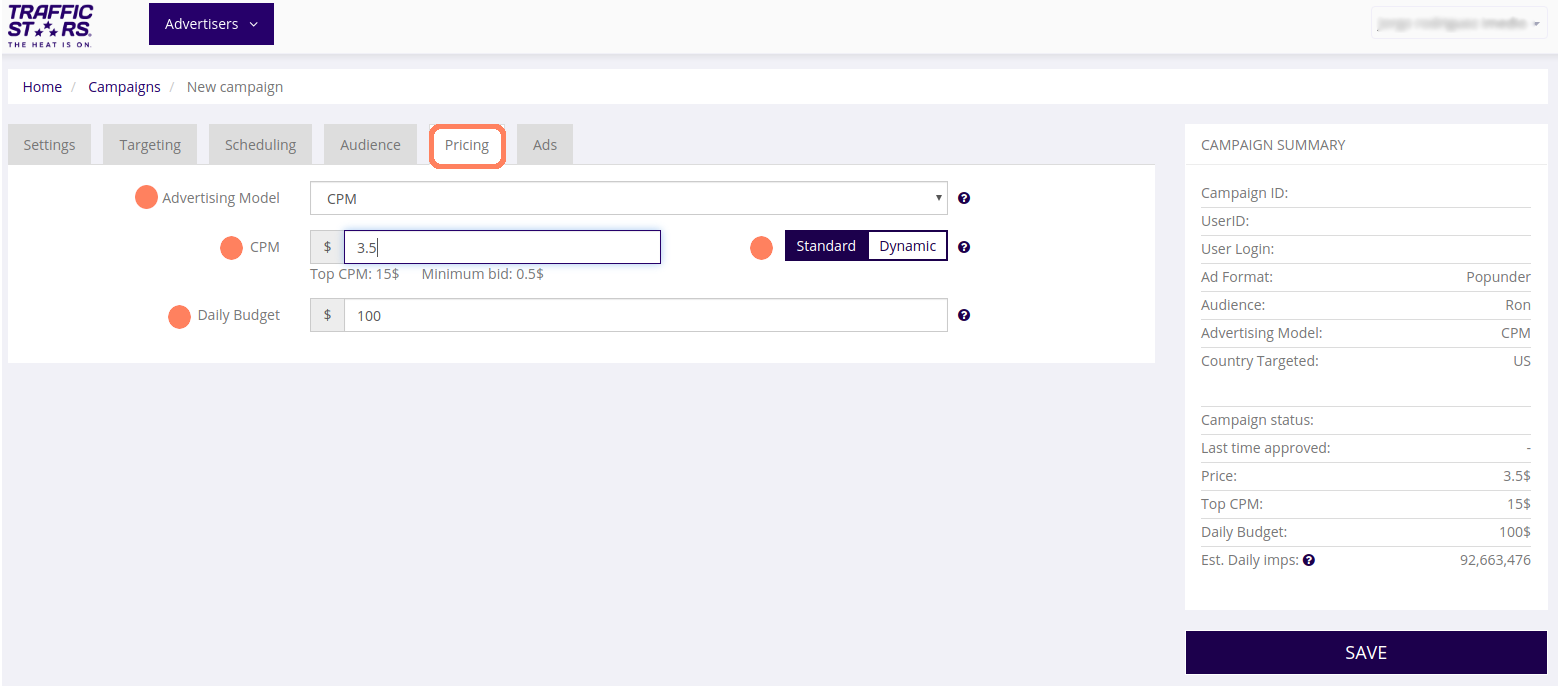
Almost finish¡
Ads: Click on > +Add button
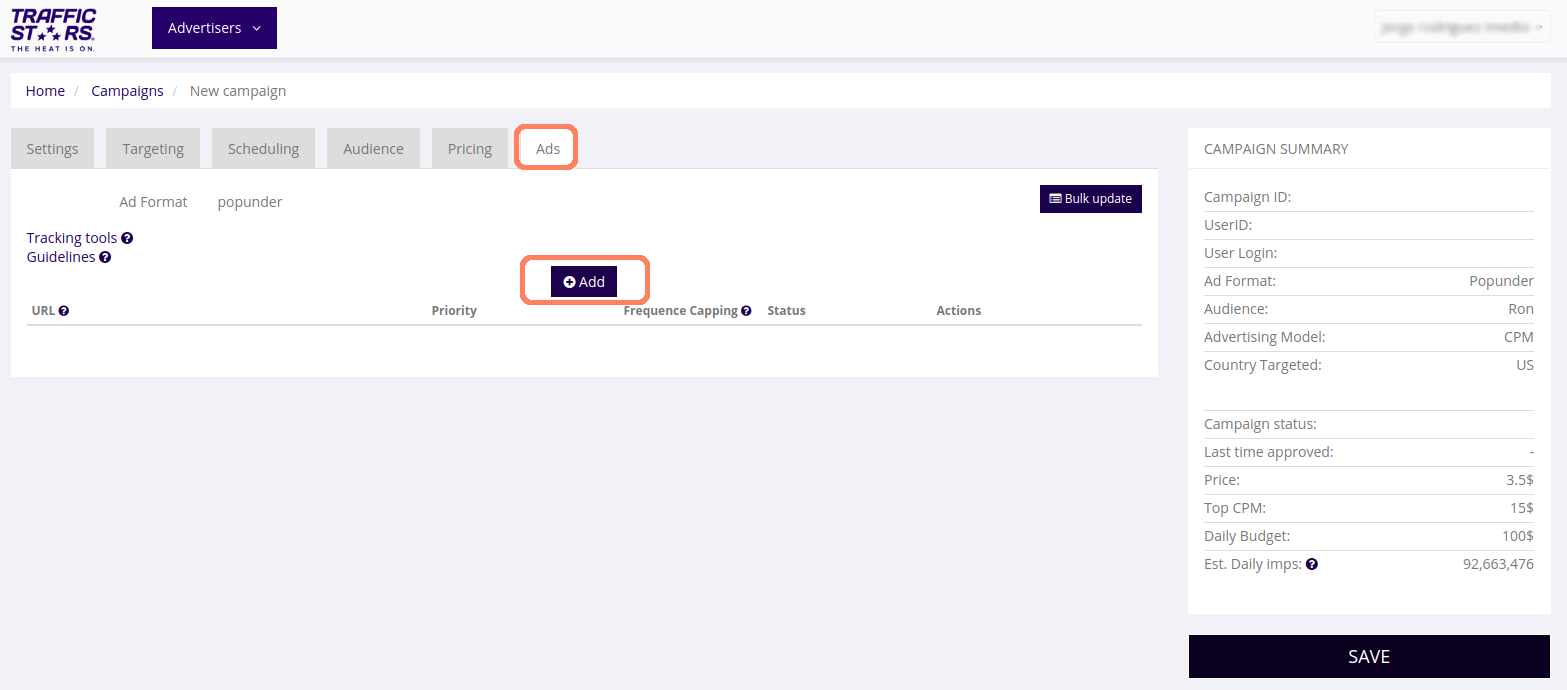
— and place your Campaign URL.
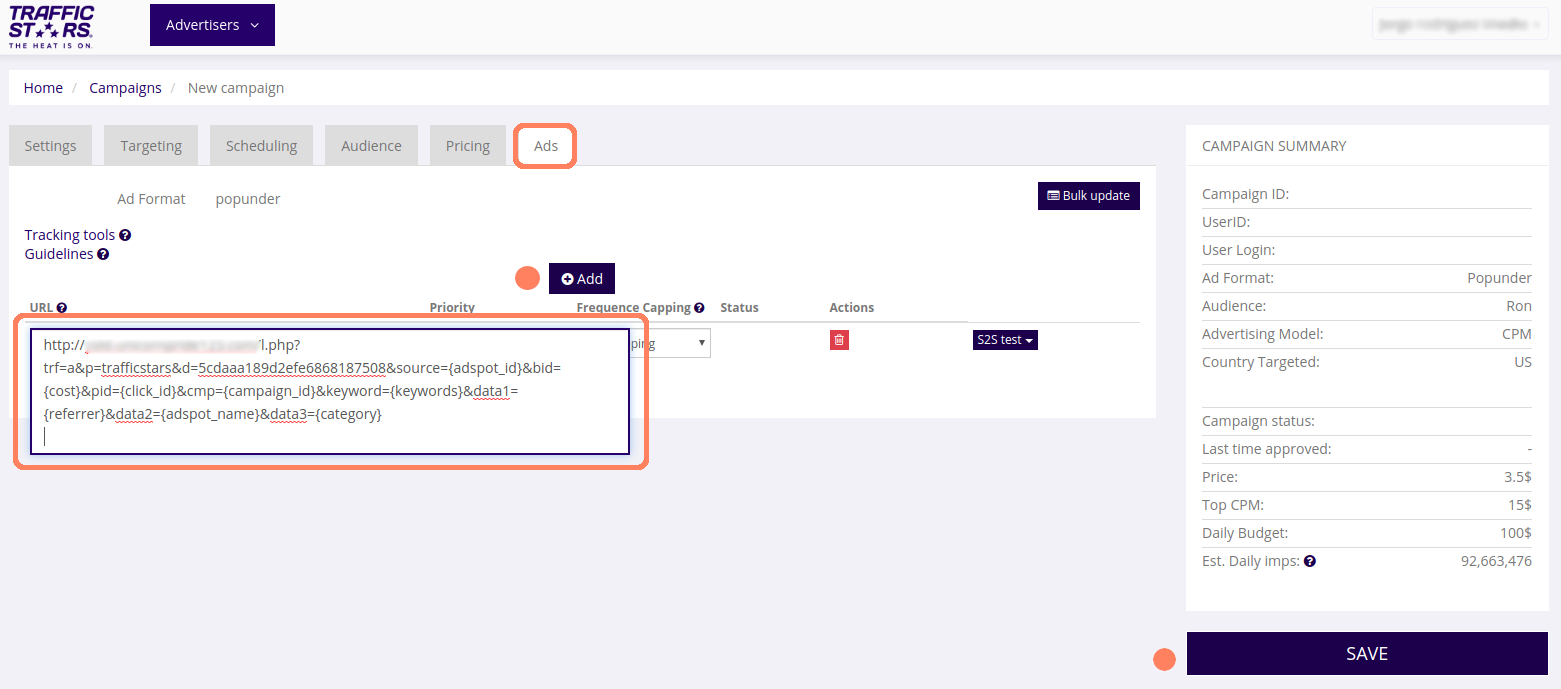
Job done — now let's check the Campaign ID to sync.
After saving the Campaign, copy the Campaign ID that belongs to your new Campaign.

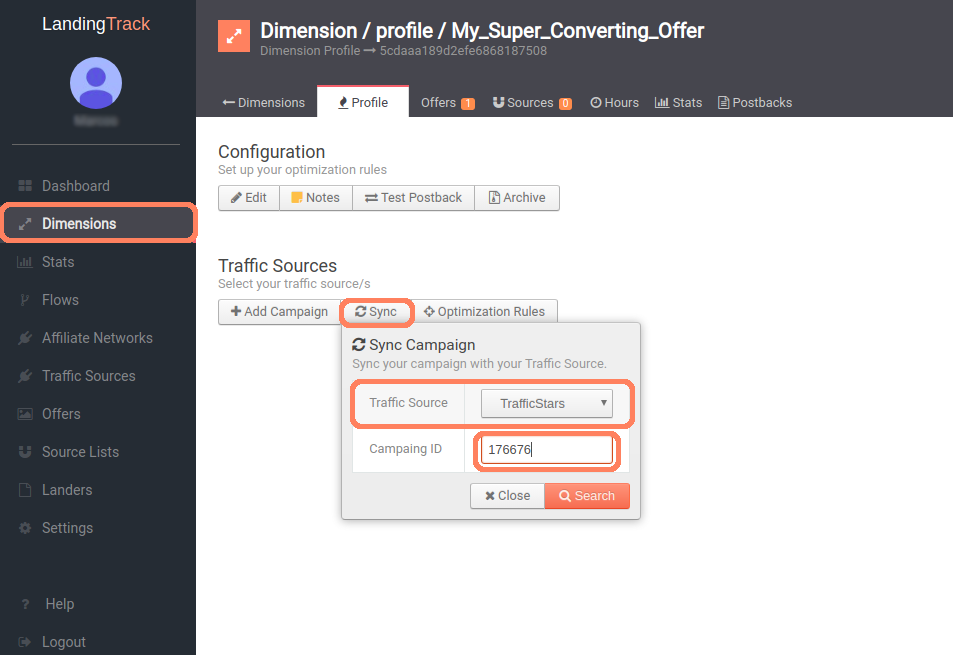
Back on LandingTrack — Dimension — Profile. We are going to sync your TrafficStars Campaign with LandingTrack Platform. Click on button > Sync. Select TrafficStars from your API DSP and Paste the Campaign ID < click on Search.
The next view will be:
Everything has been set up already, our advice — Chill, relax and wait for the traffic to start.
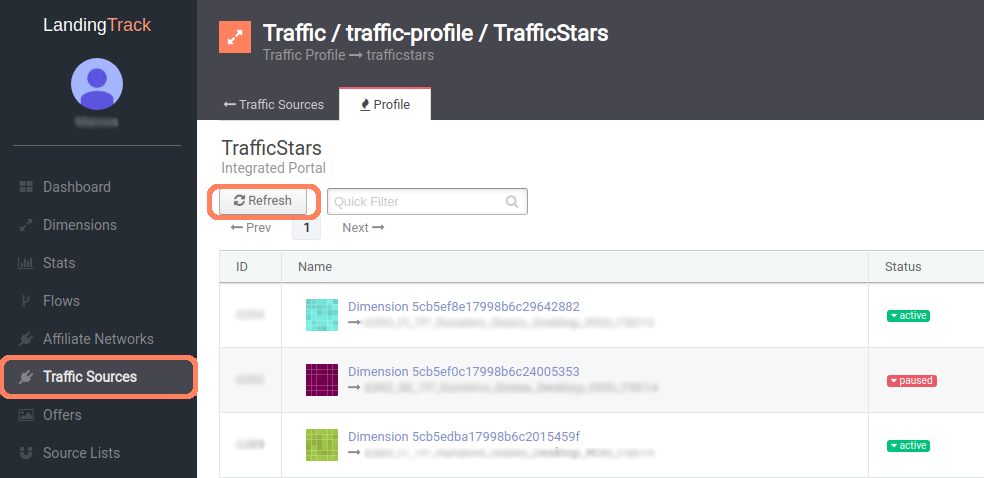
IMPORTANT: If you would like to SYNC all your TrafficStars Campaigns with LandingTrack then Go to Traffic Sources, Menu entry and click on TrafficStars name and then> Refresh button (this action is literally calling TrafficStars API to look for your All your Campaigns)
ALL GOOD¡
Everything has been set up already, our advice — Chill, relax and wait for the traffic to start.
These are the benefits of automation and how it can help your daily activity.
For all of you looking for Adult/dating Traffic, now you can Track and auto-optimice all Trafficstars with LandingTrack
STEP 1 — Adding TrafficStars as Traffic Source
Go to Traffic Source Tab and click on > +Connect new Source; from the list of options select > Integrated DSPs
Look for TrafficStars. In order to connect with them, you will need a total of 4 fields to be filled.
1- Your TrafficStars Email address
2- Your TrafficStars Password
3- Client ID
4- Client Secret
Check full guide here: LandingTrack & TrafficStars
After getting the green Check we will suggest you add some more steps like — URL Tokens and Outgoing Postback
We are about to set up some extra Tokens for TrafficStars URL.To do so we just need to click on the button > Edit and from the slideout select the option > URL Tokens.
Each time you want to generate a URL for TrafficStars we will be provided to you by default the following URL:
portal=trafficstars&source={adspot_id}&bid={price}&pid={click_id}&cmp={campaign_id}&keyword={keywords}
- source={adspot_id} — Ad spot ID
- bid={price} — CPM price, CPC price, etc…
- pid={click_id} — Randomly generated unique click id used for s2s tracking
- cmp={campaign_id} — Campaign ID
- keyword={keywords} — Keywords collected
1.2 — Postback (Optional):
We are missing only one thing to finish the full integration with TrafficStars, adding their postback :
https://tsyndicate.com/api/v1/cpa/action/{yourclickid}
Remember to replace their Tokens for the LandingTrack ones:
. {yourclickid}={{PID}}
You can Copy the following Postback and place it on > Outgoing Postback: https://tsyndicate.com/api/v1/cpa/action/{{PID}}
Replace TrafficStars Tokens by the LandingTrack ones and SAVE.
And that’s all, remember to SAVE after all your changes.
STEP 2 — Creating a campaign (Dimension) on LandingTrack
Remember you have three different ways to create a dimension.
1- From an existing FLow — see how
2- From Menu side > Offer — see how
3- From Dimension Menu: see bellow
Click on button > New Dimension
You will be redirected to our Dimension creator.
After Creating it you will be redirected to it's profile
Want to know everything About Dimensions? see full guide HERE
— Dimension Configuration Options:
See full guide HERE
— Dimension Traffic Sources Section:
See full guide HERE
— Optimization Rules:
As you may know already, LandingTrack can optimize the traffic base on different rules, here its when automation comes into action :
You can always check our guide here — to refresh the concept.
— Getting the URL for TrafficStars:
Click on button > + Add Campaign and select TrafficStars as your traffic source, then select your Domain and your Traffic Segment; Finally, copy the name and URL we provide you with:
IMPORTANT: Copy the Full name that we provide you with and the Full URL:
REMEMBER: Use the Dimension name on TrafficStars Campaign Name and LandingTrack URL for the Campaign URL.
STEP 3— Creating a campaign on TrafficStars
Let’s login to your TrafficStars Account and go straight to +CREATE CAMPAIGN button.
Next, be will present to you all the different steps and target for your new Campaign;
Settings: IMPORTANT — use LandingTrack DImension name here. Then choose your Ad format: Native or Push. Select your Country and your Ad group.
Targeting: Select your Language, your Devices and OS, Browser if you need it and Carrier. Check that TrafficStars has a cool option to Target by IP ranges. And you have them all in LandingTrack
Scheduling: Which day and time should we start the Campaign?
Audience: Time to be picky or go for all — Add your white/blacklist here.
Pricing: choose between CPM and CPC — be wise and run a few tests to find the right bid. You can also choose between Standards and Dinamic CPM.
Almost finish¡
Ads: Click on > +Add button
— and place your Campaign URL.
Job done — now let's check the Campaign ID to sync.
After saving the Campaign, copy the Campaign ID that belongs to your new Campaign.
Back on LandingTrack — Dimension — Profile. We are going to sync your TrafficStars Campaign with LandingTrack Platform. Click on button > Sync. Select TrafficStars from your API DSP and Paste the Campaign ID < click on Search.
The next view will be:
Everything has been set up already, our advice — Chill, relax and wait for the traffic to start.
IMPORTANT: If you would like to SYNC all your TrafficStars Campaigns with LandingTrack then Go to Traffic Sources, Menu entry and click on TrafficStars name and then> Refresh button (this action is literally calling TrafficStars API to look for your All your Campaigns)
ALL GOOD¡
Everything has been set up already, our advice — Chill, relax and wait for the traffic to start.
These are the benefits of automation and how it can help your daily activity.
Here we go again!! This time is for:
Yes¡¡ Zeropark is now fully integrated with LandingTrack so you can start tracking an auto-optimizing all your campaigns.
STEP 1 — Adding Zeropark as Traffic Source
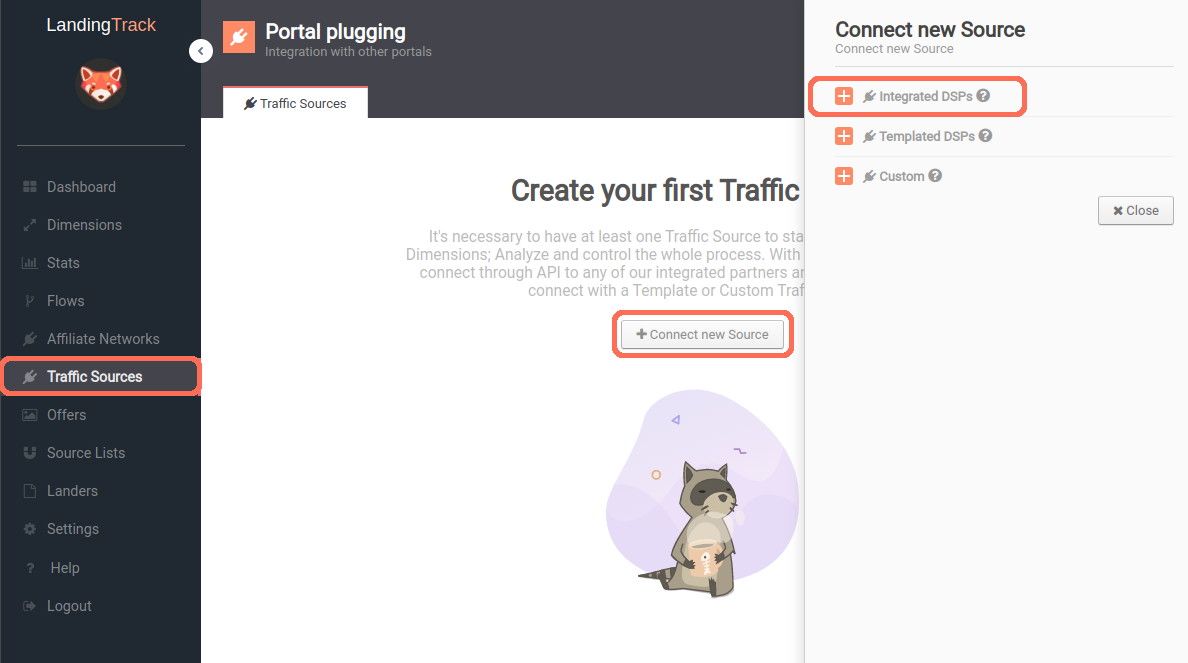
Go to Traffic Source and select >Connect new Source; then select the option >Integrated DSPs, from the list, displayed pick > Zeropark.
In order to connect with Zeropark you just need to add your API KEY
¿Do you know where to find it?
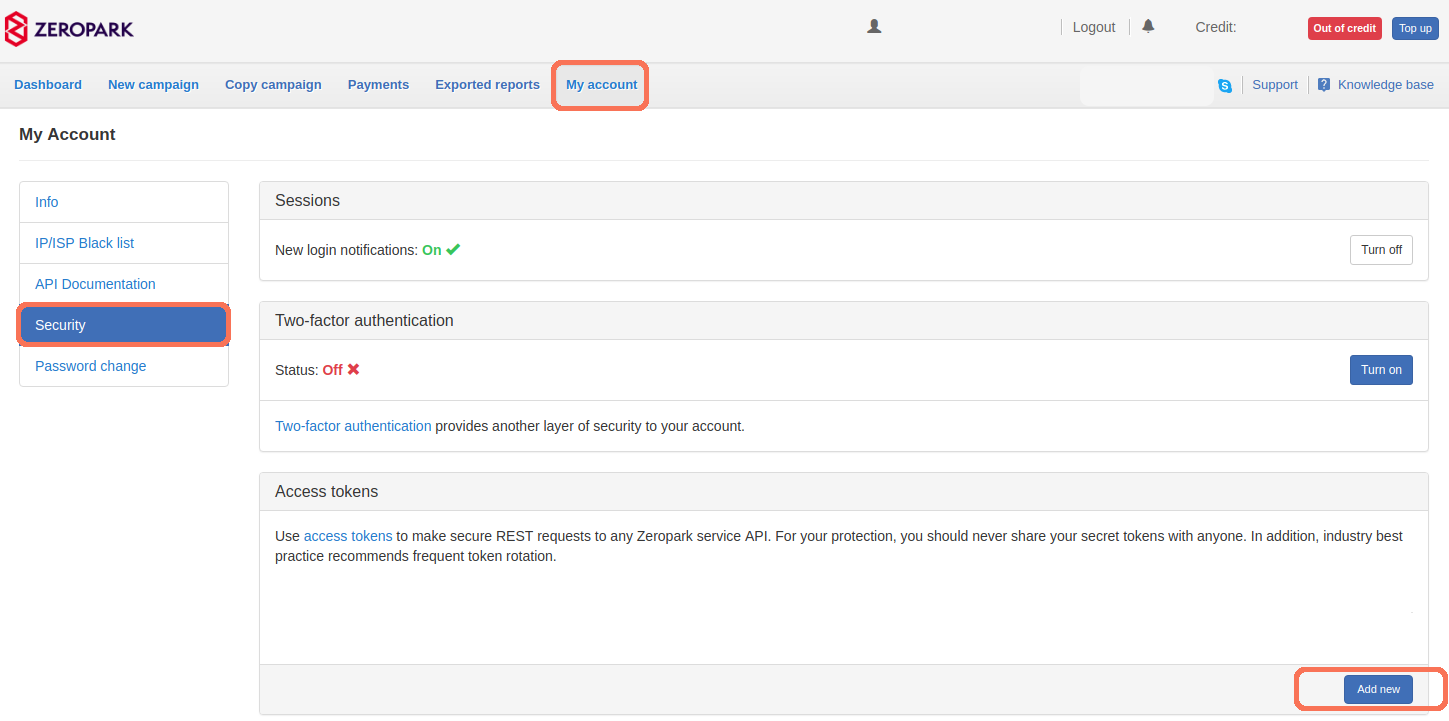
Let us help you — Go to your Zeropark account, and click on the TAB > My Account. On the left side, select the option Security. You will need to add a new Access Token.
Name your new Access Token and Generate
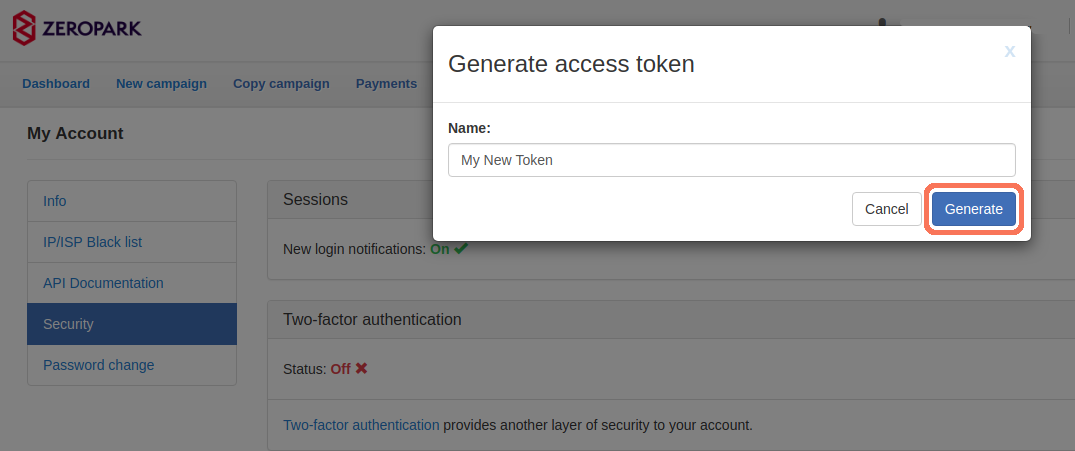
Write the name and Generate it.
Once you have created we can connect both platforms.
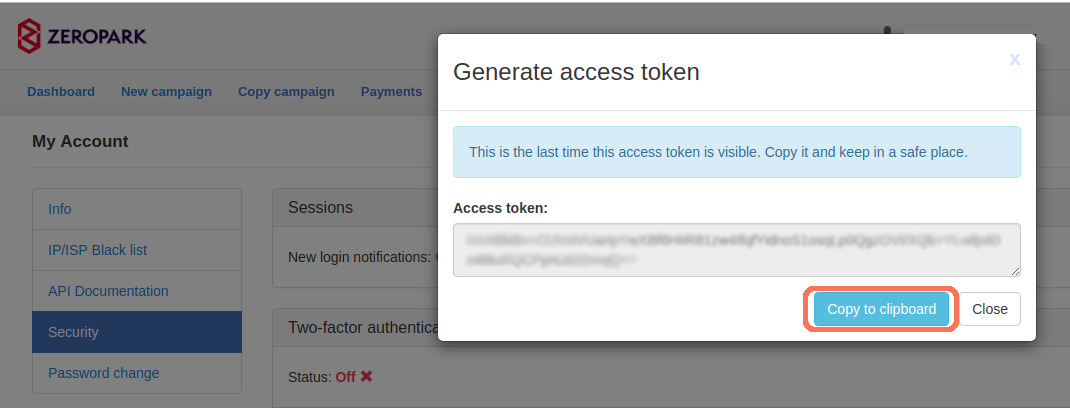
Finally, copy the new Token generated and let's get back to your LandingTrack Account.
The Green Check means we are fully Integrated with Zeropark and we can start automating all your Campaigns but, We will suggest you add some more steps like →Additional Tokens and Notification Postback
We are about to set up some extra Tokens for Zeropark URL.
To do so we just need to click on the button > Edit
Each time you want to generate a URL for Zeropark we will be provided to you by default the following URL:
“portal=zeropark&s={target}&b={creative_number}&bid={visit_cost}&pid={cid}&cmp={long_campaign_id}&keyword={keyword}”
The following Parameters and Tokens will be provided by default for each Zeropark URL :
1.2 — Postback (Optional):
We are missing only one thing to finish the full integration with Zeropark, adding their postback.
Although this Time, Zeropark has done a great job by adding us on their platform. On campaign creation you will find our Red Fox:
Just select and Copy
Back to LandingTrack > Zeropark > button Edit and section > Outgoing Postback
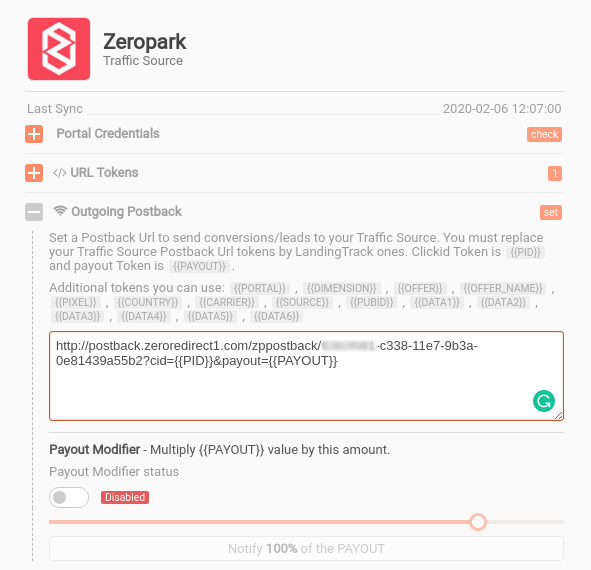
Easy Right? Let’s move to our next step then.
STEP 2 — Creating a campaign (Dimension) on LandingTrack
Remember you have three different ways to create a dimension.
1- From an existing Flow — see how
2- From Menu side > Offer — see how
3- From Dimension Menu: see bellow
Click on button > New Dimension

You will be redirected to our Dimension creator.

First, we will recommend you to click on the pencil right bellow the bucket to add your Campaign Name, at the same time you will see displayed all your offers with the name and status (right side), click on the left arrow button to add them to your Dimension.
As you can see, now we have added two offer on our dimension and if we like to add more we just need to click on the left arrow next to the offer “Play Sweeptakes US_cpa”
You will be redirected to its profile:
Want to know everything About Dimensions? see full guide HERE
— Dimension Configuration Options:
See full guide HERE
— Dimension Traffic Sources Section:
See full guide HERE
— Optimization Rules:
As you may know already, LandingTrack can optimize the traffic base on different rules, here its when automation comes into action :
You can always check our guide here — to refresh the concept.
— Getting the URL and Campaign name for Zeropark:
Click on button > Get Campaign URL and select Zeropark as your traffic source. Copy the name and URL we provide you with:
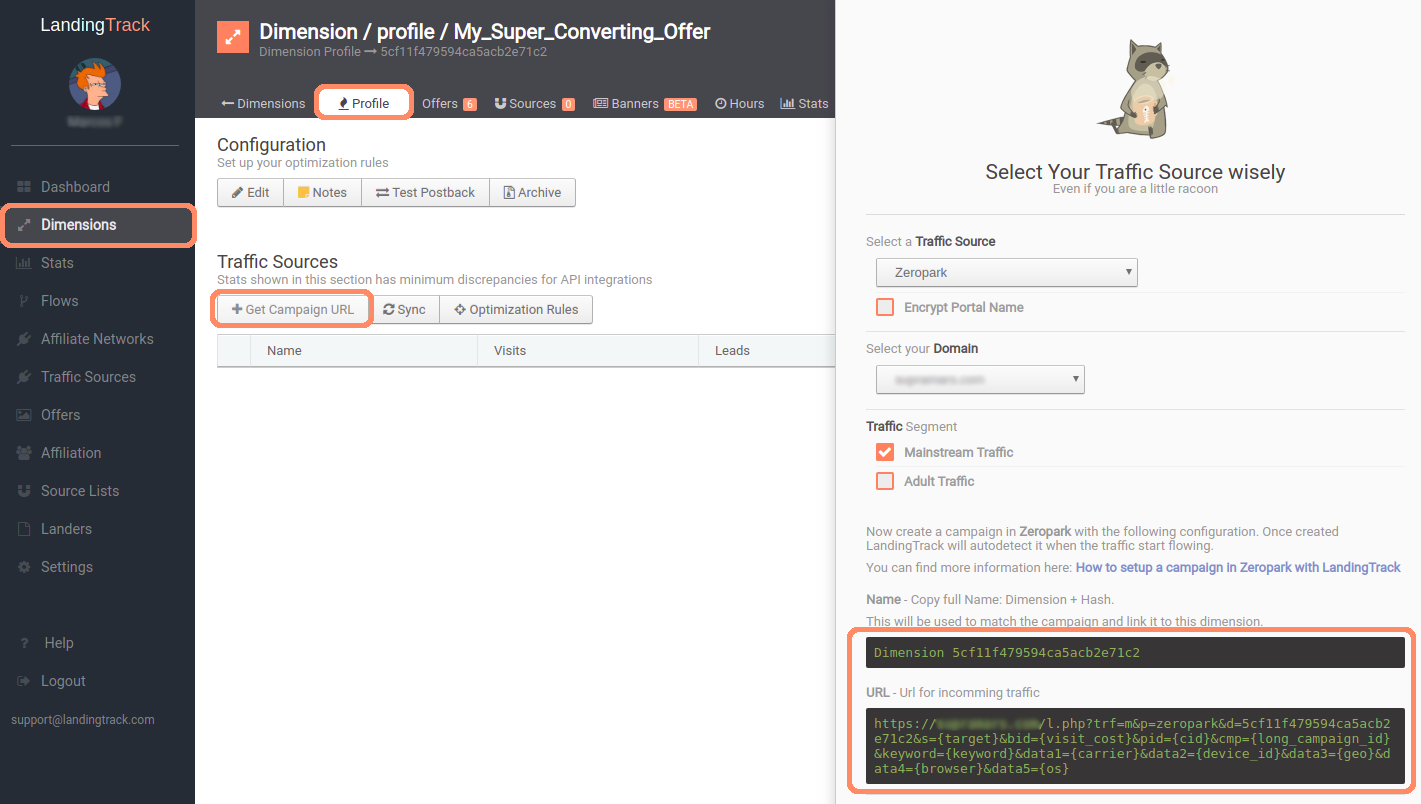
Copy the Full Name and URL we provide to you and paste them on Zeropark Campaign fields.
STEP 3 — Creating a campaign on Zeropark
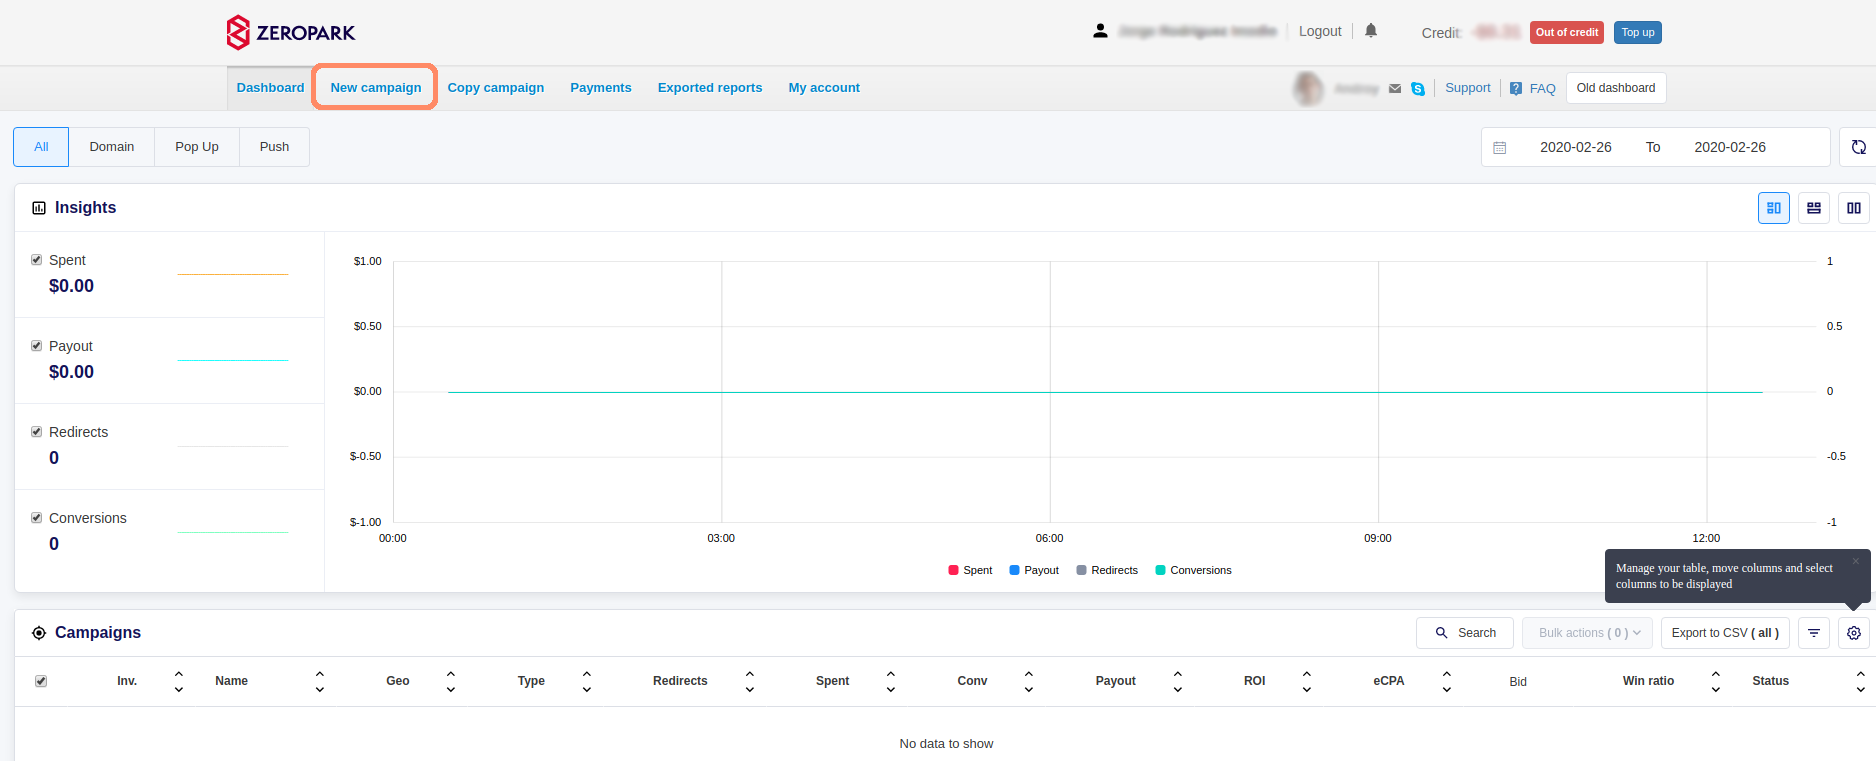
After login to your Zeropark account you will see the following dashboard:
By clicking on New Campaign TAB you will see three different types of campaigns with :
1- Domain: Redirect/zero click
2- POP: Full Page POP traffic
3- Push: Push notification Traffic (Cost-Per-Click-model)
You can also Target Desktop/Mobile by Keyword
Interface speaking — all formats are pretty similar so we will explain just the basic creation:
REMEMBER: Use LandingTrack Dimension name
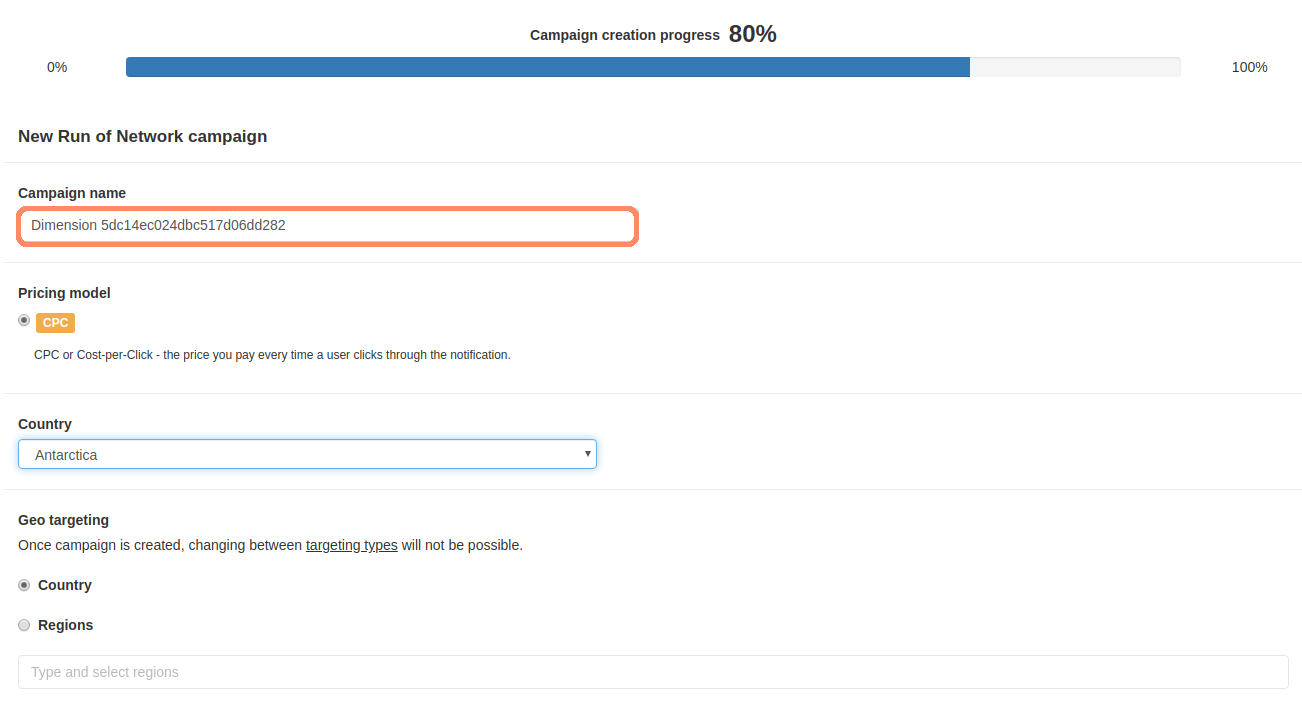
Yes, you are right — Antarctica Target

After naming and selecting Pricing model and country we should focus on our targets & Bid:

Zeropark has several options under Traffic Filters, let’s have a quick look for Desktop & Mobile.
Ps: Mobile has carrier target available
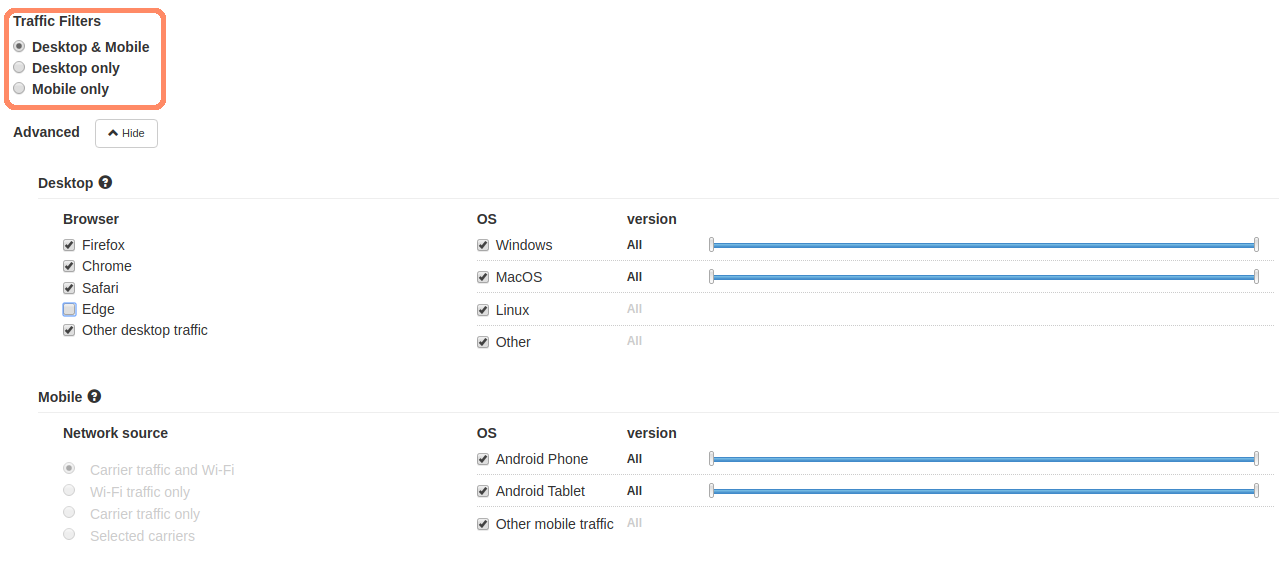
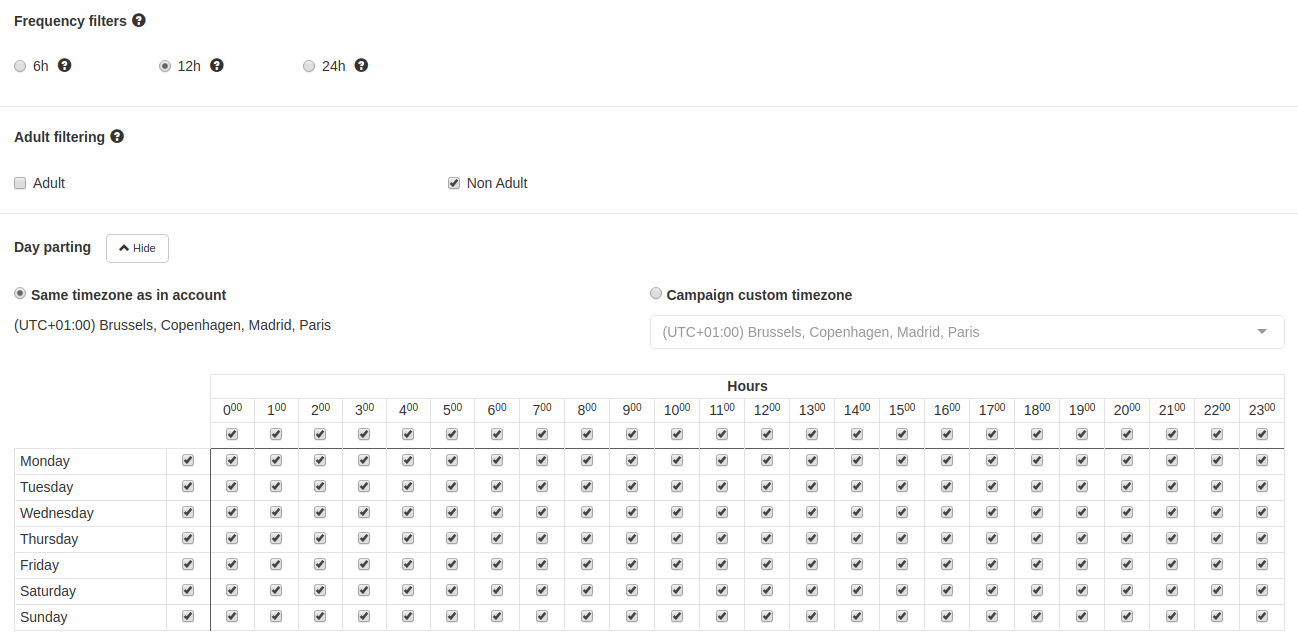
We just need to add our Frequency filter (how many often a visitor will see your ads) and if our ad contains Adult or not.
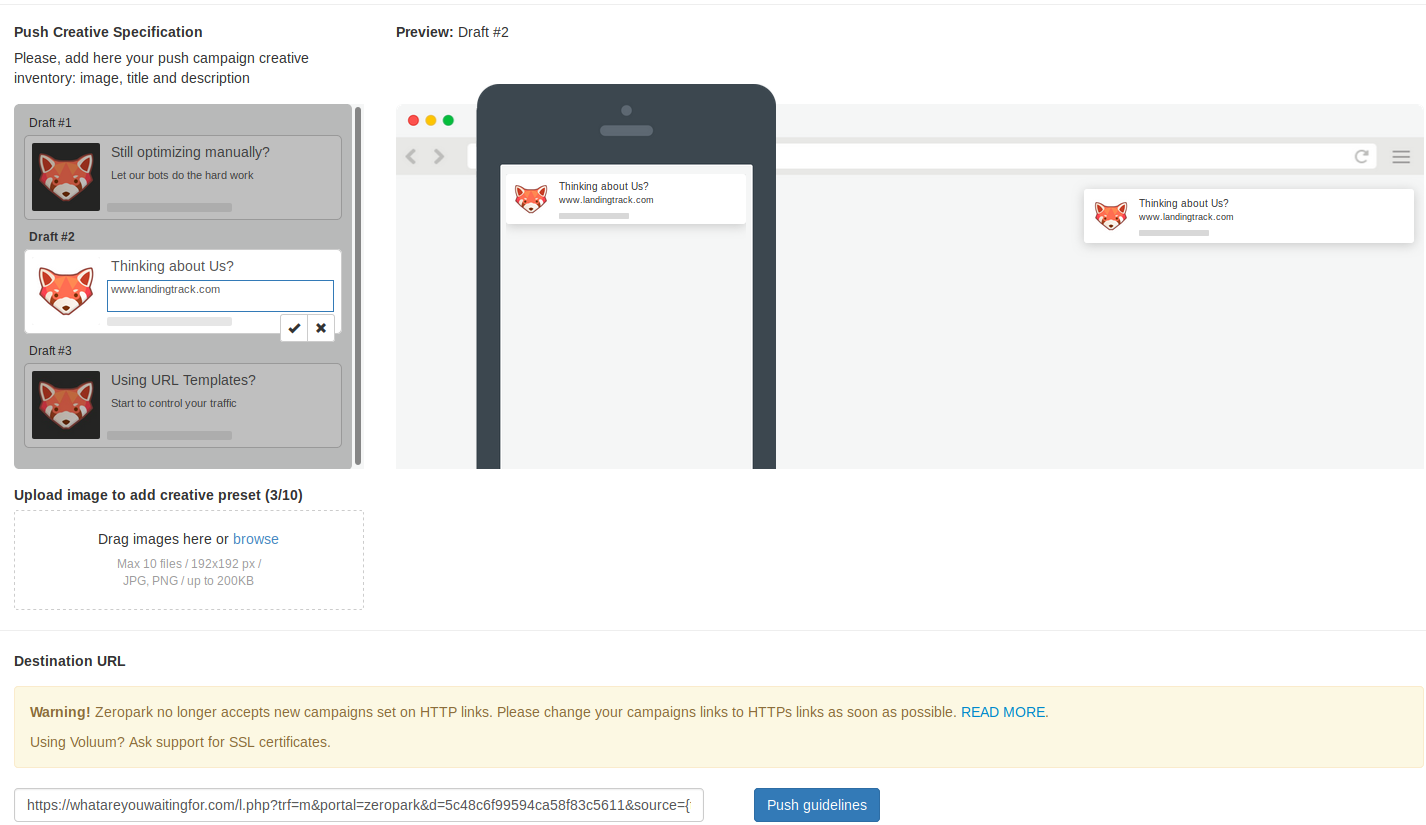
Time for push Ads, you know how it works, prepare your ads and best Title / description
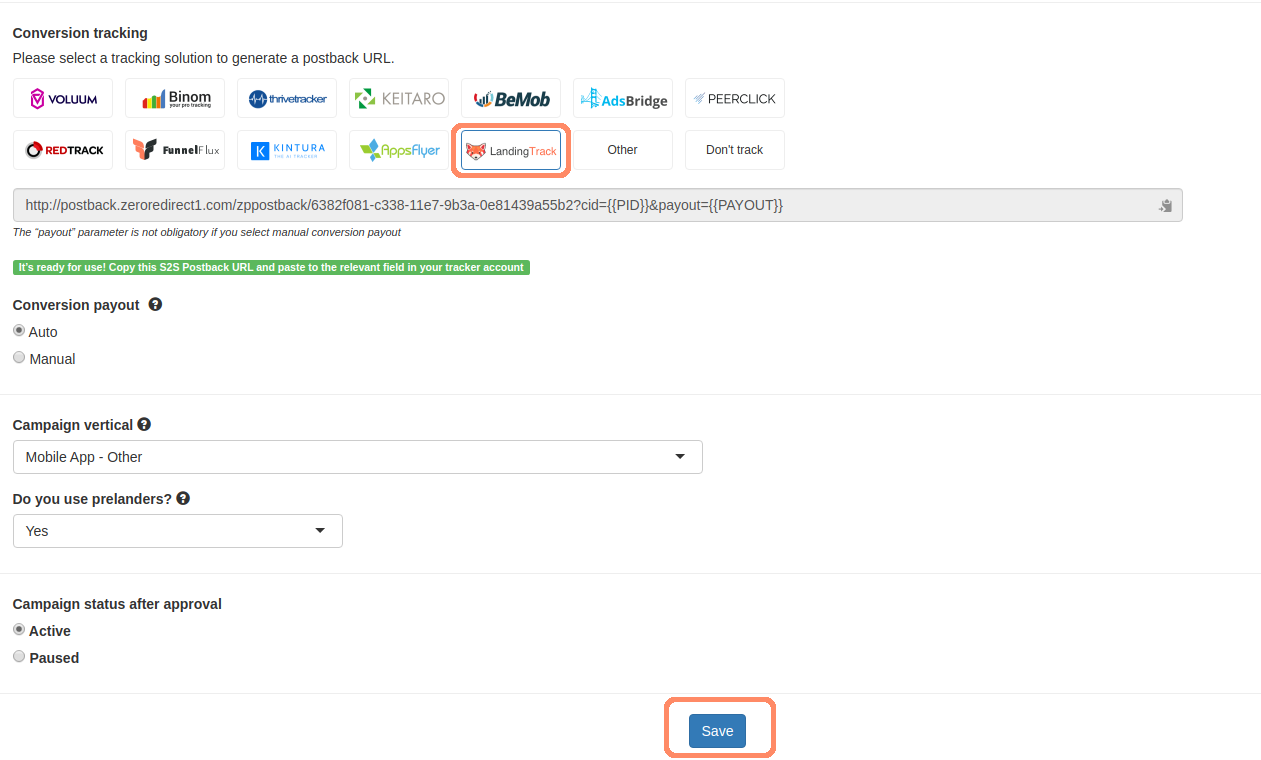
If you would like to notify Zeropark each conversion, feel free — you have seen already how to add their postback on LandingTrack.
Select your Campaign Vertical and select whether if you are running with prelanding or not, then SAVE.
After saving the Campaign just wait for its approval in the meantime let me show to you how to speed up the synchronization with Zeropark.
Go back to LandingTrack and click on the Menu side > Traffic Sources, then click on Zeroparks name and right after that the button> Refresh ( this actually is making a Call to Zeropark to get all your campaigns sync)
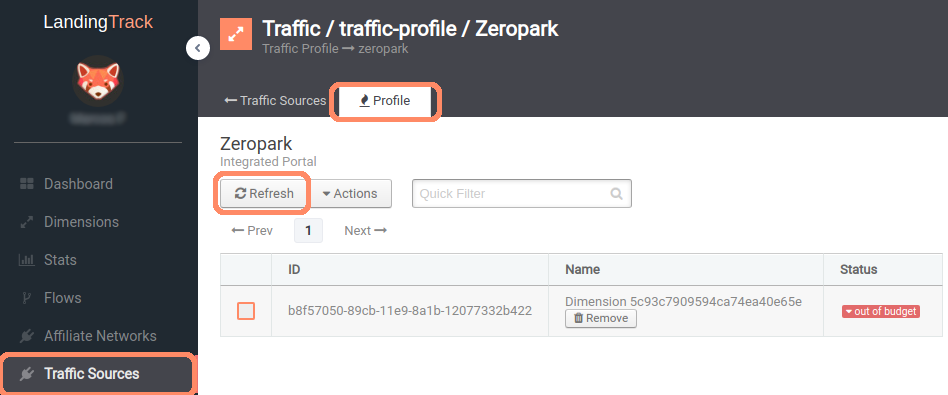
As soon as it finishes the operation you will see the full list of campaign sync between Zeropark and LandingTrack
Back to your Dimension profile, you will see the next view :

If you do not see it, check one of the steps above — you might have spear one.
Everything has been set up already, our advice — Chill, relax and wait for the traffic to start.
These are the benefits of automation and how it can help your daily activity.
Yes¡¡ Zeropark is now fully integrated with LandingTrack so you can start tracking an auto-optimizing all your campaigns.
STEP 1 — Adding Zeropark as Traffic Source
Go to Traffic Source and select >Connect new Source; then select the option >Integrated DSPs, from the list, displayed pick > Zeropark.
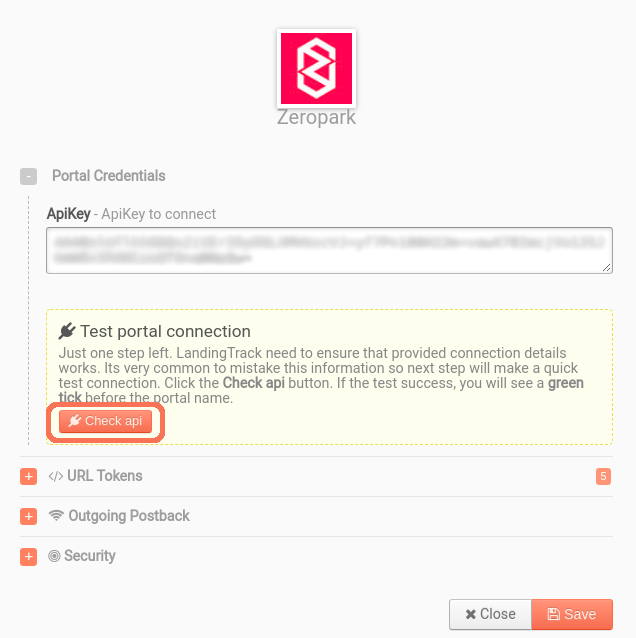
In order to connect with Zeropark you just need to add your API KEY
¿Do you know where to find it?
Let us help you — Go to your Zeropark account, and click on the TAB > My Account. On the left side, select the option Security. You will need to add a new Access Token.
Name your new Access Token and Generate
Write the name and Generate it.
Once you have created we can connect both platforms.
Finally, copy the new Token generated and let's get back to your LandingTrack Account.
The Green Check means we are fully Integrated with Zeropark and we can start automating all your Campaigns but, We will suggest you add some more steps like →Additional Tokens and Notification Postback
We are about to set up some extra Tokens for Zeropark URL.
To do so we just need to click on the button > Edit
Each time you want to generate a URL for Zeropark we will be provided to you by default the following URL:
“portal=zeropark&s={target}&b={creative_number}&bid={visit_cost}&pid={cid}&cmp={long_campaign_id}&keyword={keyword}”
The following Parameters and Tokens will be provided by default for each Zeropark URL :
- source={target}— The source/ Site ID which presented your ad
- bid={visit_cost}
- pid={cid} — For conversion tracking
- cmp={campaign_id} — Sends campaign name
- keyword={keyword} — The keyword sent per impression in a RON campaign
- b={creative_number}
1.2 — Postback (Optional):
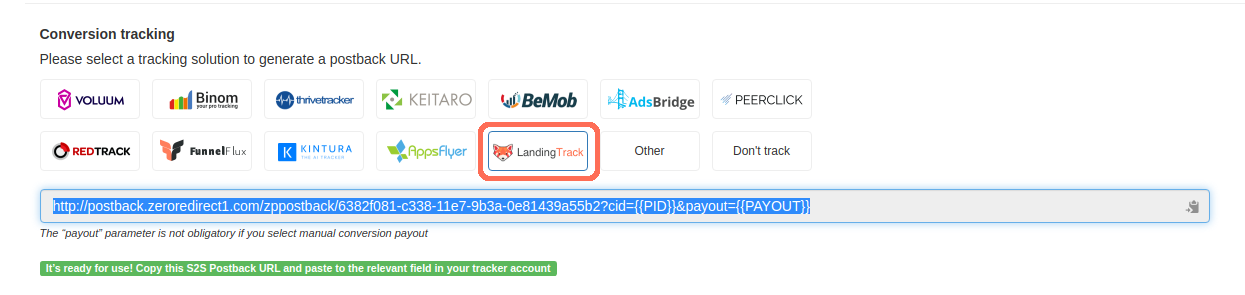
We are missing only one thing to finish the full integration with Zeropark, adding their postback.
Although this Time, Zeropark has done a great job by adding us on their platform. On campaign creation you will find our Red Fox:
Just select and Copy
Back to LandingTrack > Zeropark > button Edit and section > Outgoing Postback
Easy Right? Let’s move to our next step then.
STEP 2 — Creating a campaign (Dimension) on LandingTrack
Remember you have three different ways to create a dimension.
1- From an existing Flow — see how
2- From Menu side > Offer — see how
3- From Dimension Menu: see bellow
Click on button > New Dimension
You will be redirected to our Dimension creator.
First, we will recommend you to click on the pencil right bellow the bucket to add your Campaign Name, at the same time you will see displayed all your offers with the name and status (right side), click on the left arrow button to add them to your Dimension.
As you can see, now we have added two offer on our dimension and if we like to add more we just need to click on the left arrow next to the offer “Play Sweeptakes US_cpa”
You will be redirected to its profile:
Want to know everything About Dimensions? see full guide HERE
— Dimension Configuration Options:
See full guide HERE
— Dimension Traffic Sources Section:
See full guide HERE
— Optimization Rules:
As you may know already, LandingTrack can optimize the traffic base on different rules, here its when automation comes into action :
You can always check our guide here — to refresh the concept.
— Getting the URL and Campaign name for Zeropark:
Click on button > Get Campaign URL and select Zeropark as your traffic source. Copy the name and URL we provide you with:
Copy the Full Name and URL we provide to you and paste them on Zeropark Campaign fields.
STEP 3 — Creating a campaign on Zeropark
After login to your Zeropark account you will see the following dashboard:
By clicking on New Campaign TAB you will see three different types of campaigns with :
1- Domain: Redirect/zero click
2- POP: Full Page POP traffic
3- Push: Push notification Traffic (Cost-Per-Click-model)
You can also Target Desktop/Mobile by Keyword
Interface speaking — all formats are pretty similar so we will explain just the basic creation:
REMEMBER: Use LandingTrack Dimension name
Yes, you are right — Antarctica Target
After naming and selecting Pricing model and country we should focus on our targets & Bid:
Zeropark has several options under Traffic Filters, let’s have a quick look for Desktop & Mobile.
Ps: Mobile has carrier target available
We just need to add our Frequency filter (how many often a visitor will see your ads) and if our ad contains Adult or not.
Time for push Ads, you know how it works, prepare your ads and best Title / description
If you would like to notify Zeropark each conversion, feel free — you have seen already how to add their postback on LandingTrack.
Select your Campaign Vertical and select whether if you are running with prelanding or not, then SAVE.
After saving the Campaign just wait for its approval in the meantime let me show to you how to speed up the synchronization with Zeropark.
Go back to LandingTrack and click on the Menu side > Traffic Sources, then click on Zeroparks name and right after that the button> Refresh ( this actually is making a Call to Zeropark to get all your campaigns sync)
As soon as it finishes the operation you will see the full list of campaign sync between Zeropark and LandingTrack
Back to your Dimension profile, you will see the next view :
If you do not see it, check one of the steps above — you might have spear one.
Everything has been set up already, our advice — Chill, relax and wait for the traffic to start.
These are the benefits of automation and how it can help your daily activity.
Here we come again, leading innovation.
This one is a Big Milestone for LandingTrack and for revcontent also!!

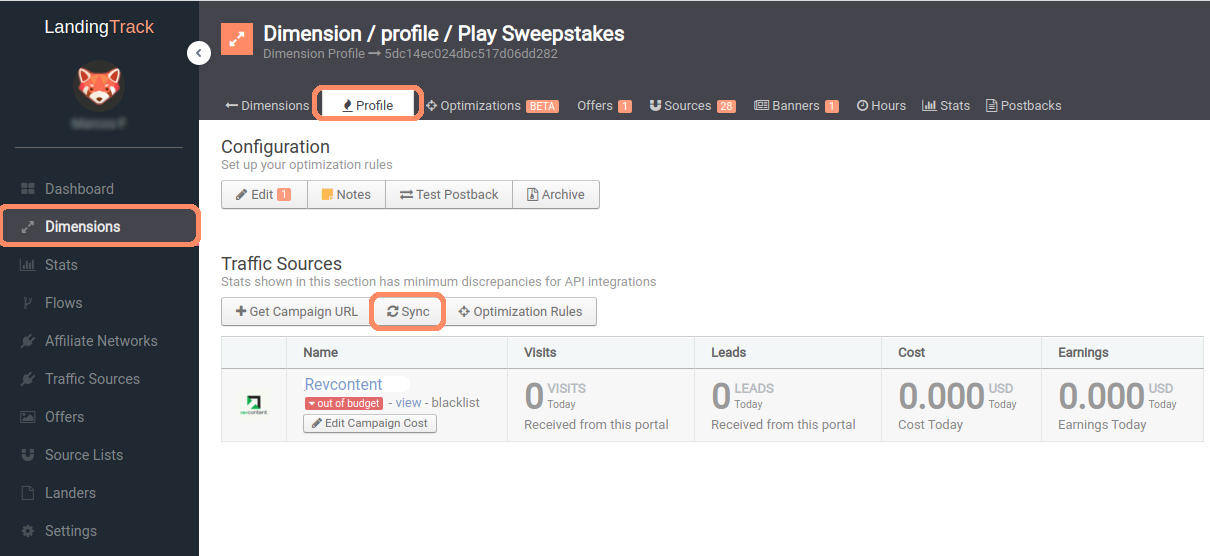
STEP 1 — Adding Revcontent as Integrated Traffic Source
Go to Traffic Source on the menu and click on > +Connect new Source; from the list of options select > Integrated DPSs
* You may have to contact their support team in order to activate the API connection.
Look for Revcontent. In order to connect with them, you will need a total of 2 fields to be filled.
1- Your Revcontent Client ID(email) for the field Users
2- Your Revcontent Param ID for the field Password
¿Where can I get those Credentials on Revcontent?
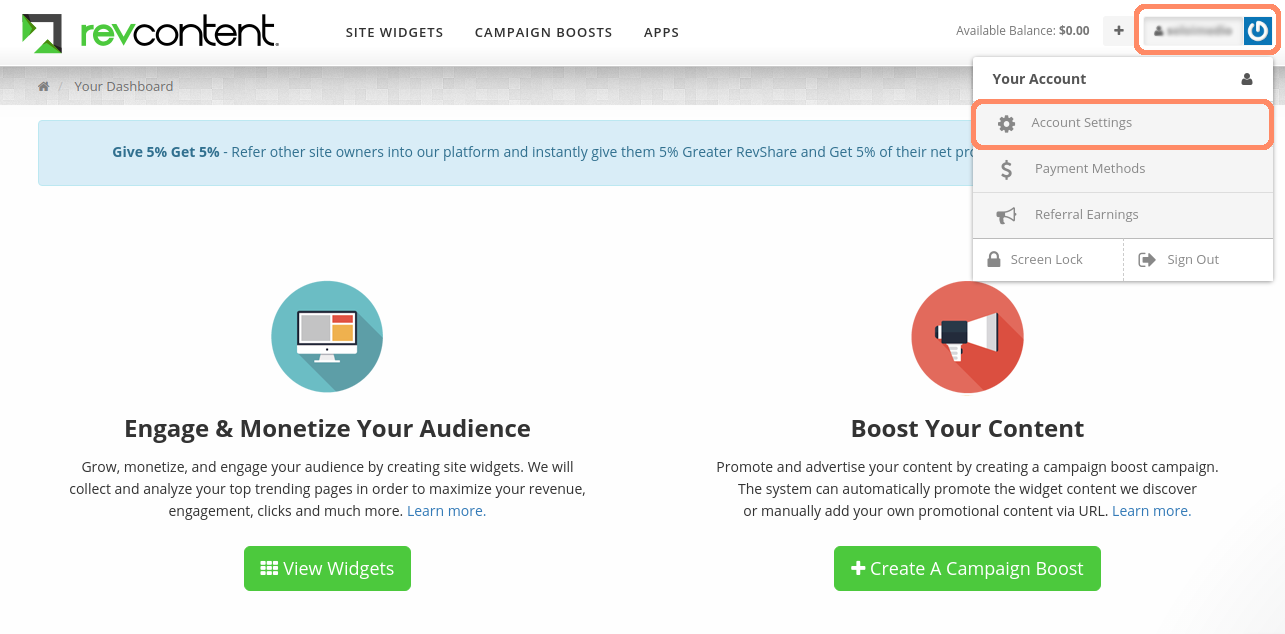
First, you should talk with your AM or just message directly to the chatbot on your Dashboard asking for the API access. Once Revconten team granted you the access, go to your Profile and select > Account settings
On Account settings just scroll down to the bottom
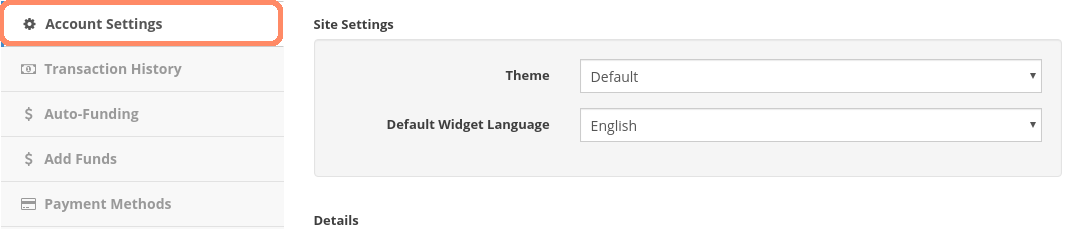
You will find your Stats API credentials to connect your LandingTrack account with Revcontent one. Client ID and Secret ID

Back to your LandingTrack Account > add your credentials
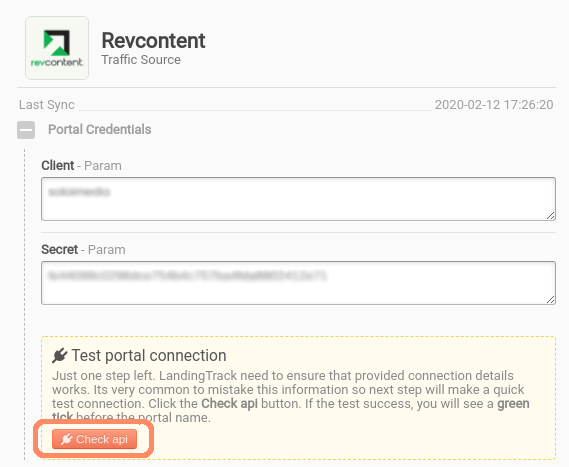
Then click on > Check api
Green Check!!!! meaning that we are fully Integrated with Revcontent.
We will suggest you add some more steps such us — URL Tokens and Outgoing Postback
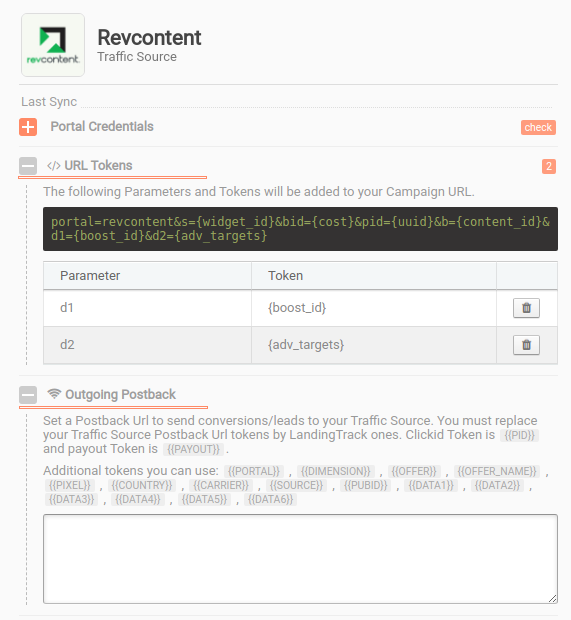
Now that we are synchronized with Revcontent let’s have a look on > Edit button.
The following Parameters and Tokens will be provided by default for each Revcontent URL :
portal=revcontent&s={widget_id}&bid={cost}&pid={uuid}&b={content_id}
STEP 2 — Creating a campaign (Dimension) on LandingTrack
Remember you have three different ways to create a dimension.
1- From an existing Flow — see how
2- From Menu Offers — see how
3- From Dimension Menu: see bellow
Click on button > New Dimension
You will be redirected to our Dimension creator.
First, we will recommend you to click on the pencil right bellow the bucket to add your Campaign Name, at the same time you will see displayed all your offers with the name and status (right side), click on the left arrow button to add them to your Dimension.

As you can see, now we have added two offer on our dimension and if we like to add more we just need to click on the left arrow next to the offer “Play Sweeptakes US_cpa”
You will be redirected to its profile:
Want to know everything About Dimensions? see full guide HERE
Dimension: Configuration Options:
See full guide HERE
Dimension: Traffic Sources Section:
See full guide HERE
Optimization Rules:
As you may know already, LandingTrack can optimize the traffic base on different rules, here its when automation comes into action :

— Campaign Optimization Rules.
You can always check our guide — to refresh the concept.
— — — — — — — — — — — — — —
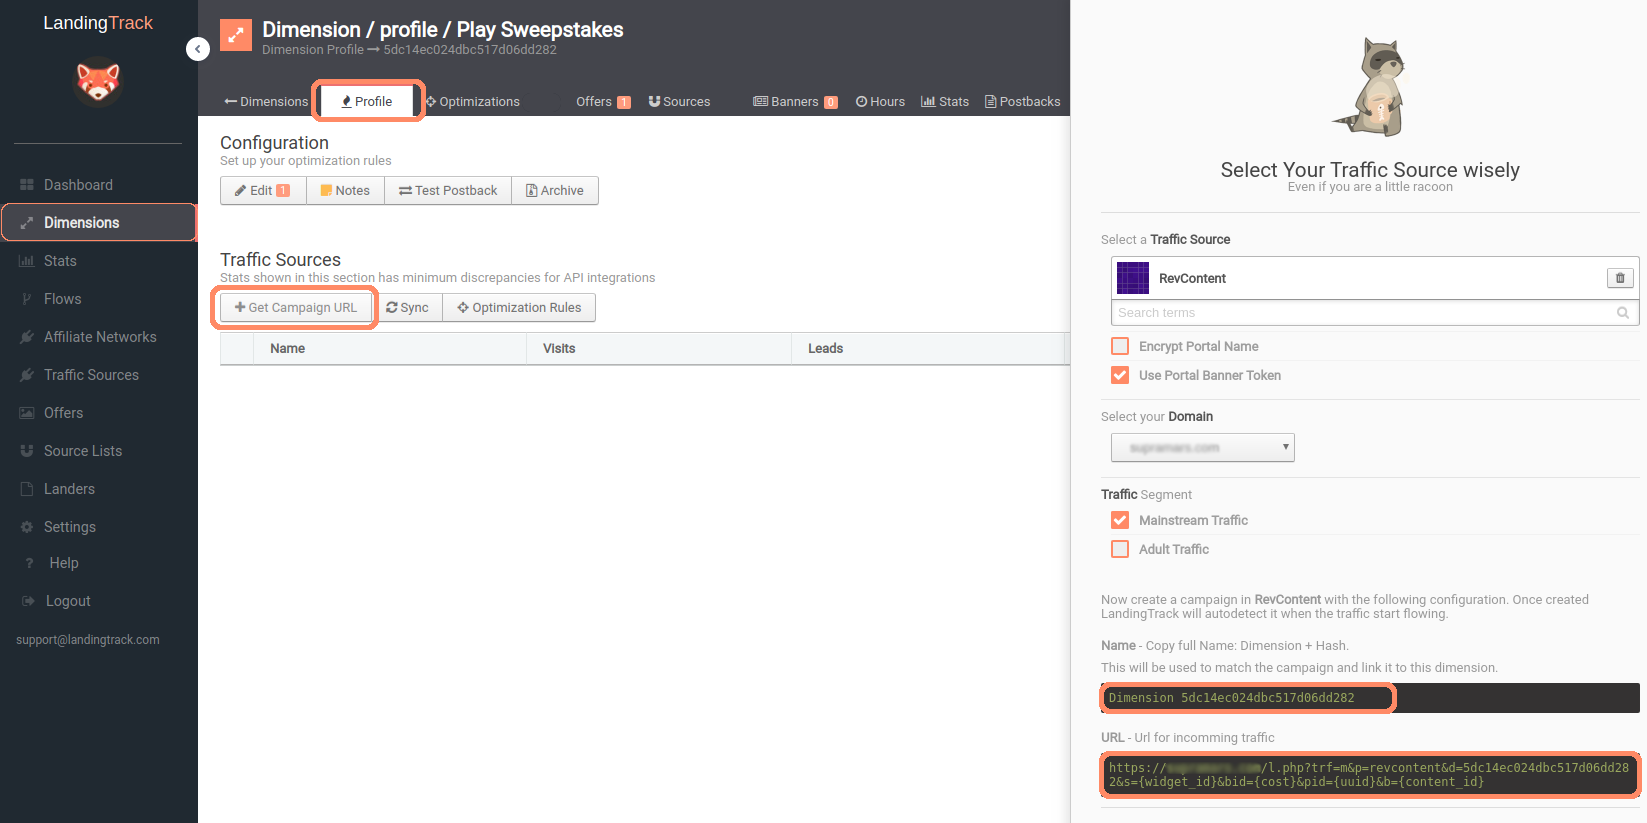
Getting the URL for Revcontent
Click on button > + Get Campaign URL
Select Revcontent as your traffic source, tick Encrypt Portal Name, and Banner Token, then select your Domain and your Traffic Segment;
Finally, copy the Campaign Name and URL we provide you with:
IMPORTANT: Copy the Full name that we provide you with and the Full URL:
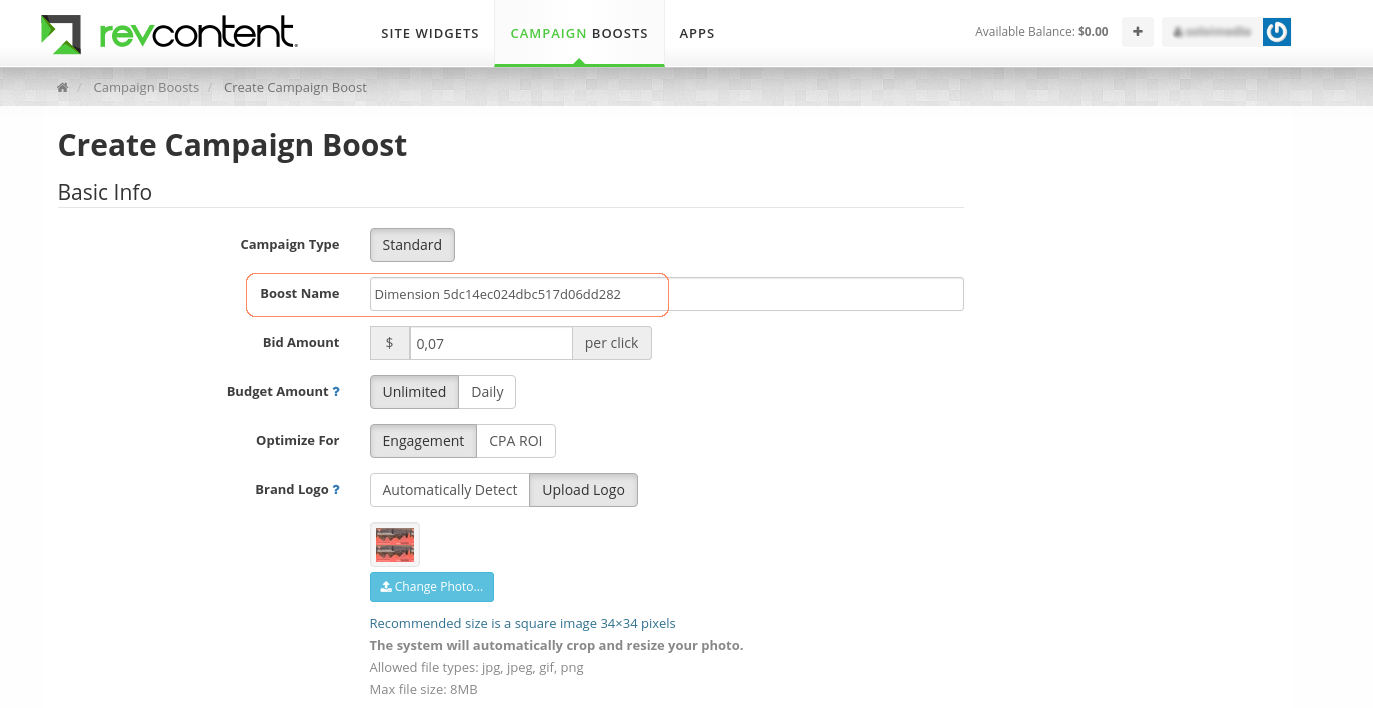
STEP 3 — Creating a campaign on Revcontent
On Revcontent Dashboard you just need to click on CAMPAIGN BOOST > after that a new panel will show to you the Basic info.
Remember that you must use our Campaign naming.
Then you can select your Scheduling and Targeting.
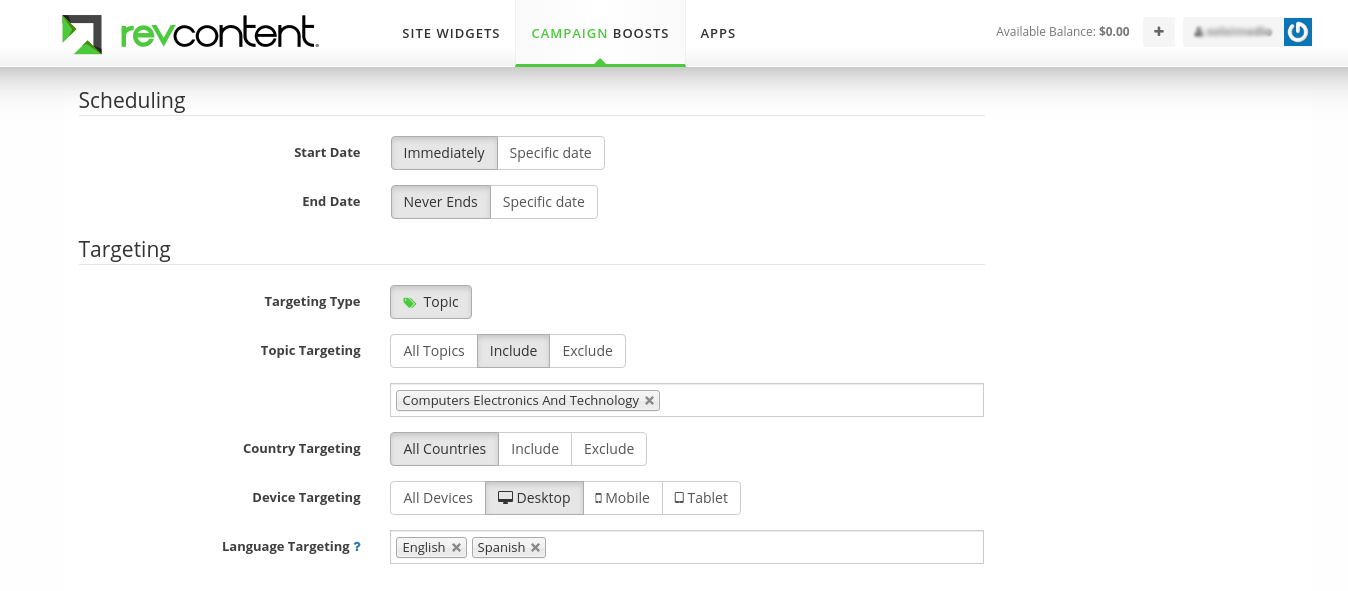
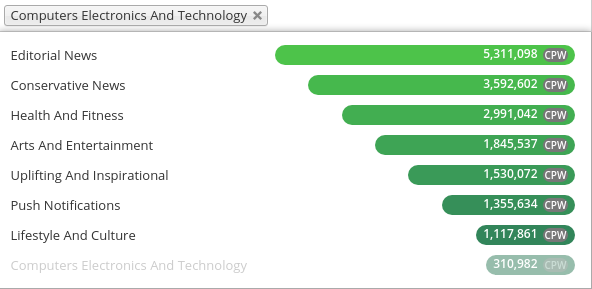
Revcontent has the following Topic targetings in order for you to match your ads with the right content
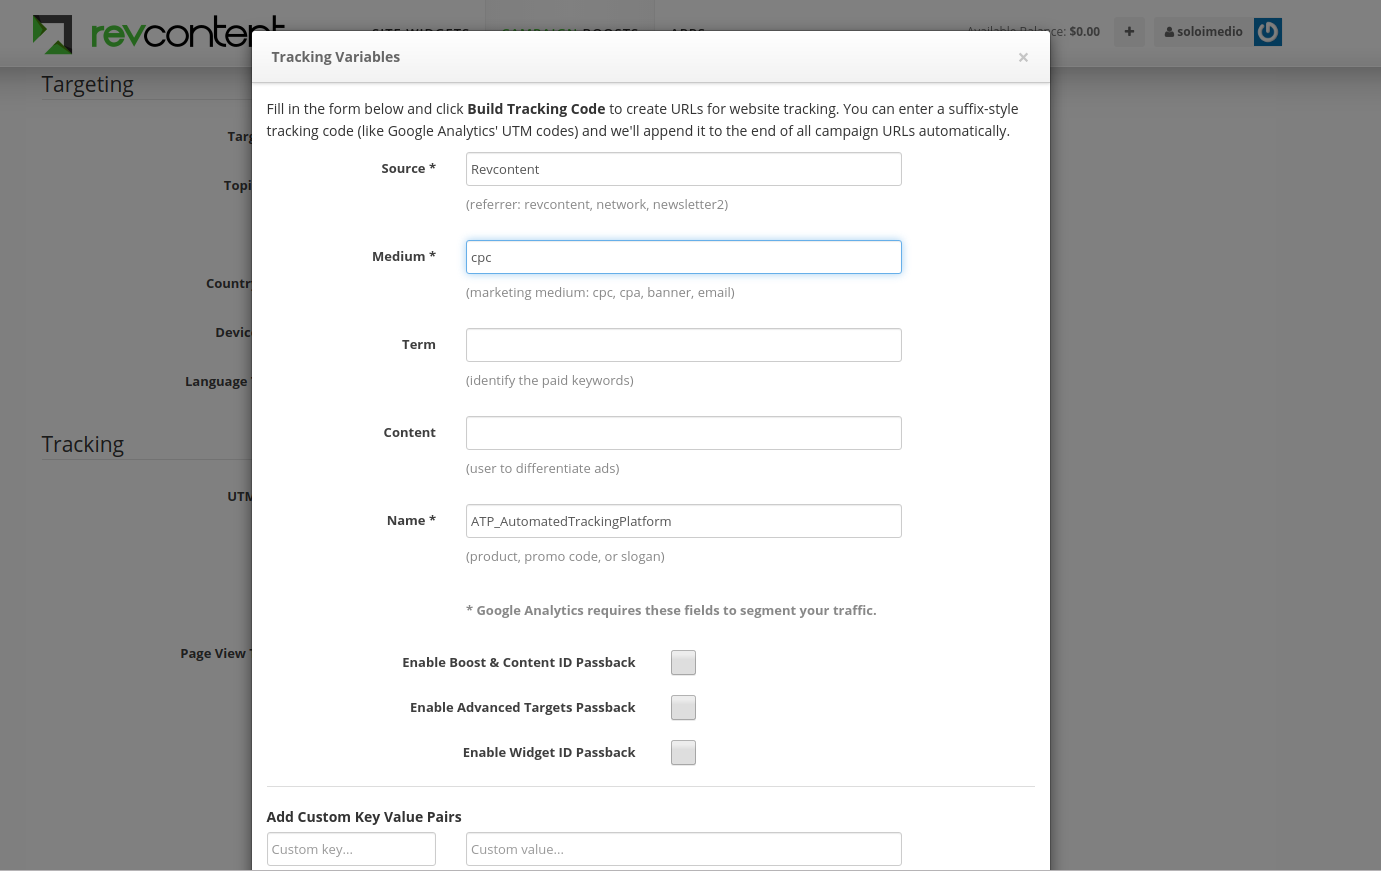
You can set up your UTM tracking and also grab a script to keep the track on your website.
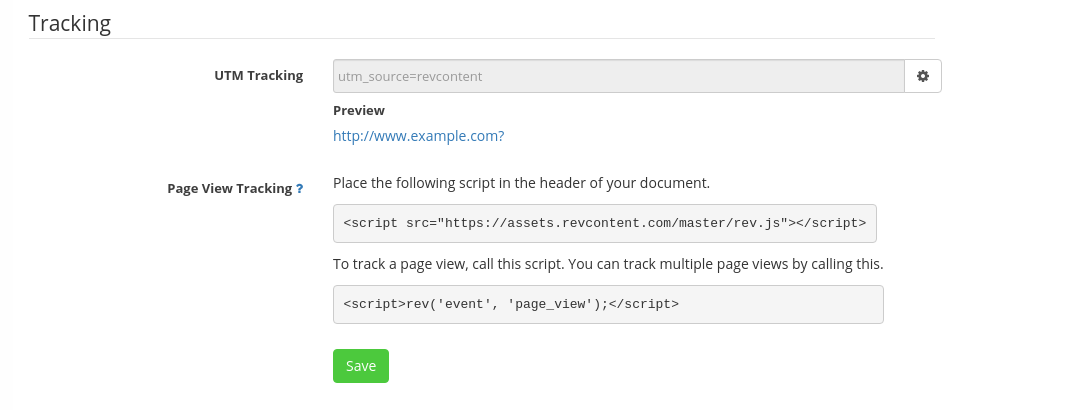
This is the panel to configure your UTM Tracking
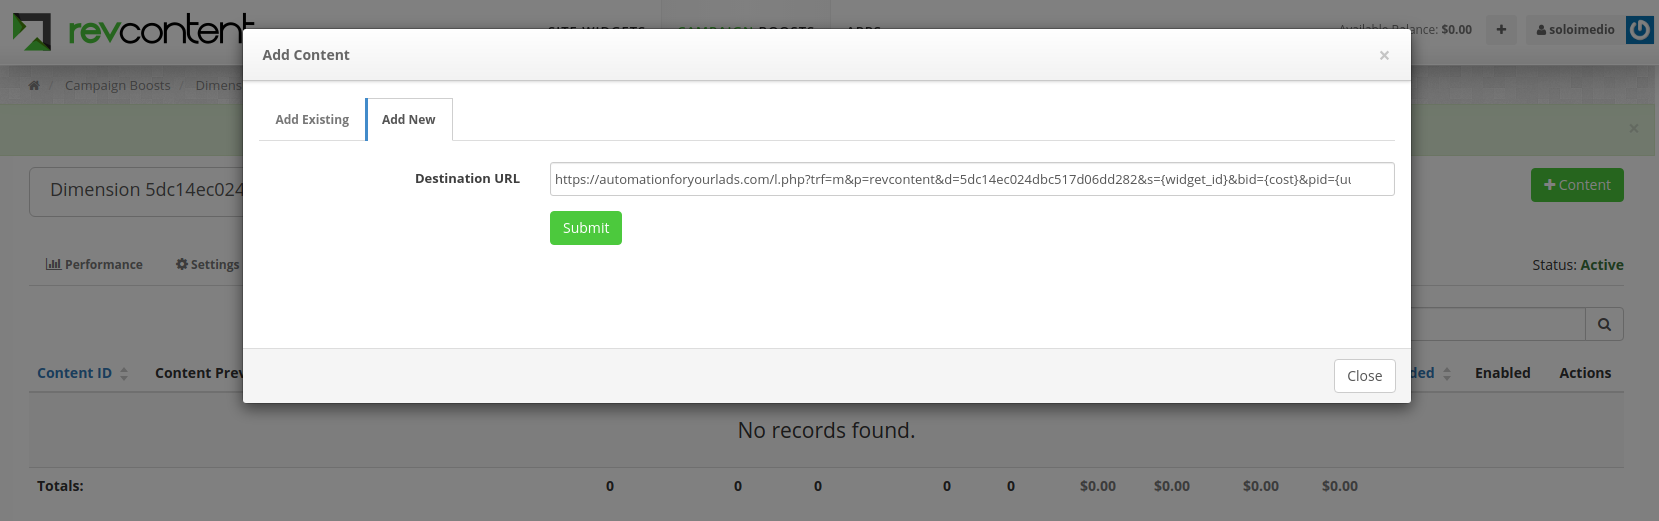
Once you save all your campaign details we can then add our content
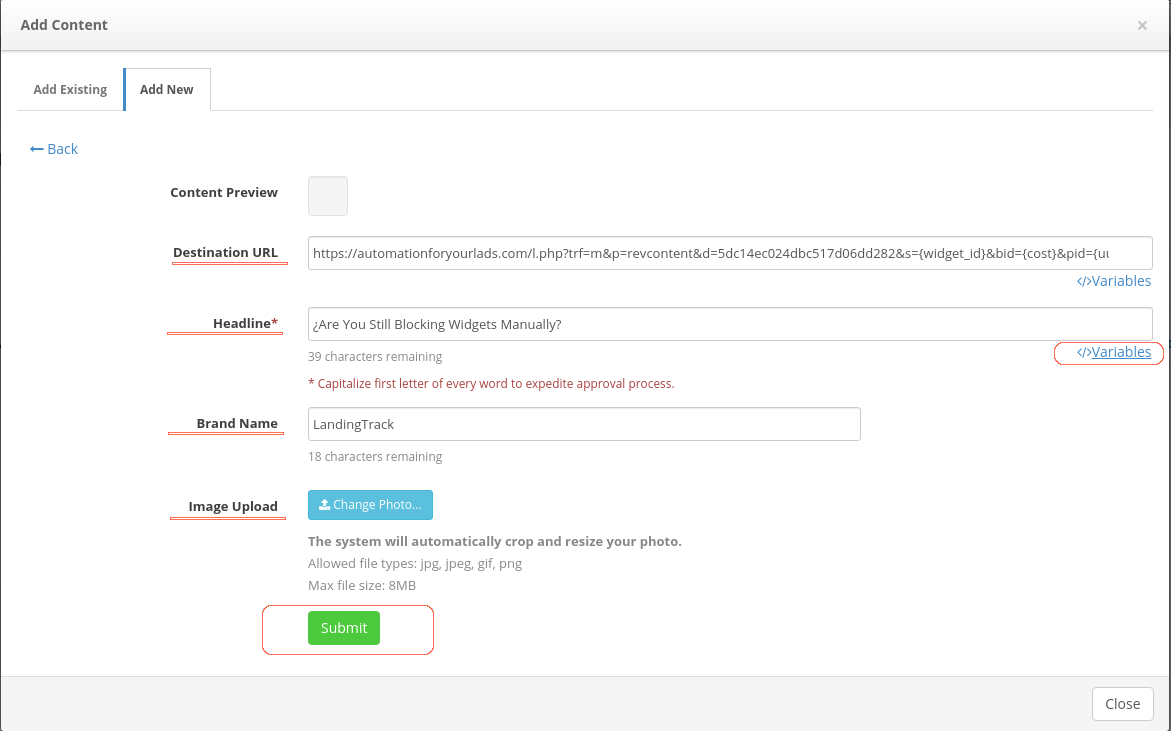
By clicking on > Add new you can set up your Campaign URL > the one provided by LandingTrack to show your ads and track your clicks.
Once you submit your Destination URL you can start building your ads. Remember to add your Headline and Brad name along with your Ad/Image, then > Submit
Once you have finished, your campaign will need to be verified by Revconten team and is the time to get back to LandingTrack and work on your optimization rules, and Dimension set up.
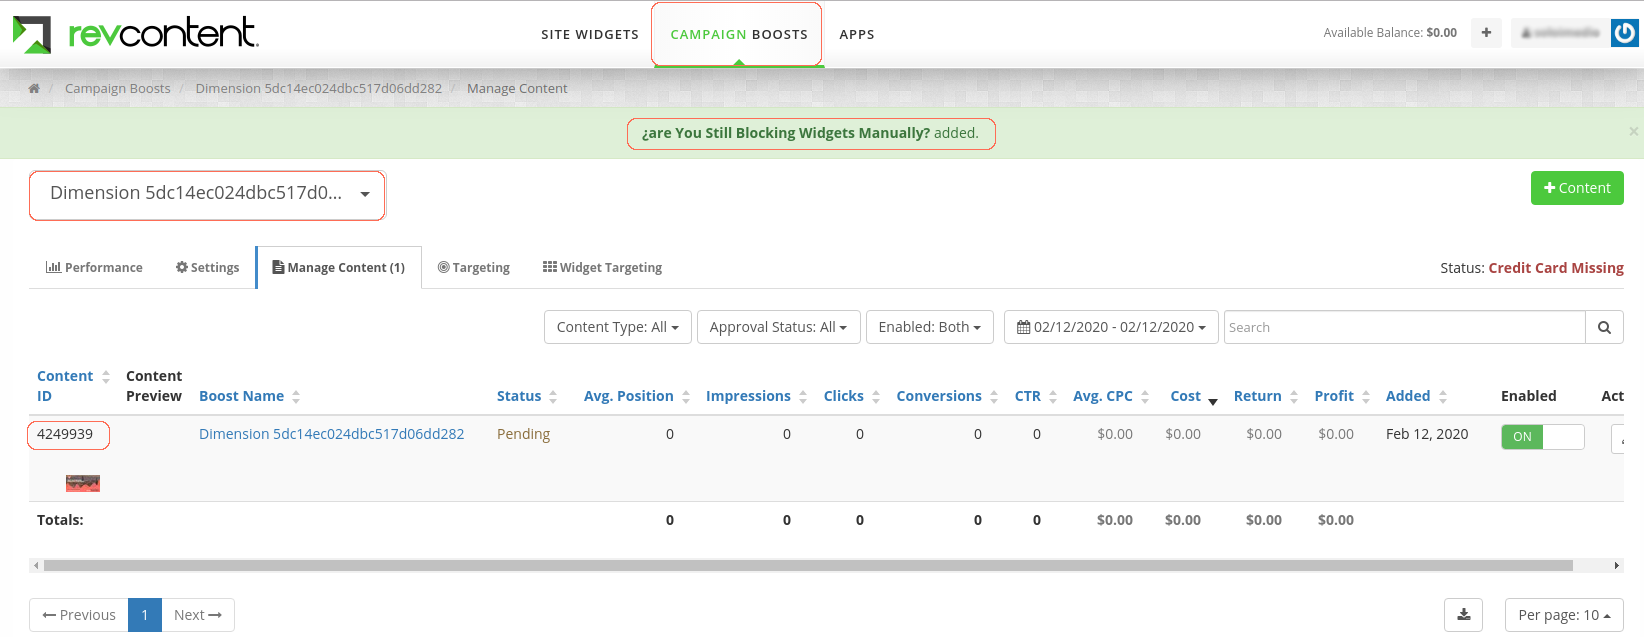
Copy your Content ID number and back to your Dimension Profile click on button > Sync > select Revcontent and Paste your ID then save.
Bravo¡
Everything has been set up already, our advice — Chill, relax and wait for the traffic to start.
These are the benefits of automation and how it can help your daily activity.
What are you waiting to Start automating all your Native Campaigns with LandingTrack?
This one is a Big Milestone for LandingTrack and for revcontent also!!
STEP 1 — Adding Revcontent as Integrated Traffic Source
Go to Traffic Source on the menu and click on > +Connect new Source; from the list of options select > Integrated DPSs
* You may have to contact their support team in order to activate the API connection.
Look for Revcontent. In order to connect with them, you will need a total of 2 fields to be filled.
1- Your Revcontent Client ID(email) for the field Users
2- Your Revcontent Param ID for the field Password
¿Where can I get those Credentials on Revcontent?
First, you should talk with your AM or just message directly to the chatbot on your Dashboard asking for the API access. Once Revconten team granted you the access, go to your Profile and select > Account settings
On Account settings just scroll down to the bottom
You will find your Stats API credentials to connect your LandingTrack account with Revcontent one. Client ID and Secret ID
Back to your LandingTrack Account > add your credentials
Then click on > Check api
Green Check!!!! meaning that we are fully Integrated with Revcontent.
We will suggest you add some more steps such us — URL Tokens and Outgoing Postback
Now that we are synchronized with Revcontent let’s have a look on > Edit button.
The following Parameters and Tokens will be provided by default for each Revcontent URL :
portal=revcontent&s={widget_id}&bid={cost}&pid={uuid}&b={content_id}
- s={widget_id} — (the one need it in order to track the site)
- bid={cost} — The cost of the visit (how much you pay for a click)
- b={content_id} — ID of the banner displayed.
- pid={uuid} — Clickid for the postback
STEP 2 — Creating a campaign (Dimension) on LandingTrack
Remember you have three different ways to create a dimension.
1- From an existing Flow — see how
2- From Menu Offers — see how
3- From Dimension Menu: see bellow
Click on button > New Dimension
You will be redirected to our Dimension creator.
First, we will recommend you to click on the pencil right bellow the bucket to add your Campaign Name, at the same time you will see displayed all your offers with the name and status (right side), click on the left arrow button to add them to your Dimension.
As you can see, now we have added two offer on our dimension and if we like to add more we just need to click on the left arrow next to the offer “Play Sweeptakes US_cpa”
You will be redirected to its profile:
Want to know everything About Dimensions? see full guide HERE
Dimension: Configuration Options:
See full guide HERE
Dimension: Traffic Sources Section:
See full guide HERE
Optimization Rules:
As you may know already, LandingTrack can optimize the traffic base on different rules, here its when automation comes into action :
— Campaign Optimization Rules.
You can always check our guide — to refresh the concept.
— — — — — — — — — — — — — —
Getting the URL for Revcontent
Click on button > + Get Campaign URL
Select Revcontent as your traffic source, tick Encrypt Portal Name, and Banner Token, then select your Domain and your Traffic Segment;
Finally, copy the Campaign Name and URL we provide you with:
IMPORTANT: Copy the Full name that we provide you with and the Full URL:
STEP 3 — Creating a campaign on Revcontent
On Revcontent Dashboard you just need to click on CAMPAIGN BOOST > after that a new panel will show to you the Basic info.
Remember that you must use our Campaign naming.
Then you can select your Scheduling and Targeting.
Revcontent has the following Topic targetings in order for you to match your ads with the right content
You can set up your UTM tracking and also grab a script to keep the track on your website.
This is the panel to configure your UTM Tracking
Once you save all your campaign details we can then add our content
By clicking on > Add new you can set up your Campaign URL > the one provided by LandingTrack to show your ads and track your clicks.
Once you submit your Destination URL you can start building your ads. Remember to add your Headline and Brad name along with your Ad/Image, then > Submit
Once you have finished, your campaign will need to be verified by Revconten team and is the time to get back to LandingTrack and work on your optimization rules, and Dimension set up.
Copy your Content ID number and back to your Dimension Profile click on button > Sync > select Revcontent and Paste your ID then save.
Bravo¡
Everything has been set up already, our advice — Chill, relax and wait for the traffic to start.
These are the benefits of automation and how it can help your daily activity.
What are you waiting to Start automating all your Native Campaigns with LandingTrack?
It's been a while but Team has been working hard to get this.
New Integration with the Affiliate Network Reflex Affiliates

Reflex Affiliates is an internationally renowned affiliation platform providing exclusive campaigns from top converting verticals such as:
Dating
Gaming
Finance
Nutra
Home improvements.
Join us now to benefit from our experienced team and faster payment to scale your campaigns like never before.
Adding Reflex Affiliates on LandingTrack
Now that we are sure we will be getting all the conversions we can move on with Reflex Affiliates integration. To do so, login into your LandingTrack Account and click on > Affiliate Networks > +Activate a new Network

From the list below, select Reflex Affiliates.
In order to connect with them you need to add :
1- Your API KEY (Check below where to find it)
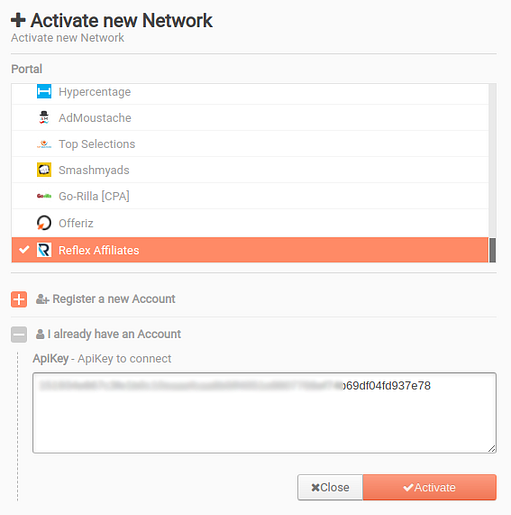
- Getting the API Key:
Although we have seen it before, just in case. Ask your AM to get you access first in case you do not see it or log in to your Reflex Affiliates Account and click on >Tools > then select API’s to see if it enabled:
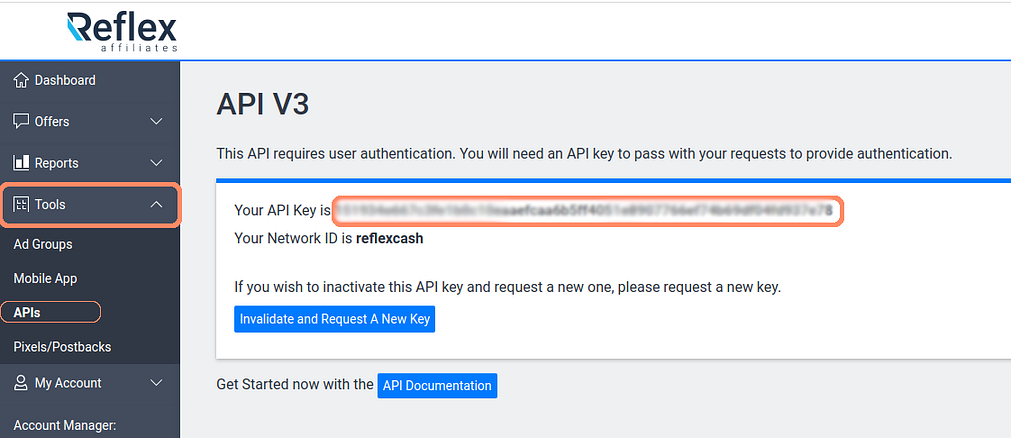
Copy your API Key and let’s go back to LandingTrack
Then click on Activate and you will see the following information, just click on check api.
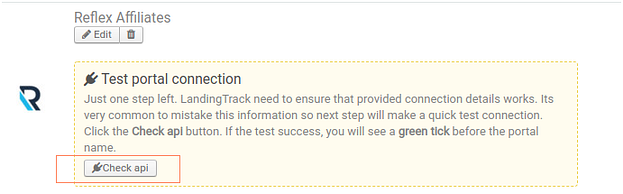
Once you have confirmed you should see the Green check
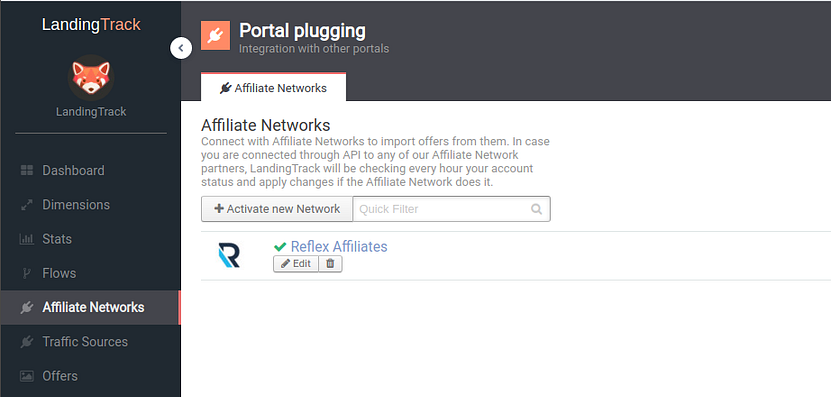
And that’s all.
Before starting getting/importing offers we will recommend you to set up your postback
Setting up your Postback:
No postback = No money on your tracker.
Let’s quickly check again how to get your LandingTrack postback.
On menu side > Settings, just select your domain and the Postback created will be the one to add on Reflex Affiliates panel.
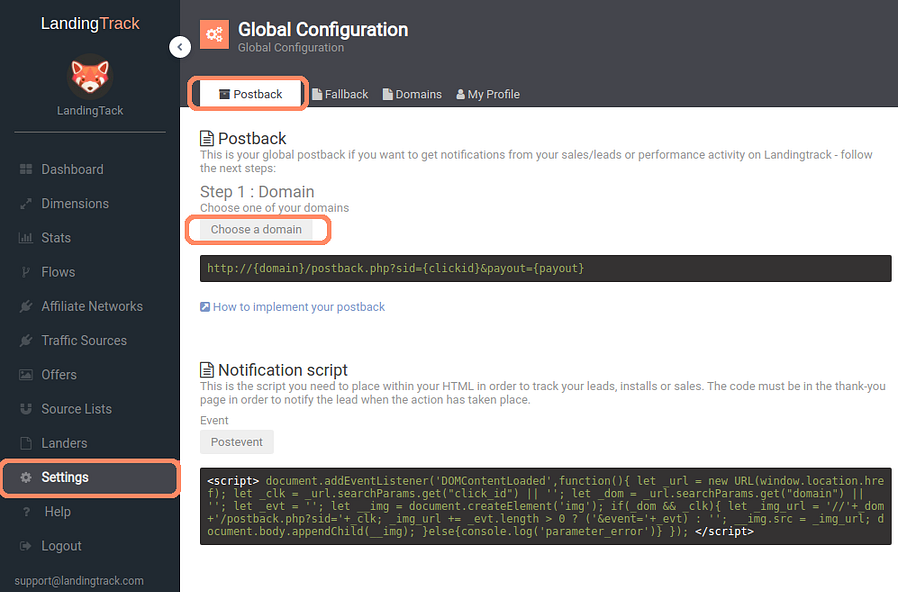
Once you have generated you just need to get in touch with your Account Manager and share it. They will take care of the implementation.
— — — — — — — — — — — — — — — — — — — — — — — — — — — — — — —
Upload Reflex Affiliates offers on LandingTrack

We just need to click on Reflex Affiliates name to access it’s the profile:
In case you do not see offers yet this could be the reason
1- You do not have any offer approved yet > check with you Reflex Affiliates AM.
2- Just click on the button > Update Offers to force LandingTrack to check your approved ones.
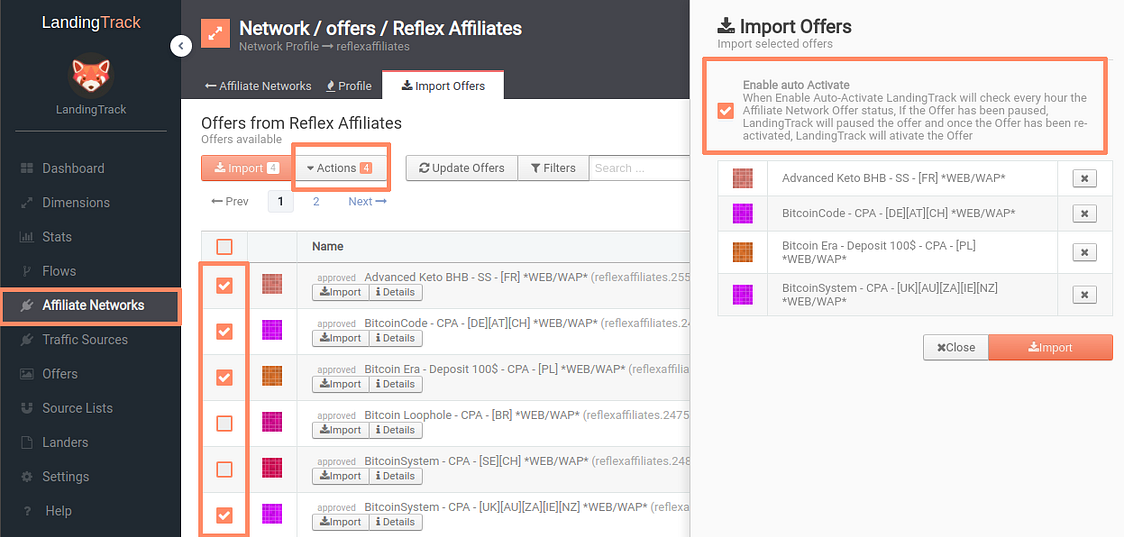
Tick the ones you would like to import and select the Actions button, then Import > Before import then you might want to tick the box “Enable auto Activate” so LandingTrack in case the offers got pause will activate once they become active again.
Once you Import them all the offers will appear on your Offers section > Menu side > Offers
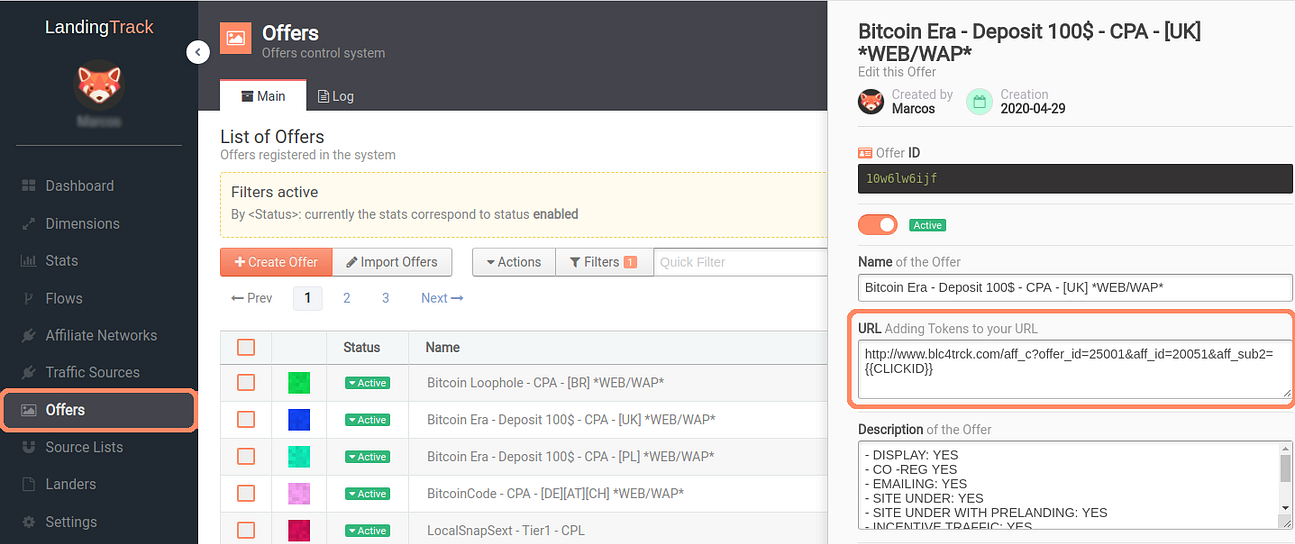
How do we create a campaign for our new offers?
Just tick the one/s you would like to send traffic to:
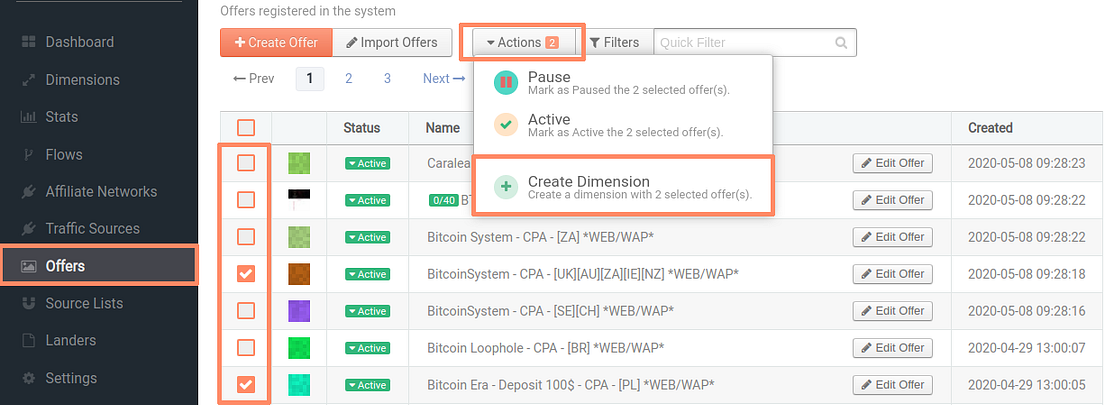
Once you click on “Create Dimension” you will be redirected to your Dimension Profile, ready to start your campaign
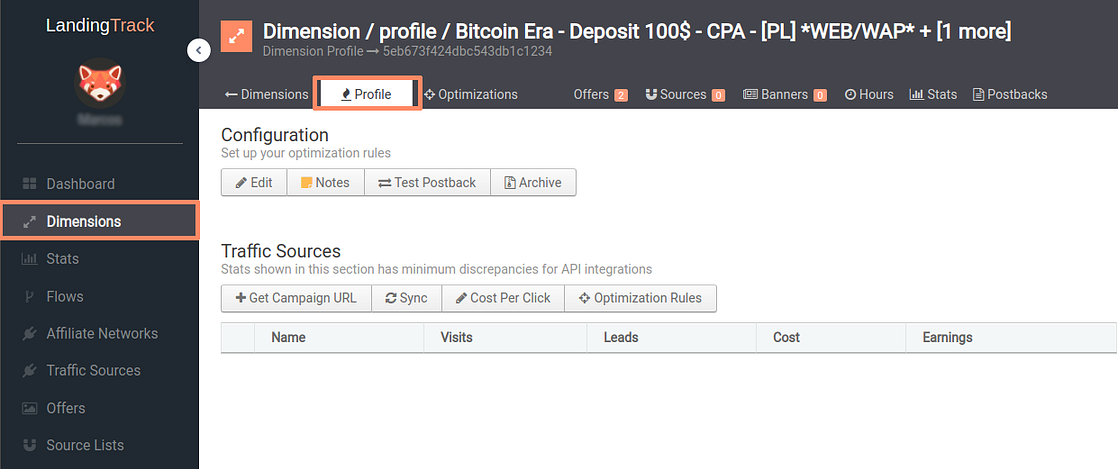
— Dimension Overview.
— How to generate a Testlink for your Advertiser.
And that’s all. This is how automation helps every day.
Remember, if the offer gets paused it will be paused on LandingTrack automatically.
If your Dimension is connected to a Campaign on API redirecting to a Reflex Affiliates offer and this one gets paused → LandingTrack will pause the Campaign too.
Everything has been set up already, our advice — Chill, relax, and wait for the traffic to start.
These are the benefits of automation and how it can help your daily activity.
What are you waiting to Start automating all your affiliate activity with LandingTrack?
New Integration with the Affiliate Network Reflex Affiliates
Reflex Affiliates is an internationally renowned affiliation platform providing exclusive campaigns from top converting verticals such as:
Dating
Gaming
Finance
Nutra
Home improvements.
Join us now to benefit from our experienced team and faster payment to scale your campaigns like never before.
Adding Reflex Affiliates on LandingTrack
Now that we are sure we will be getting all the conversions we can move on with Reflex Affiliates integration. To do so, login into your LandingTrack Account and click on > Affiliate Networks > +Activate a new Network
From the list below, select Reflex Affiliates.
In order to connect with them you need to add :
1- Your API KEY (Check below where to find it)
- Getting the API Key:
Although we have seen it before, just in case. Ask your AM to get you access first in case you do not see it or log in to your Reflex Affiliates Account and click on >Tools > then select API’s to see if it enabled:
Copy your API Key and let’s go back to LandingTrack
Then click on Activate and you will see the following information, just click on check api.
Once you have confirmed you should see the Green check
And that’s all.
Before starting getting/importing offers we will recommend you to set up your postback
Setting up your Postback:
No postback = No money on your tracker.
Let’s quickly check again how to get your LandingTrack postback.
On menu side > Settings, just select your domain and the Postback created will be the one to add on Reflex Affiliates panel.
Once you have generated you just need to get in touch with your Account Manager and share it. They will take care of the implementation.
— — — — — — — — — — — — — — — — — — — — — — — — — — — — — — —
Upload Reflex Affiliates offers on LandingTrack
We just need to click on Reflex Affiliates name to access it’s the profile:
In case you do not see offers yet this could be the reason
1- You do not have any offer approved yet > check with you Reflex Affiliates AM.
2- Just click on the button > Update Offers to force LandingTrack to check your approved ones.
Tick the ones you would like to import and select the Actions button, then Import > Before import then you might want to tick the box “Enable auto Activate” so LandingTrack in case the offers got pause will activate once they become active again.
Once you Import them all the offers will appear on your Offers section > Menu side > Offers
How do we create a campaign for our new offers?
Just tick the one/s you would like to send traffic to:
Once you click on “Create Dimension” you will be redirected to your Dimension Profile, ready to start your campaign
— Dimension Overview.
— How to generate a Testlink for your Advertiser.
And that’s all. This is how automation helps every day.
Remember, if the offer gets paused it will be paused on LandingTrack automatically.
If your Dimension is connected to a Campaign on API redirecting to a Reflex Affiliates offer and this one gets paused → LandingTrack will pause the Campaign too.
Everything has been set up already, our advice — Chill, relax, and wait for the traffic to start.
These are the benefits of automation and how it can help your daily activity.
What are you waiting to Start automating all your affiliate activity with LandingTrack?
Time for our PushGround Friends!! and even more if you are already buying from them you can have a special discount, simply ask them.


Time for our @Pushground Friends!! and even more if you are already buying from them you can have a special discount, simply ask them.
STEP 1 — Adding PushGround as Traffic Source
Go to Traffic Source Menu and click on > +Connect new Source; from the list of options select > Integrated DSPs
Look for PushGround. In order to connect with them, you will need to fill 2 fields
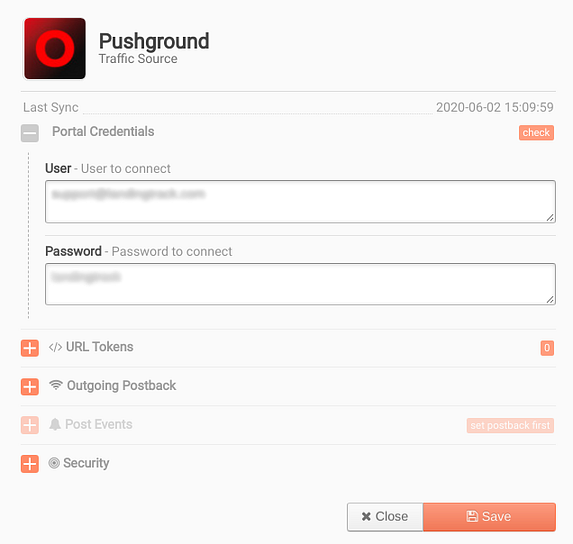
Once you see the Green Check means we are fully Integrated with PushGround and we can start automating all your Campaigns but, We will suggest you add some more steps like →Additional Campaign Tokens and Notification Postback
We are about to set up some extra Tokens for PushGround URL. To do so we just need to click on the button > Edit and from the slideout select the option > URL Tokens.
Each time you want to generate a URL for PushGround we will be provided to you by default the following URL:
portal=pushground&source={site_id}&pid={clicki_id}&cmp={campaign_id}&bid={bid}&b={creativity_id}
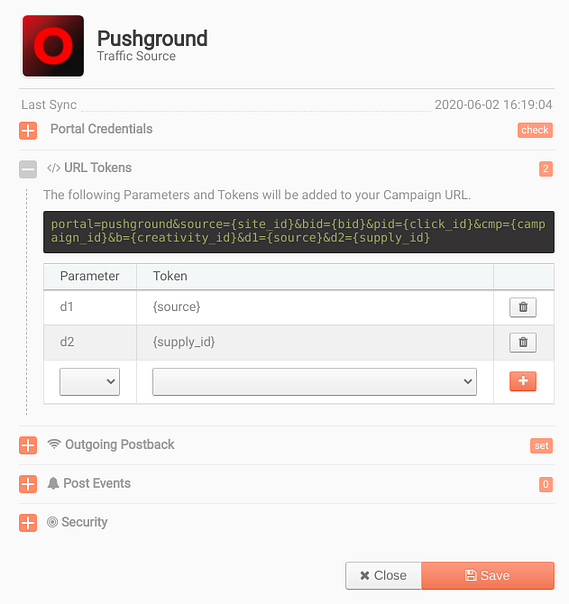
1.2 — Postback (Optional):
We are missing only one thing to finish the full integration with PushGround, adding their postback :
You will find their postback once you start creating a Campaign on their Dashboard.
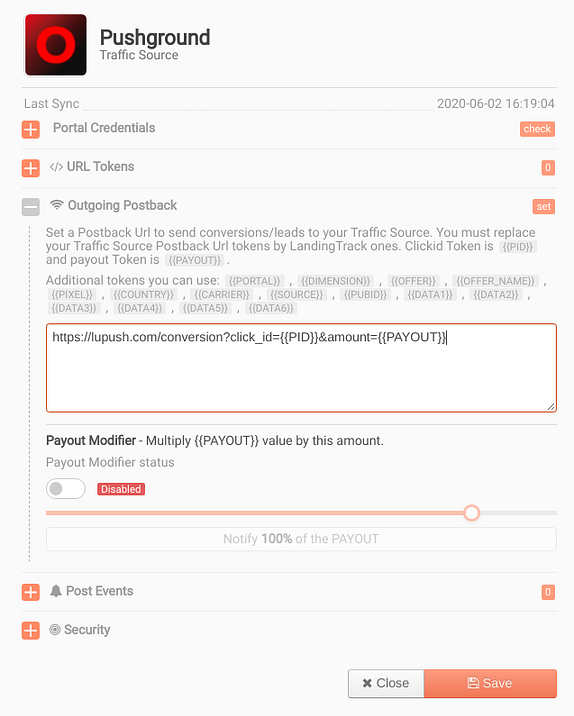
Remember to replace their {Tokens} for the LandingTrack ones:
. {your_extenal_id_paramater} by {{PID}}
. {payout} by {{PAYOUT}}
You can Copy the following Postback and place it on > Outgoing Postback:
https://lupush.com/conversion?click_id={{PID}}&amount={{PAYOUT}}
STEP 2 — Creating a campaign (Dimension) on LandingTrack
Remember you have three different ways to create a dimension.
1- From an existing Flow — see how
2- From Menu side > Offer — see how
3- From Dimension Menu: see bellow
Click on button > New Dimension
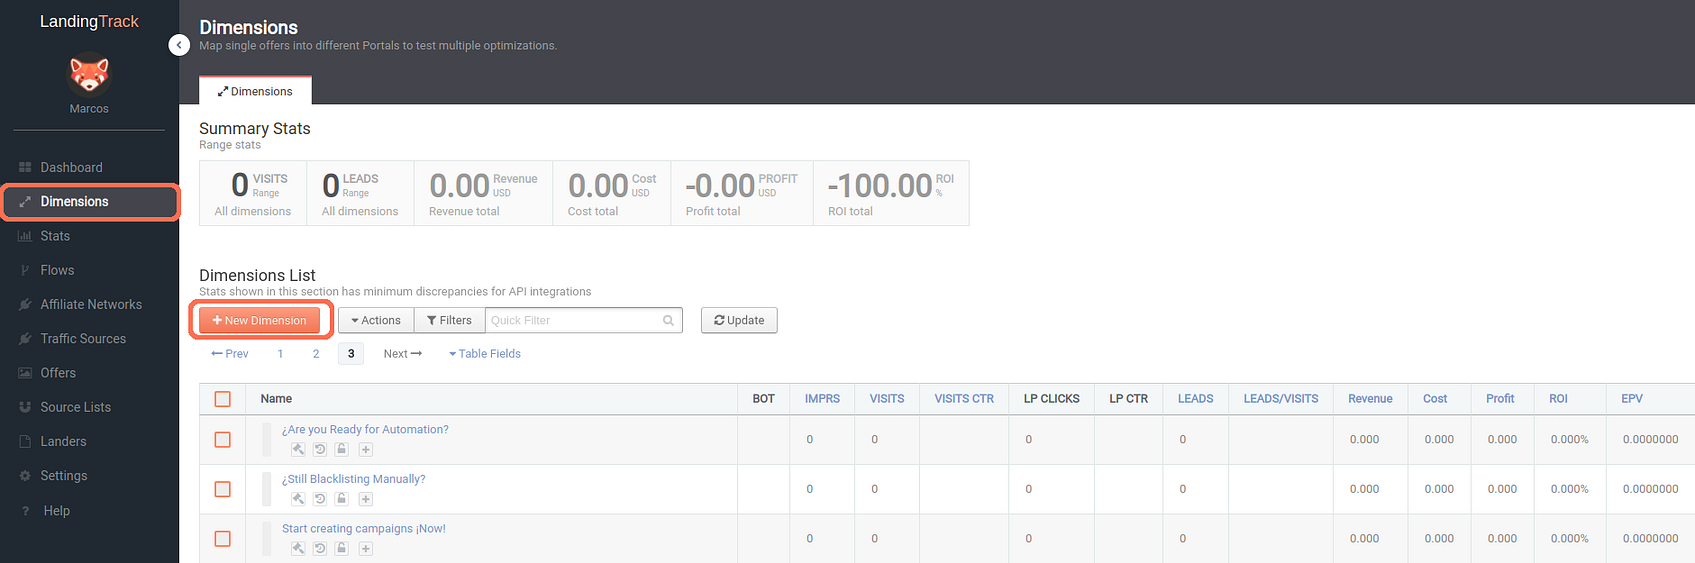
You will be redirected to our Dimension creator.
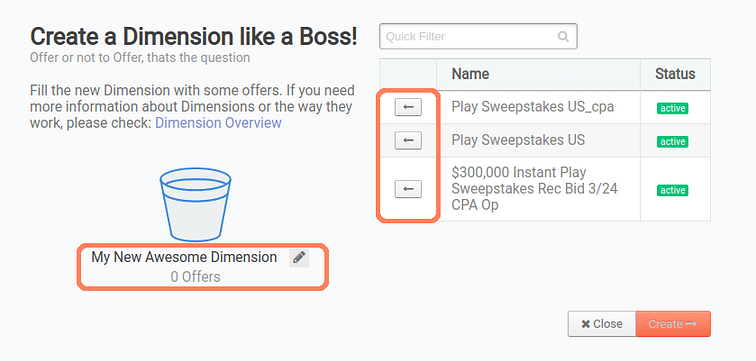
First, we will recommend you to click on the pencil right bellow the bucket to add your Campaign Name, at the same time you will see displayed all your offers with the name and status (right side), click on the left arrow button to add them to your Dimension.
As you can see, now we have added two offer on our dimension and if we like to add more we just need to click on the left arrow next to the offer “Play Sweepstakes US_cpa”
You will be redirected to its profile:
Want to know everything About Dimensions? see full guide HERE
— Dimension Configuration Options:
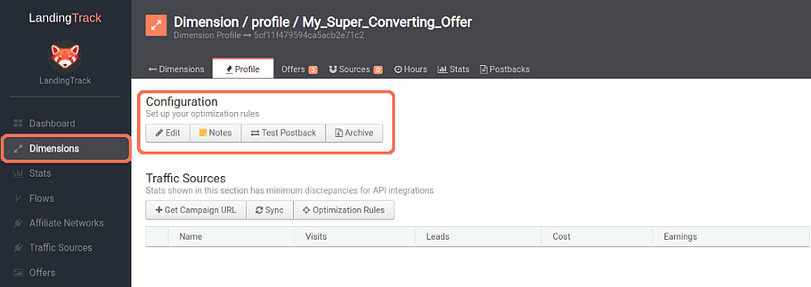
See full guide HERE
— Dimension Traffic Sources Section:
See full guide HERE
— Get Campaign URL:

— Optimization Rules:
As you may know already, LandingTrack can optimize the traffic base on different rules, here its when automation comes into action :
You can always check our guide here — to refresh the concept.
— — — — — — — — — — — — — — — — — — — —
— Getting the URL for PushGround:
Click on button > + Add Campaign and select PushGround as your traffic source, then select your Domain and your Traffic Segment; Finally, copy the name and URL we provide you with:
IMPORTANT: Copy the Full name that we provide you with and the Full URL:
STEP 3 — Creating a campaign on PushGround
I guess the first thing to do here will be logging into your PushGround Account so, let’s do it!
Then click on button + Create Campaign.
We Must use LandingTrack name — no other — only the one we provide you with and also the Campaign URL we provide you with.
Right after that > PushGround postback! there it goes, now you can set it up on your LandingTrack Account
— REMEMBER: Traffic Source > PushGround edit button Outgoing Postback.
Then select your Category.
Time for our Creatives.
Perhaps you should know that PushGround allows you to upload several creativities per CAMPAIGN.
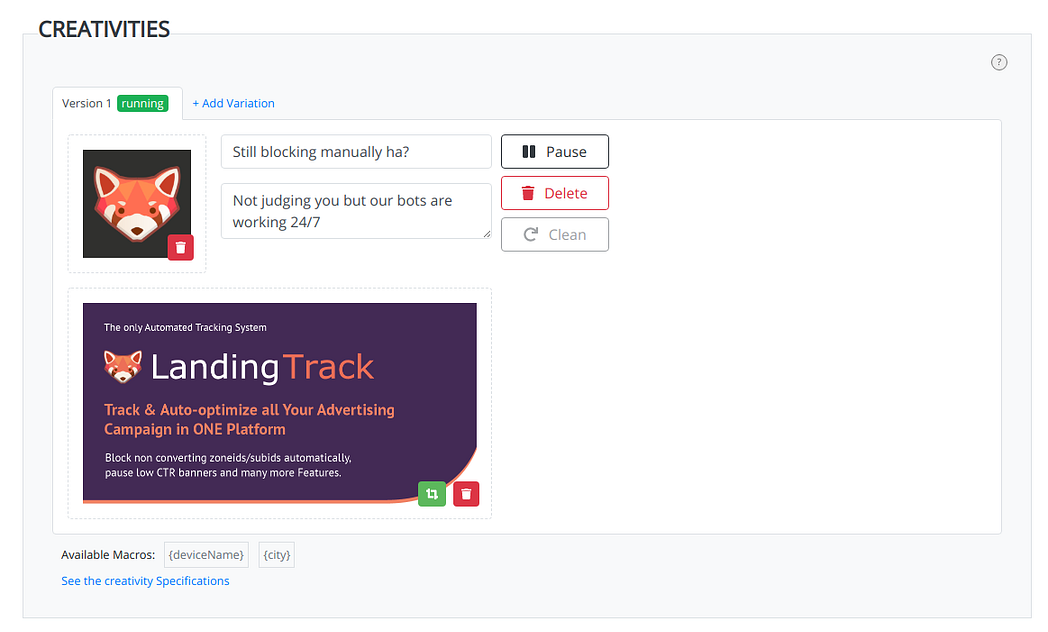
Once you finish your creative part, let’s move to the targeting, to set up our Country — Regions — Cities — Languages — Device — OS — Network type and Carriers
Watch the Advance targeting if you need more.
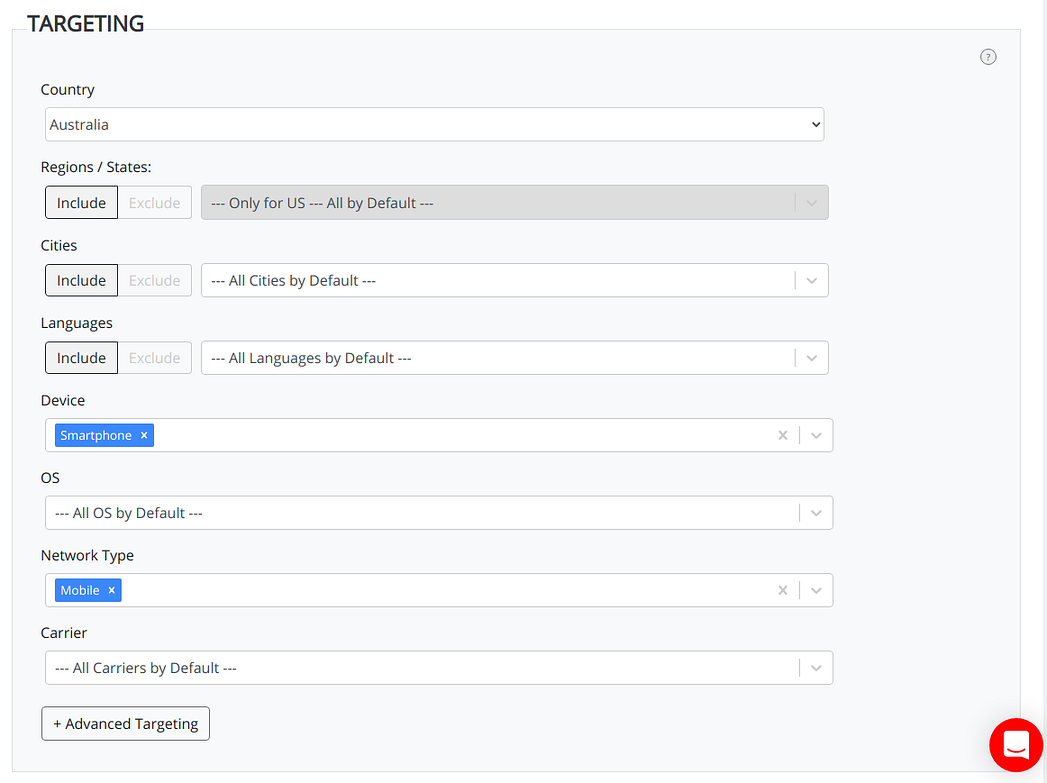
Frequency Caps meaning — how many times would you PushGround showing your ad to the same user?
If its the first time you run with PushGround Traffic no need to add white or blacklist. This can be done on future campaigns if you need it.
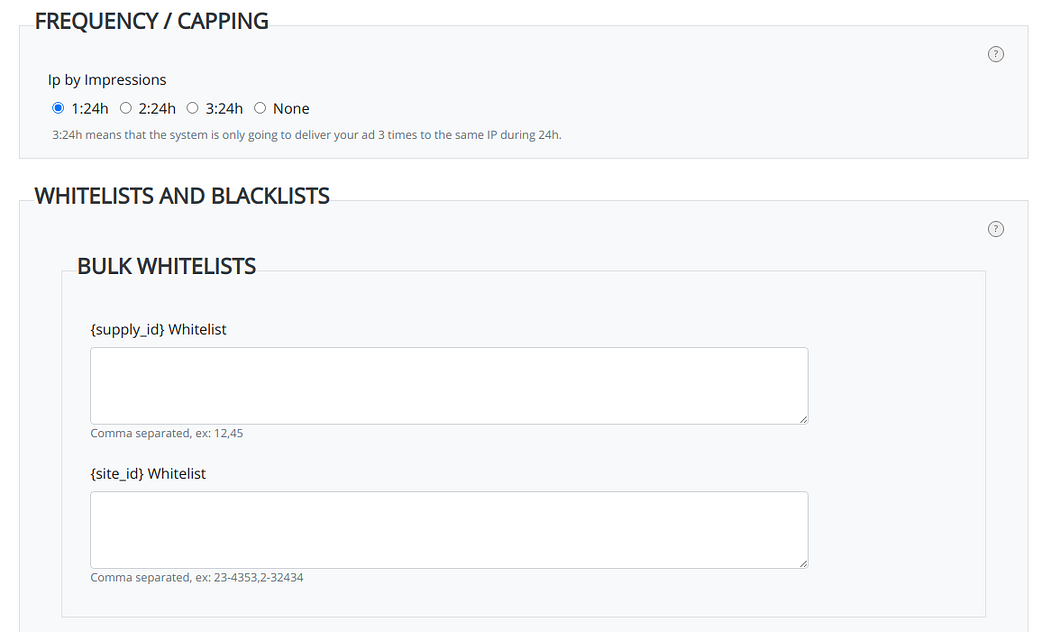
For Future Campaign
Remember you can do it on PushGround Platform or…..
On LandingTrack Dimension > Watch the video (Once you have finished your popcorns we can keep on with the Campaign.)
This time you can select the Campaign Reach and also the Audience.
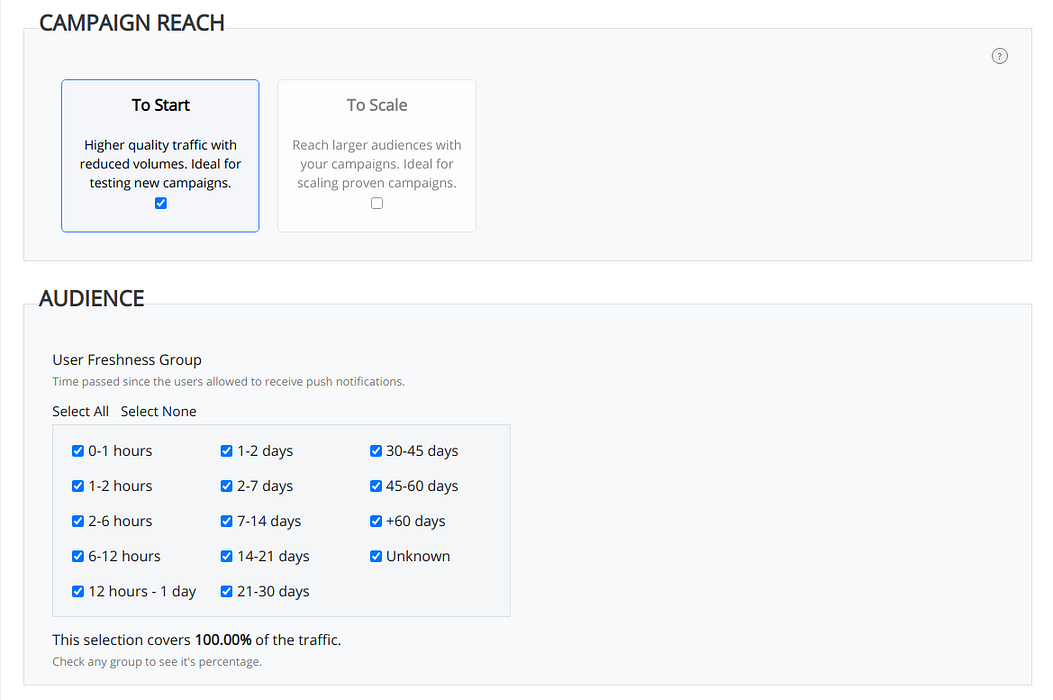
If there’s no-bid you will barely get traffic so, set up the recommended bid, lower it, even higher is up to you.
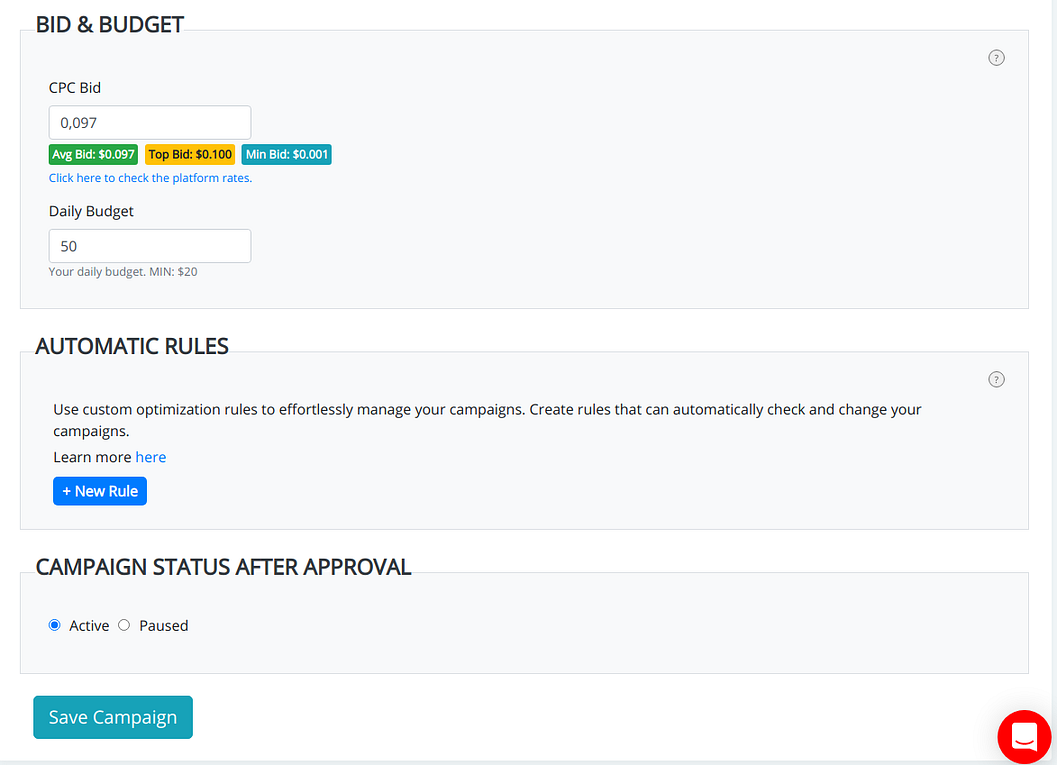
Once you click on SAVE CAMPAIGN there’s no way back _ Kidding_ you can always go back and modify your campaign.
Copy the Campaign ID that PushGround has generated for your Campaign

Back on LandingTrack, on your new magnificent Dimension we will sync the Campaign just clicking on button > Sync — Look for PushGround and then Paste the Campaign ID.
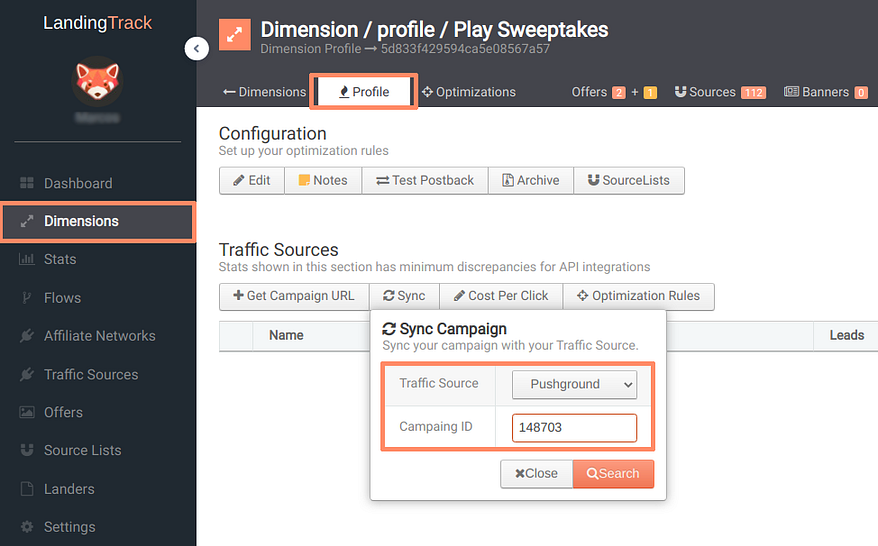
Bingo!
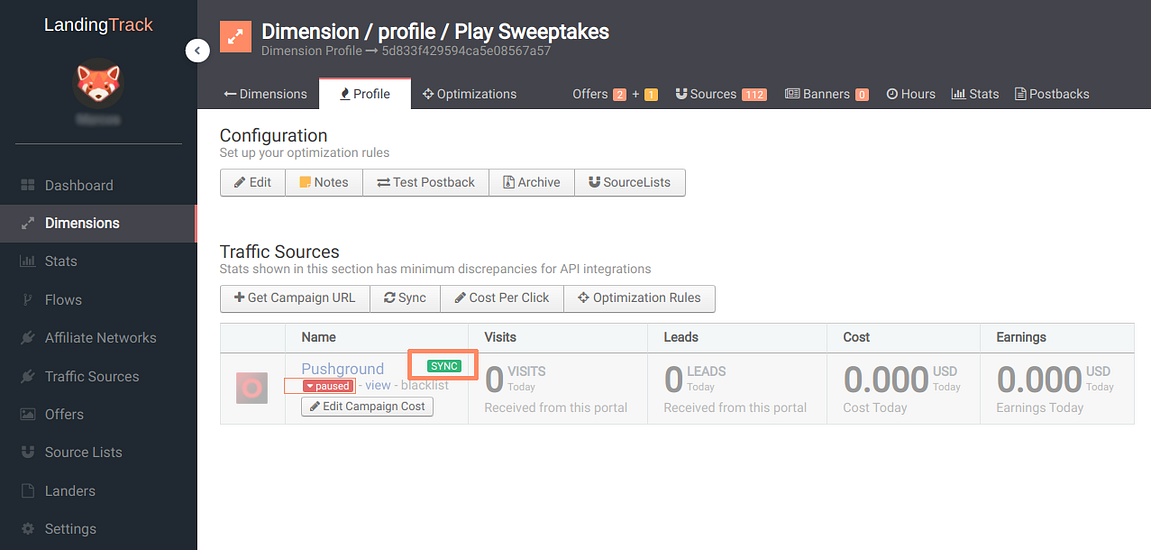
Everything has been set up already, our advice — Chill, relax, and wait for the traffic to start.
These are the benefits of automation and how it can help your daily activity.
¿What are you waiting to automate your PushGround Campaigns with LandingTrack?
Time for our @Pushground Friends!! and even more if you are already buying from them you can have a special discount, simply ask them.
STEP 1 — Adding PushGround as Traffic Source
Go to Traffic Source Menu and click on > +Connect new Source; from the list of options select > Integrated DSPs
Look for PushGround. In order to connect with them, you will need to fill 2 fields
- Your PushGround user
- Your PushGround Password
Once you see the Green Check means we are fully Integrated with PushGround and we can start automating all your Campaigns but, We will suggest you add some more steps like →Additional Campaign Tokens and Notification Postback
We are about to set up some extra Tokens for PushGround URL. To do so we just need to click on the button > Edit and from the slideout select the option > URL Tokens.
Each time you want to generate a URL for PushGround we will be provided to you by default the following URL:
portal=pushground&source={site_id}&pid={clicki_id}&cmp={campaign_id}&bid={bid}&b={creativity_id}
- source={site_id}
- pid={clicki_id}
- cmp={campaign_id}
- b={creativity_id}
- bid={bid}
1.2 — Postback (Optional):
We are missing only one thing to finish the full integration with PushGround, adding their postback :
You will find their postback once you start creating a Campaign on their Dashboard.
Remember to replace their {Tokens} for the LandingTrack ones:
. {your_extenal_id_paramater} by {{PID}}
. {payout} by {{PAYOUT}}
You can Copy the following Postback and place it on > Outgoing Postback:
https://lupush.com/conversion?click_id={{PID}}&amount={{PAYOUT}}
STEP 2 — Creating a campaign (Dimension) on LandingTrack
Remember you have three different ways to create a dimension.
1- From an existing Flow — see how
2- From Menu side > Offer — see how
3- From Dimension Menu: see bellow
Click on button > New Dimension
You will be redirected to our Dimension creator.
First, we will recommend you to click on the pencil right bellow the bucket to add your Campaign Name, at the same time you will see displayed all your offers with the name and status (right side), click on the left arrow button to add them to your Dimension.
As you can see, now we have added two offer on our dimension and if we like to add more we just need to click on the left arrow next to the offer “Play Sweepstakes US_cpa”
You will be redirected to its profile:
Want to know everything About Dimensions? see full guide HERE
— Dimension Configuration Options:
See full guide HERE
— Dimension Traffic Sources Section:
See full guide HERE
— Get Campaign URL:
— Optimization Rules:
As you may know already, LandingTrack can optimize the traffic base on different rules, here its when automation comes into action :
You can always check our guide here — to refresh the concept.
— — — — — — — — — — — — — — — — — — — —
— Getting the URL for PushGround:
Click on button > + Add Campaign and select PushGround as your traffic source, then select your Domain and your Traffic Segment; Finally, copy the name and URL we provide you with:
IMPORTANT: Copy the Full name that we provide you with and the Full URL:
STEP 3 — Creating a campaign on PushGround
I guess the first thing to do here will be logging into your PushGround Account so, let’s do it!
Then click on button + Create Campaign.
We Must use LandingTrack name — no other — only the one we provide you with and also the Campaign URL we provide you with.
Right after that > PushGround postback! there it goes, now you can set it up on your LandingTrack Account
— REMEMBER: Traffic Source > PushGround edit button Outgoing Postback.
Then select your Category.
Time for our Creatives.
Perhaps you should know that PushGround allows you to upload several creativities per CAMPAIGN.
Once you finish your creative part, let’s move to the targeting, to set up our Country — Regions — Cities — Languages — Device — OS — Network type and Carriers
Watch the Advance targeting if you need more.
Frequency Caps meaning — how many times would you PushGround showing your ad to the same user?
If its the first time you run with PushGround Traffic no need to add white or blacklist. This can be done on future campaigns if you need it.
For Future Campaign
On LandingTrack Dimension > Watch the video (Once you have finished your popcorns we can keep on with the Campaign.)
This time you can select the Campaign Reach and also the Audience.
If there’s no-bid you will barely get traffic so, set up the recommended bid, lower it, even higher is up to you.
Once you click on SAVE CAMPAIGN there’s no way back _ Kidding_ you can always go back and modify your campaign.
Copy the Campaign ID that PushGround has generated for your Campaign
Back on LandingTrack, on your new magnificent Dimension we will sync the Campaign just clicking on button > Sync — Look for PushGround and then Paste the Campaign ID.
Bingo!
Everything has been set up already, our advice — Chill, relax, and wait for the traffic to start.
These are the benefits of automation and how it can help your daily activity.
¿What are you waiting to automate your PushGround Campaigns with LandingTrack?
DanTe_0101
Active Member
Hello,
Do you have prefilled "templates" for traffic sources which we can plugin and then change values later?
Because lets say I am new to certain traffic sources then by using a basic template can help me save lots of money beforehand as compared to manually setting up the fields AFTER I run test campaigns.
Similar threads
