


Sometimes we’re just stuck on one idea and focus on it so much that we fail to take a look around and realize there are many other opportunities. This normally happens when we’re used to something, and decide to remain stuck in the lazy comfort of a well-known environment. This probably means we’re afraid to move on to a better future, opening ourselves to new possibilities. The same often happens in the Media Buy arena. Indeed, most Media Buyers prefer working with one already-known ad-network, trying to get the maximum juice out of it instead of exploring other potentially profitable traffic sources.
In this article, I’ll introduce you to a very interesting ad-network which can be an alternative traffic source for you: Adultmoda.
This is a pretty easy and user-friendly platform, which means you won’t waste a huge amount of time learning how to work with it. Additionally, if you have any doubts about where to start, this ad-network provides you lots of useful tutorial videos.
Adultmoda offers you an inventory of image ads, text ads and redirect traffic. Interesting fact: unlike other ad-networks, the two main spots with a lot of traffic on Adultmoda are 300*50 and 468*60. On the other hand, both 300*250 and 300*100 have limited traffic there.
The campaign planner is the most useful tool you’ll find on Adultmoda. There, you have access to information regarding the volume of the traffic categorized by country, ad-format, category, proxy traffic, device, OS, operator and ad size. This possibility gives you the chance of actually targeting and checking how much traffic is available for sale. Moreover, it also provides extra information regarding your ad-request. Let’s say we want to check how much traffic and in which spots I can get in Argentina – Android – Movistar. Here’s what the campaign planner shows us:

Here, we get to see that the two aforementioned spots (300×50 and 468×60) have the majority of traffic. The fill-rate shows us the percentage of ad-requests where the ad is shown. The lower this value is, the fewer buyers are fighting for the traffic, which means prices are relatively low. In addition, avg. CPC shows us how much we should bid in order to get at least some traffic – in the case of 300×50, our minimum bid needs to be at least 0.0005. If we want to receive the majority of the traffic, we need to bid over max CPC, which should be at least 0.007.
How to create a campaign
Launching a campaign is easy. All you gotta do is choose a campaign name, add the offer URL, select a campaign category and the targeting (country/operator/OS/device). Don’t forget to click on the “Update” button to save the changes you’ve made to your campaign.
After this process is done, you’re ready to choose your bid. You have two bidding options available: CPM and CPC. CPM means “cost per a thousand impressions” – the amount you have to pay per every thousand impressions; CPC refers to the “cost per click”, and it’s basically the value you pay for each click. My advice is for you to pick the one option you feel more comfortable with, setting your bid accordingly.
After you’ve been through this process, you’ll find an estimator box. This tool can predict on how much traffic you will receive with the current bid. It also shows you how many impressions were available for your targeting the day before and what is the average and maximum bid for it. Apart from that, you need to add funds to your campaign in order for it to start running. You always have to be wary, never forgetting to fund your campaigns, inasmuch as they may run out of funds. If that happens, your campaign will be paused, so you need to be careful. If your campaign is profitable, I suggest you set the auto top-up option which will automatically transfer a certain amount of money to your campaign every day.
Then, you are simply uploading images in the empty box of the Ads section. You can drag several banners with different sizes and each banner will be associated with a unique id. Moreover, Adultmoda offers interesting features – they allow you to resize your banner to the accepted banner size or create a new banner size that is not available.
When your campaign is ready, you need to activate it in order for it to be approved. Once it’s approved, it’ll start running.
Dynamic tracking
Adultmoda does not provide traffic source stats but you can implement dynamic tracking on your offer link. Thusly, you can track zone id (website id), ad id and campaign id on your end with the corresponding tokens %zoneid%, %adid% and %campaignid%. Using these parameters, you’ll be able to track both the performance and revenue.
How to optimize a campaign
While your campaign is running, there are things you can do in order to optimize it. Adultmoda provides you pretty detailed campaign stats. In fact, you can display stats by day, month or any other chosen period you wish to analyse.
They also provide you stats by banners based on impressions served, avg. CPM, CTR and your costs for you to reach conclusions.

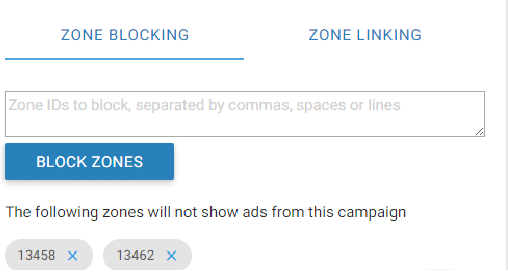
If you notice that there’s an under-performing banner, you can pause it and upload a new one. In case the specific site is losing, you’ll notice it by checking the negative results of the specific zone id. Indeed, you can choose this zone id and place it in the zone blocking box available on the campaign settings, therefore creating a blacklist. On the other hand, if you reckon that zone has a good margin, you can create a whitelist campaign by inserting the zone id in the Zone Linking section.
This has been a quick overview of Adultmoda. As you can see, this is definitely an easy-to-use, quality ad-network.
We hope you’re able to experience and enjoy Adultmoda!
Let’s see if you can turn a huge profit!
Good luck to all!
In this article, I’ll introduce you to a very interesting ad-network which can be an alternative traffic source for you: Adultmoda.
This is a pretty easy and user-friendly platform, which means you won’t waste a huge amount of time learning how to work with it. Additionally, if you have any doubts about where to start, this ad-network provides you lots of useful tutorial videos.
Adultmoda offers you an inventory of image ads, text ads and redirect traffic. Interesting fact: unlike other ad-networks, the two main spots with a lot of traffic on Adultmoda are 300*50 and 468*60. On the other hand, both 300*250 and 300*100 have limited traffic there.
The campaign planner is the most useful tool you’ll find on Adultmoda. There, you have access to information regarding the volume of the traffic categorized by country, ad-format, category, proxy traffic, device, OS, operator and ad size. This possibility gives you the chance of actually targeting and checking how much traffic is available for sale. Moreover, it also provides extra information regarding your ad-request. Let’s say we want to check how much traffic and in which spots I can get in Argentina – Android – Movistar. Here’s what the campaign planner shows us:
Here, we get to see that the two aforementioned spots (300×50 and 468×60) have the majority of traffic. The fill-rate shows us the percentage of ad-requests where the ad is shown. The lower this value is, the fewer buyers are fighting for the traffic, which means prices are relatively low. In addition, avg. CPC shows us how much we should bid in order to get at least some traffic – in the case of 300×50, our minimum bid needs to be at least 0.0005. If we want to receive the majority of the traffic, we need to bid over max CPC, which should be at least 0.007.
How to create a campaign
Launching a campaign is easy. All you gotta do is choose a campaign name, add the offer URL, select a campaign category and the targeting (country/operator/OS/device). Don’t forget to click on the “Update” button to save the changes you’ve made to your campaign.
After this process is done, you’re ready to choose your bid. You have two bidding options available: CPM and CPC. CPM means “cost per a thousand impressions” – the amount you have to pay per every thousand impressions; CPC refers to the “cost per click”, and it’s basically the value you pay for each click. My advice is for you to pick the one option you feel more comfortable with, setting your bid accordingly.
After you’ve been through this process, you’ll find an estimator box. This tool can predict on how much traffic you will receive with the current bid. It also shows you how many impressions were available for your targeting the day before and what is the average and maximum bid for it. Apart from that, you need to add funds to your campaign in order for it to start running. You always have to be wary, never forgetting to fund your campaigns, inasmuch as they may run out of funds. If that happens, your campaign will be paused, so you need to be careful. If your campaign is profitable, I suggest you set the auto top-up option which will automatically transfer a certain amount of money to your campaign every day.
Then, you are simply uploading images in the empty box of the Ads section. You can drag several banners with different sizes and each banner will be associated with a unique id. Moreover, Adultmoda offers interesting features – they allow you to resize your banner to the accepted banner size or create a new banner size that is not available.
When your campaign is ready, you need to activate it in order for it to be approved. Once it’s approved, it’ll start running.
Dynamic tracking
Adultmoda does not provide traffic source stats but you can implement dynamic tracking on your offer link. Thusly, you can track zone id (website id), ad id and campaign id on your end with the corresponding tokens %zoneid%, %adid% and %campaignid%. Using these parameters, you’ll be able to track both the performance and revenue.
How to optimize a campaign
While your campaign is running, there are things you can do in order to optimize it. Adultmoda provides you pretty detailed campaign stats. In fact, you can display stats by day, month or any other chosen period you wish to analyse.
They also provide you stats by banners based on impressions served, avg. CPM, CTR and your costs for you to reach conclusions.
If you notice that there’s an under-performing banner, you can pause it and upload a new one. In case the specific site is losing, you’ll notice it by checking the negative results of the specific zone id. Indeed, you can choose this zone id and place it in the zone blocking box available on the campaign settings, therefore creating a blacklist. On the other hand, if you reckon that zone has a good margin, you can create a whitelist campaign by inserting the zone id in the Zone Linking section.
This has been a quick overview of Adultmoda. As you can see, this is definitely an easy-to-use, quality ad-network.
We hope you’re able to experience and enjoy Adultmoda!
Let’s see if you can turn a huge profit!
Good luck to all!

")
