


WebView - what is that?
If you are ever perusing a social application and click on an advertisement that takes you to a store's website, or if you use a news aggregation app and are taken to a page with a full article, it is probable that WebView was used. WebView is the component of the system that displays web pages in applications. It is the kind of page you see when you open a link to portals in messaging or social media apps like Instagram or VK. In short, WebView allows third party developer programs to show webpages. As part of affiliate marketing, WebView is used to include a link to an offer/offers inside mobile applications, which are then listed on app stores (such as Google Play or the App Store) or on third party one-page sites to which traffic is directed.
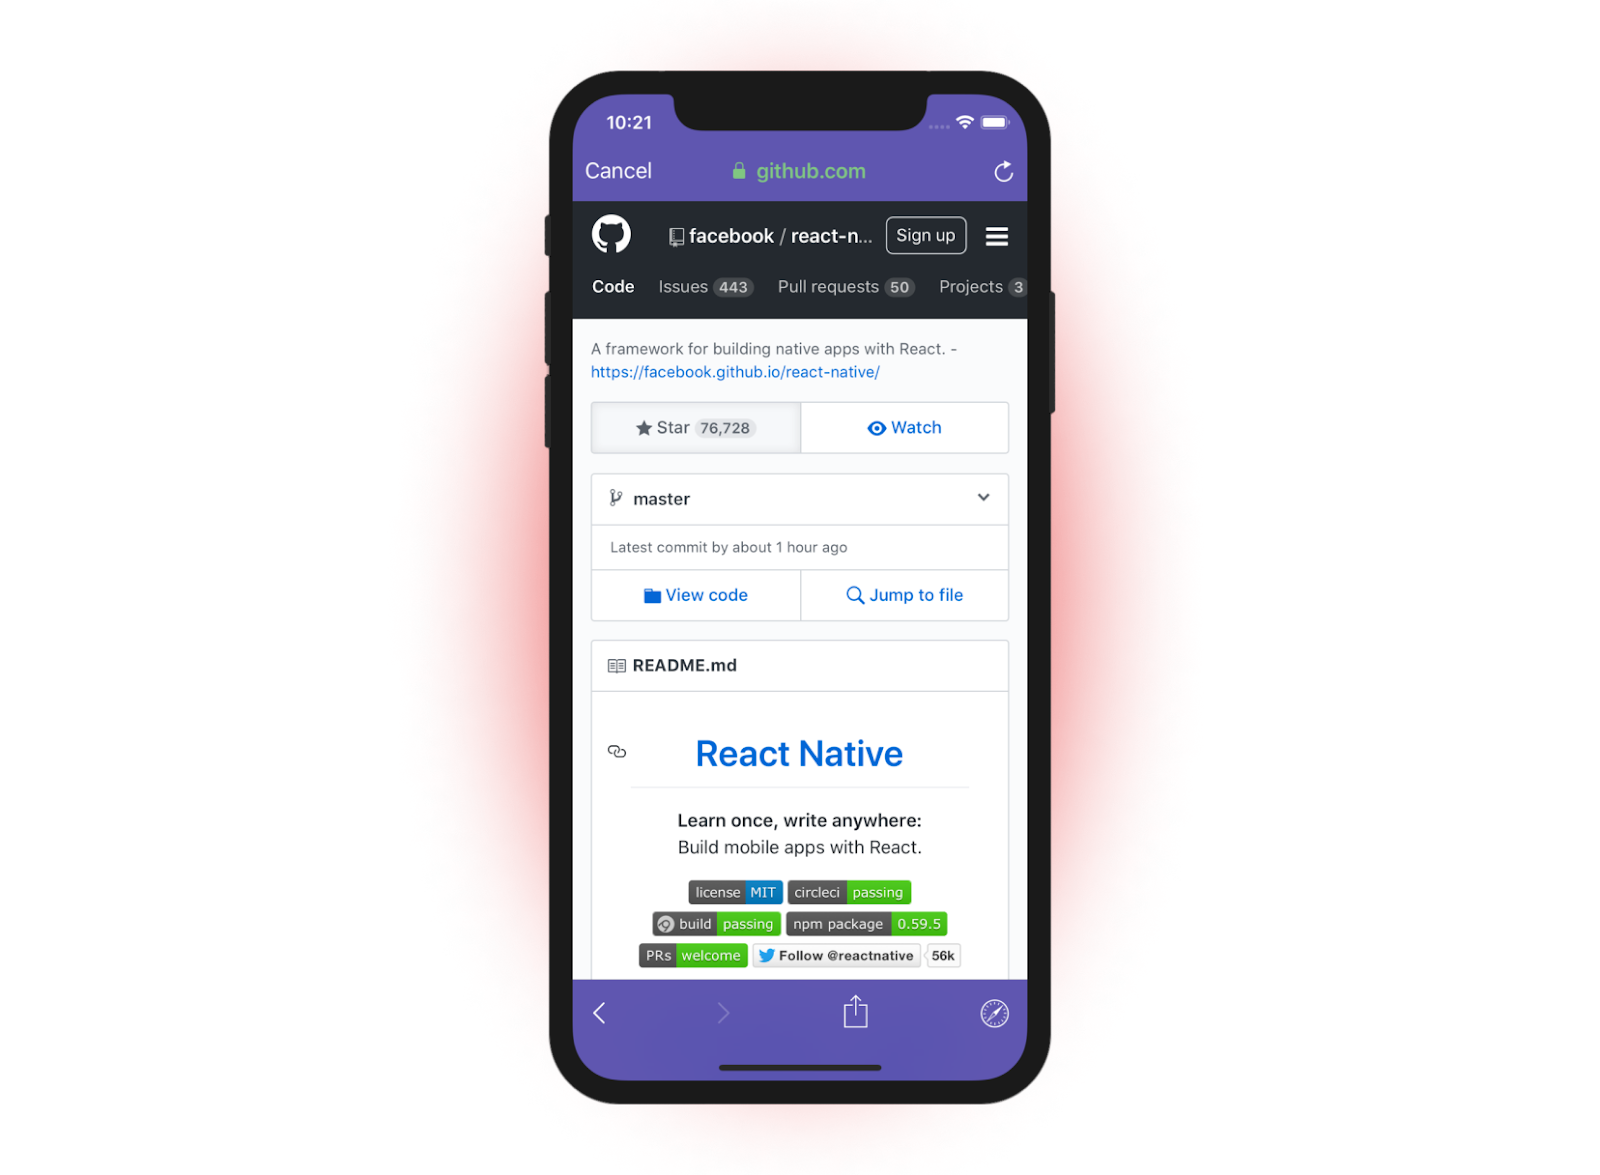
How does WebView work?
The WebView app functions as a browser, allowing users to open any link they desire. In the context of affiliate marketing, these are often links to offers or products. Downloading this app, therefore, enables the user to access the mobile version of the site by way of the browser.
What's the deal with fake apps?
Imitations of other established applications are often referred to as fake applications. These can be hard to detect for even the most experienced users. An example of this is the navigation app, Waze. All it took was a simple name change to Free Waze Traffic GPS Maps Tip, along with comments and average ratings of 3-4.5, to make it appear convincing.
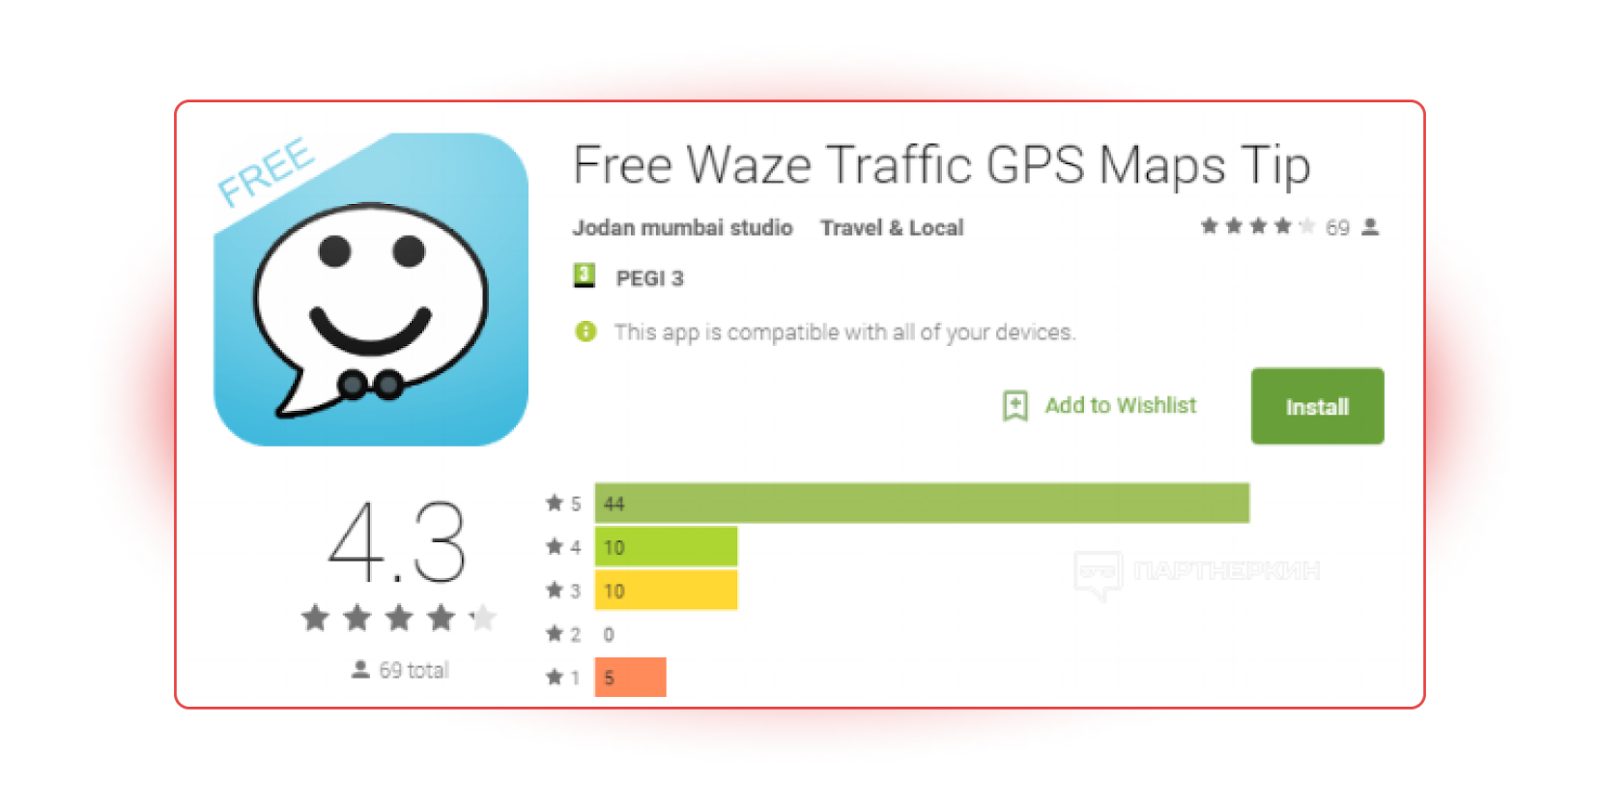
When the fake program is installed, the advertiser's webpage shows up in the WebView functionality that is integrated with the application.
What can be promoted with WebView?
Using WebView, it's common to see the advertising of gambling, dating, cryptocurrency, and other "black hat" options. Popular niches for bogus apps include: gaming; mapping; antivirus and VPN switchers; boosting and upgrading programs for IMs (e.g. "WhatsApp Updates"); battery-saver and performance-enhancer apps; apps for Touch ID or Face ID; health-related and fitness aids (e.g. heart rate monitors); photo and video editors with filters and presets.
The WebView solution offers several advantages, such as the ability to send push notifications, lower development and support costs, faster page loading, and small application size. Unfortunately, one of the main drawbacks is the quality of traffic generally being lower than average. However, there is a way to counter this.
The WebView solution offers several advantages, such as the ability to send push notifications, lower development and support costs, faster page loading, and small application size. Unfortunately, one of the main drawbacks is the quality of traffic generally being lower than average. However, there is a way to counter this.
How to improve the quality of traffic from WebView?
1. Take care of UX
Initially, it is essential to assess the offer's performance from the pre-lander to the payment page on the vendor's platform. Make sure that the whole procedure is effective and user-friendly. Client satisfaction has a great impact on transformation. If you recognize that something is not clickable or an object is not loading, alert the advertiser and affiliate program maintainer right away.
2. Take care about the relationship with the user
WebView provides a great benefit in being able to maintain communication with users over a longer period of time, making it a great option to use. When it comes to dating advertising, push notifications such as messages from women, pictures, or even simple reminders to use the chat can help to increase the user's return to the application and website of the advertiser. However, it is best to keep the notifications to a maximum of 3-4 a day to avoid bombarding the user. It is important to remember the user's cookies to allow them to go back to the page they were on when they left the app. Platforms such as OneSignal and PushPushGo can be used for shipping notifications.
3. Bet on native design
In the dating market, it is beneficial to have pages that look like Messenger. People seeking out dating are more likely to trust and engage with a platform that looks like a messaging service. If a company's landing page resembles a messenger, it will likely draw in the user and motivate them to sign up. The same strategy applies to any offers related to gaming or gambling, in which the more native design used the better the chance of success.
4. Think about an email database
Email marketing is still a powerful tool. To maximize its impact, ensure your customers sign up for your mailing list. This way, you can contact them via the newsletter and offer them even more interesting deals. Push notifications are a great way to do this; you could even create ones specifically designed to ask for consent to contact via email and direct customers to subscribe to the newsletter. An example of this could be: "Natalie sent you a message. Please verify your email address to view it."
5. Remember about segmentation
When it comes to targeting users, be mindful of their age, native language, and where they are from/living. For instance, if a large portion of people in the country are expats, you will have to pay for their ad installations, but you won't receive any revenue from them. Expats are usually unwilling to type their card details on websites, although they can understand the content in their native language, and even if they do, they may chargeback. Taking this into account can reduce your expenses. With limited choices of targeting, make use of creative options. Try using words on a banner or an image in place of segmentation. For example, upload a photo of an older woman and add words such as "35+" or "40+" to filter out users who don't fit your target demographic.
Preparing to create a Webview on Android | Installing Android Studio
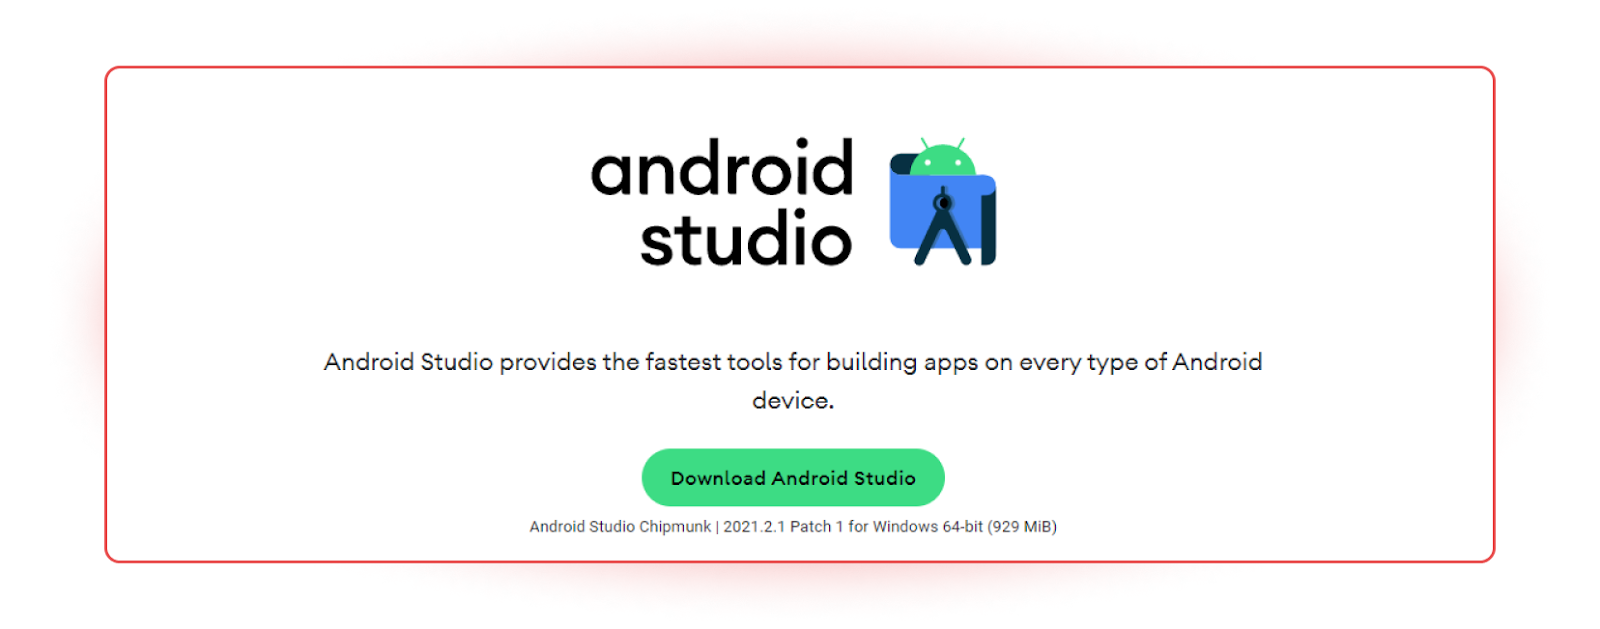
- Head over to the official Android Studio website (developer.android.com/studio) and get the program for your computer. During the installation, keep the default settings.
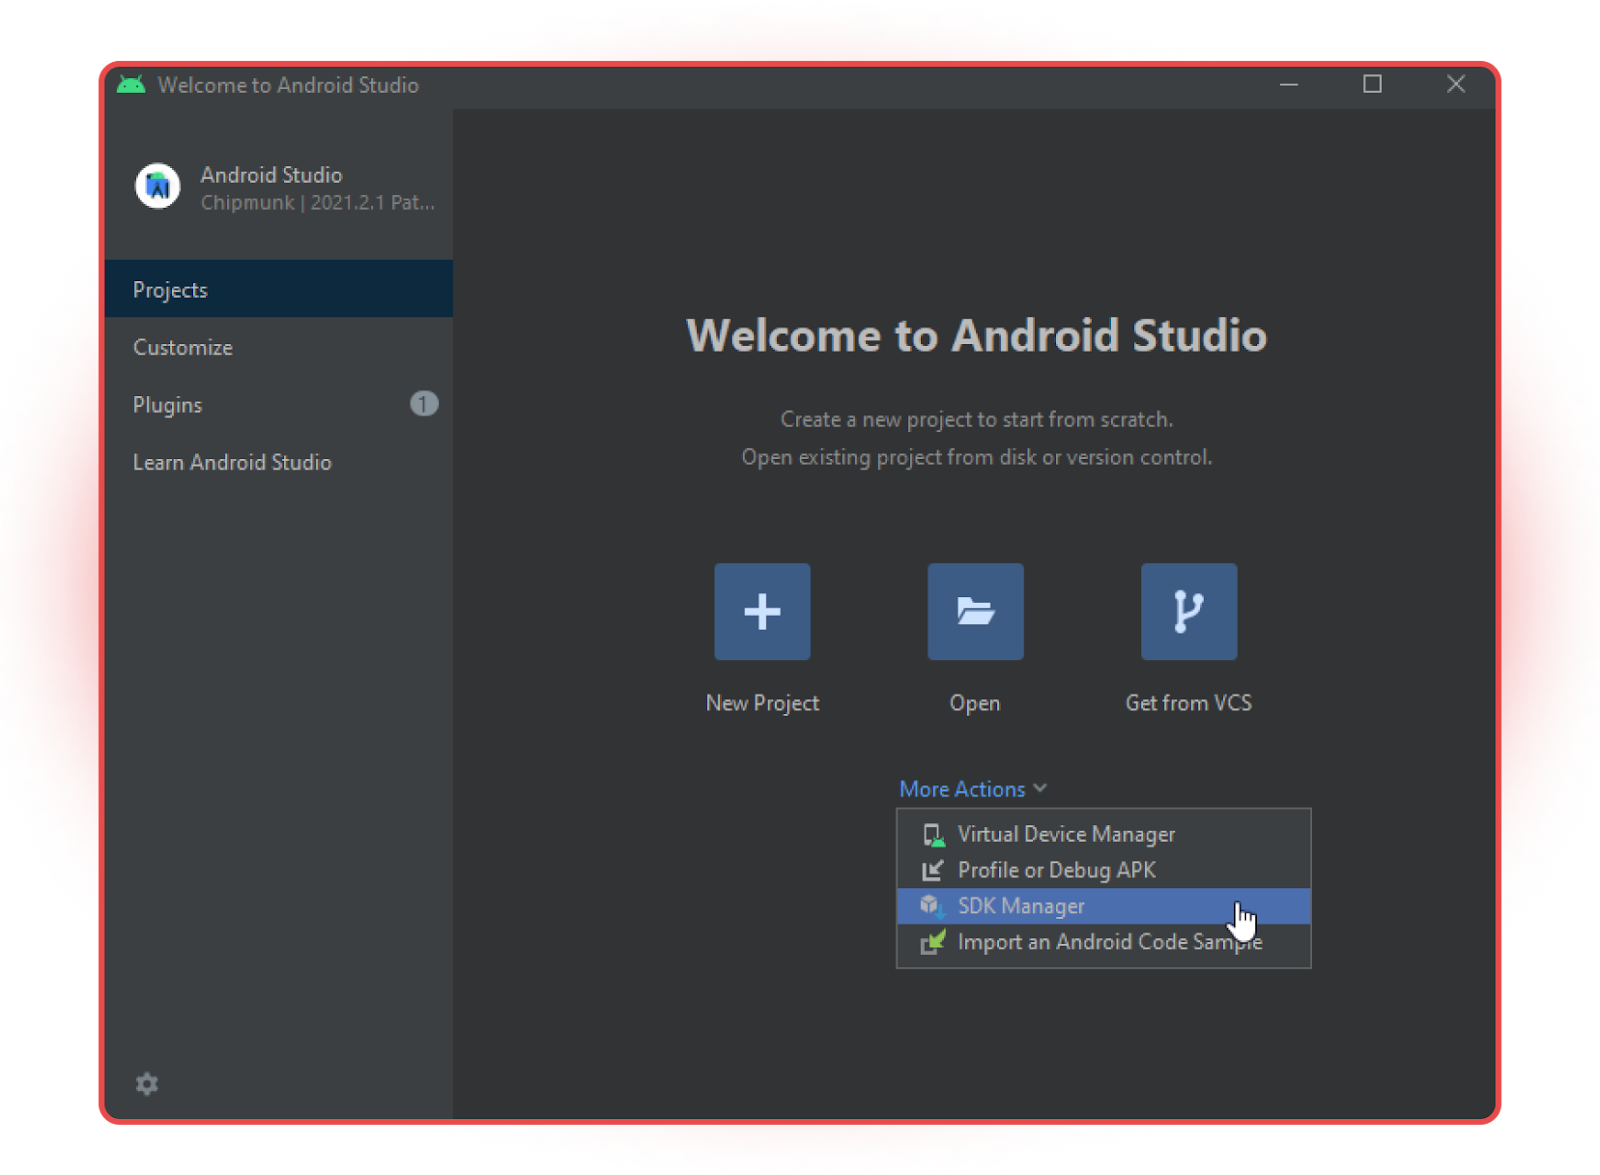
- Opening Android Studio is the first step to take. After that, you can proceed to install the Android SDK as per the program's instructions.
- On the beginning page of the program, press the More actions option. Afterwards, choose the SDK Manager.
- When the menu pops up, head to the Android SDK section (under Appearance & Behavior → System settings).
- If Android 11.0 (R) is ticked, uncheck it; otherwise, leave it unchanged. After that, choose Android 10.0 (Q) and proceed to the SDK Tools section.
- Please ensure that the following boxes are checked: Android Emulator, Android SDK Platform-Tools, and Intel x86 Emulator Accelerator (HAXM installer). If any of these boxes are unchecked, please mark them as required.
- Press the "Apply" button. After that, click "OK" and agree to the user agreement for every package. Please note that the installation process may take some time.
- While downloading, a window may appear where you'll need to allocate the maximum amount of RAM to run the emulators. Please provide a value (you may stick with the recommended size) and then click on "Next".
To proceed, we need to create an environment variable on your computer and in Android Studio. The following steps are specific to the Windows operating system:
- Open the "This PC" folder and right-click on the "My Computer" icon located on the left side.From the options presented, select "Properties".
- In the new window that appears, click on "Advanced System Settings". Next, click on the "Environment Variables" button.
1. Under the section labeled "User variables for <your username>", click on the "New" button.
2. Enter the variable name as ANDROID_SDK_ROOT, followed by the variable value (for instance, C:\your folder\AndroidStudioSDK). Click "OK" to save the changes.
3. To proceed, you need to create one more variable. Please perform the following steps:
2. Enter the variable name as ANDROID_SDK_ROOT, followed by the variable value (for instance, C:\your folder\AndroidStudioSDK). Click "OK" to save the changes.
3. To proceed, you need to create one more variable. Please perform the following steps:
- Click on the "New" button once more.
- Enter "ANDROID_SDK_HOME" as the variable name and provide the path to your Android Studio projects folder in the variable value field (e.g., C:\your folder\AndroidStudioProjects).
- Click "OK" to save the changes.
4. After creating the variables, return to Android Studio and follow the next set of instructions:
- Click on the "Customize" button.
- Select "All Settings" from the options provided.
5. Navigate to the "Path Variables" tab, and create new environment variables by clicking the plus icon.
6. Create the first variable by entering the variable name "ANDROID_SDK_ROOT" and the variable value (for instance, C:\your folder\AndroidStudioSDK). Click "OK". Next, create the second variable by specifying the variable name "ANDROID_SDK_HOME" and the path to your Android Studio projects folder (e.g., C:\your folder\AndroidStudioProjects). Click "OK" to save both variables.
7. Now press “Apply” and “OK”.
Now create a virtual application.
1. Click More Actions and open the VD Manager.
2. Click on "Create Virtual Device".
3. Select your desired phone model and import it to your computer, and then click on the "Next" button. For our testing purposes, we'll use the Pixel 4 device to ensure that our application works properly and looks good. To create a scalable application, it's a good idea to select the "Resizable" option.
4. Choose and install an application icon of your choice. Keep in mind that you can change it later if needed.
5. Name your project and then click on the "Finish" button. If prompted, install HAXM by clicking on the red information message. If you still receive a message indicating that HAXM needs to be installed despite completing the installation process.
6. Your program is now ready to be used.
Installing HAXM manually
Note that the above instructions for manual installation of HAXM are only applicable if the automatic installation from Android Studio fails and the program displays an error message indicating a missing HAXM installation.
- To manually install HAXM, start by downloading the installer from the web. You can find the available versions for download here. After downloading, extract the files and run the installer.
- The detailed steps for installing HAXM using the installer can be found here. Simply follow the instructions provided by the installer to complete the installation process.
- Assuming the HAXM installation was successful, you can now return to Android Studio and continue your work. However, if the installer encountered an error, one possible solution is to enable CPU virtualization at the BIOS level. You can find instructions for enabling virtualization on Windows 11 here and on Windows 10 here.
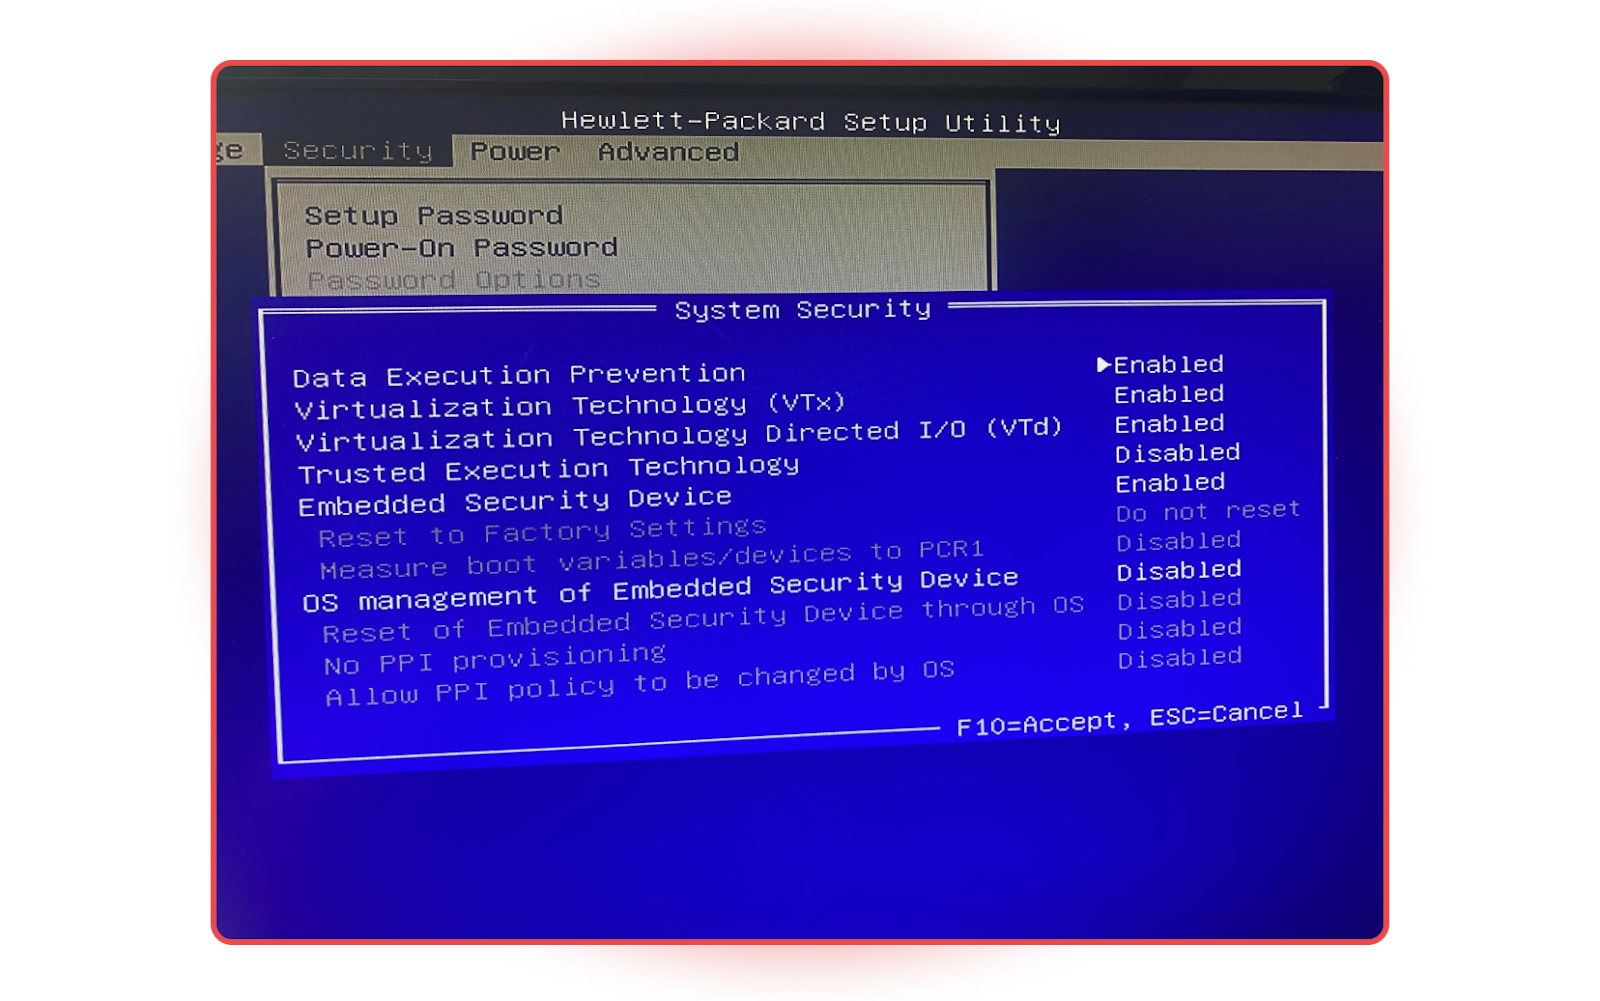
Caution! The option to enable VTd may be located in a different subfolder on different devices.
Creating a WebView app
Let's proceed with the creation of the first WebView application.
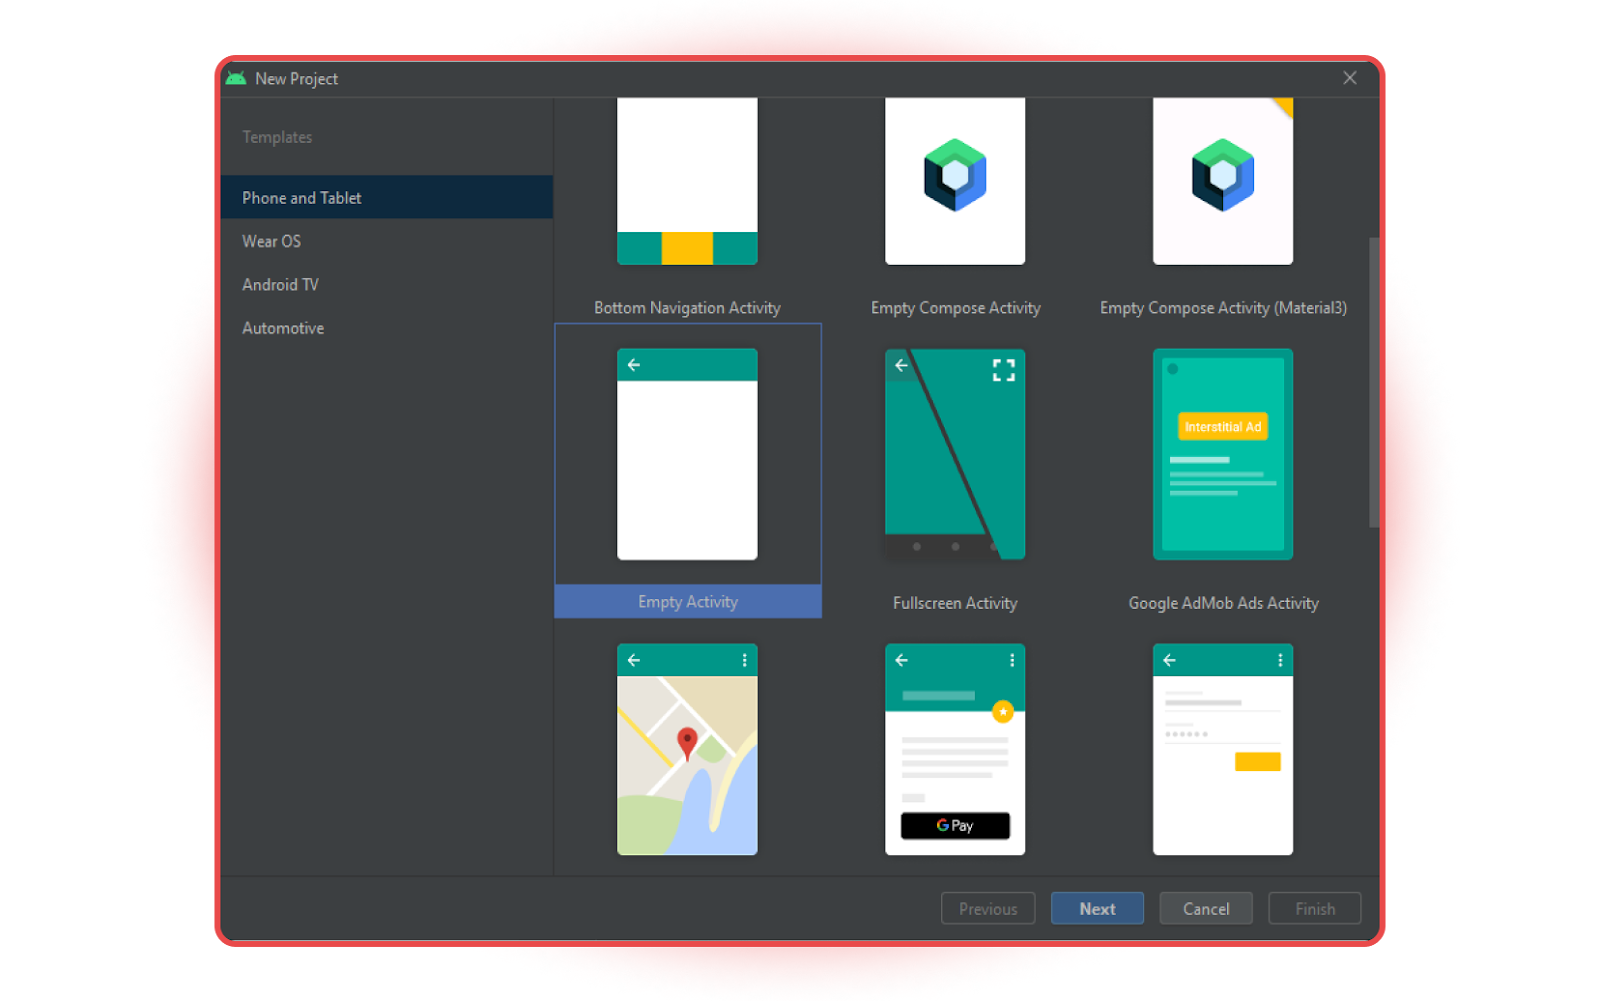
1. To begin, launch the Android Studio start page and select the option to create a new project. You can do this by clicking on the "New Project" button. Choose the "Empty Activity" template and click on "Next".
2. Provide a name for the project and choose the Java programming language and Minimum SDK, which refers to the minimum Android version that the application will support. We have chosen API 23: Android 6.0 (Marshmallow), but you can select the latest supported version or the most commonly used one. Click on "Finish" to proceed. Then, navigate to the "manifest" folder and locate the AndroidManifest.xml file. To do this, click on the Android icon and wait for the subfolders to load.
3. Add the necessary permission for the app to access the Internet by including the following code before the fragment that starts with <application:
<uses-permission android:name="android.permission.INTERNET"/>
4. To open the file Activity_main.xml, navigate to the folder “res” → “layout”. If the file is empty, click Split in the upper right corner.
5. Replace the default code in the Activity_main.xml file with the code below, or if the file is empty, paste the code into it:
<WebViewandroid:id="@+id/webView"
android:layout_width="match_parent"
android:layout_height="match_parent"
/>
6. Locate the MainActivity file in the "Java" folder of your project. Within the brackets of the @Override method (below @Override), copy and paste the following code:
WebView webView = findViewById(R.id.webView);webView.getSettings().setJavaScriptEnabled(true);
webView.loadUrl("https://cpa.rip/");
WebViewClient webViewClient = new WebViewClient() {
@SuppressWarnings("deprecation") @Override
public boolean shouldOverrideUrlLoading(WebView view, String url) {
view.loadUrl(url);
return true;
}
@TargetApi(Build.VERSION_CODES.N) @Override
public boolean shouldOverrideUrlLoading(WebView view, WebResourceRequest request) {
view.loadUrl(request.getUrl().toString());
return true;
}
};
webView.setWebViewClient(webViewClient);
7. If you notice that some of the elements are highlighted in red, it means that the program did not import the necessary classes and you will need to do it manually. To do this, right-click on the red word and select "Show Context Actions" and then "Import Class". You will need to repeat this operation for all the red parts of the code.
8. In the variable webView.loadUrl, you can insert the URL that you want to open in the application, which could be your affiliate link. For instance, we have added the address of MyLead as an example:
webView.loadUrl("Najlepsza sieć afiliacyjna - TOP programy partnerskie MyLead - zarabiaj w Internecie");.
MyLead - zarabiaj w Internecie");.
9. Access the AndroidManifest.xml file and add the following code at the end of the app tag:
android:configChanges="orientation|keyboardHidden|screenSize"
By implementing this code, the image will remain unchanged even when the screen is rotated.
10. If the automatic import of classes is disabled, you will need to manually import them. Locate the code fragments highlighted in red, hover the cursor over them, and select "Import class" from the pop-up menu.
11. By default, all applications have standard icons. You can change them by right-clicking on the "Res" folder, selecting "New," and then choosing "Image Asset." In the "Path" prompt, click the folder icon and find the file you want to use as the application icon. Click "Next" and then "Finish."
12. To ensure that the application is working properly, run the emulator and verify that the app launches without any issues.
Creating an APK file
Once the application is confirmed to be working, the next step is to generate an APK file that can be uploaded to the app store.1. Choose "Generate Signed Bundle / APK" from the "Build" menu in the top toolbar.
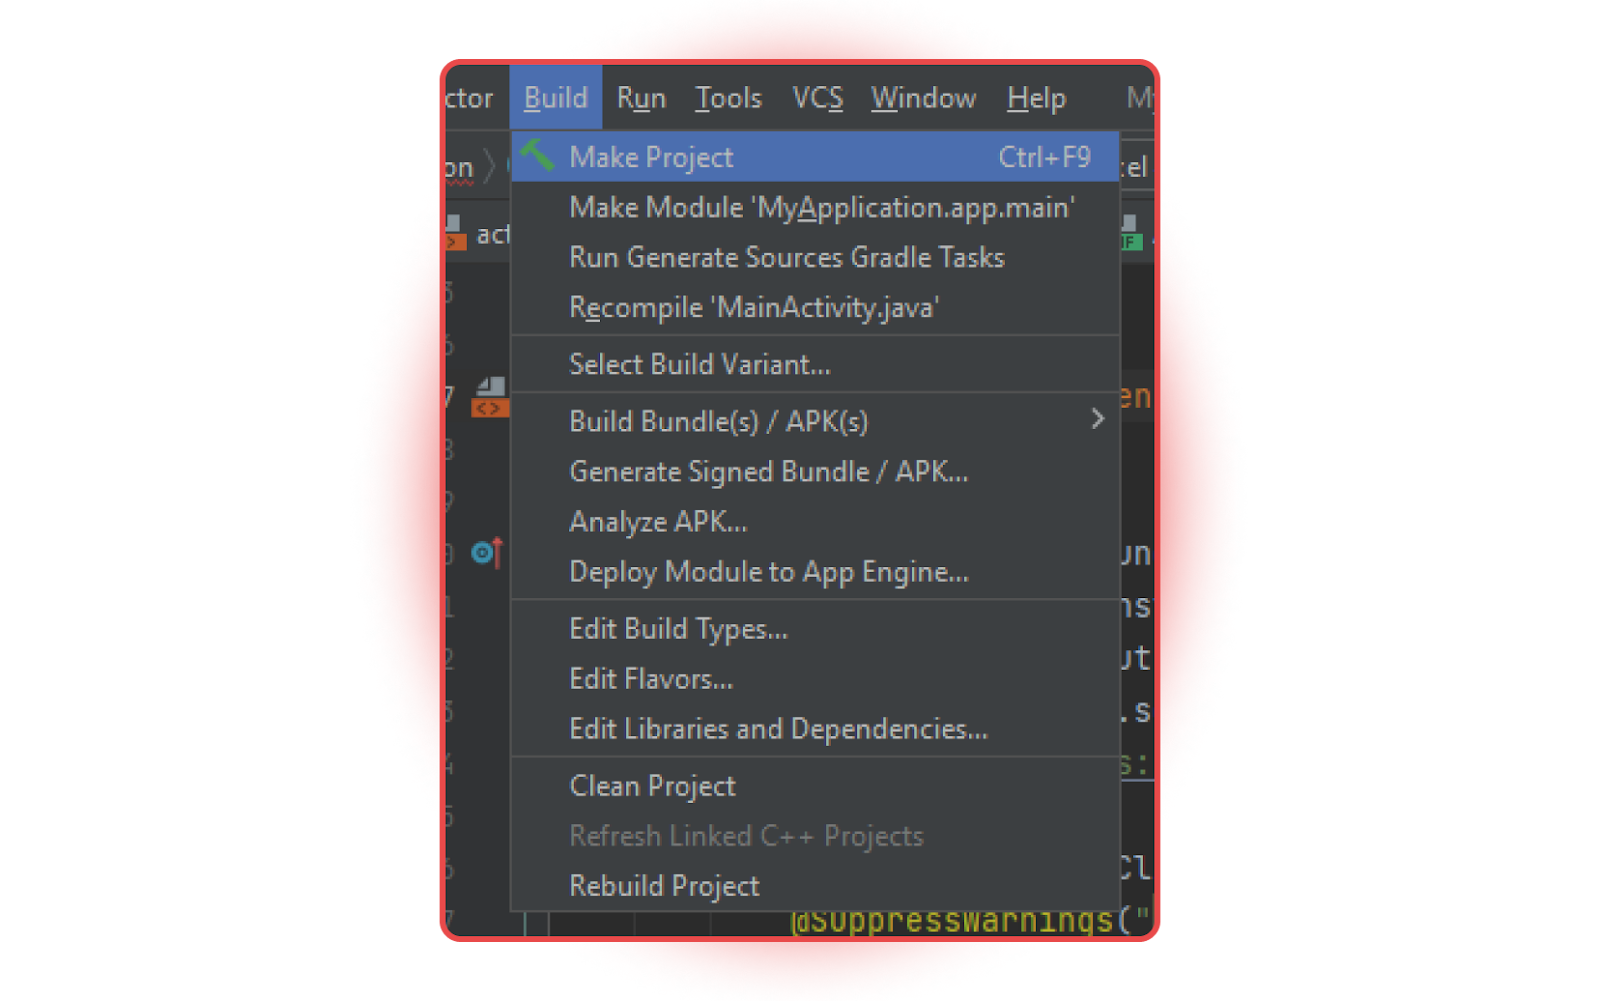
2. Go for APK and press Next.
To sign the application, a keystore file needs to be created for the first time. To accomplish this, choose the "Create new" option in the "Key store path" field.
In the window that pops up, click on the folder icon located next to the "Key store path" field and choose a name for the keystore file as well as passwords for it. Then, fill in the required details such as first name, surname, company name, organization, city, region, and country code in XX format.
Click OK and proceed to the next step. In the "Destination Folder" field, specify the directory where you want to save the APK file.
Click on the "Finish" button to complete the process. Now, you can upload the saved app to the app store.
Masking with WebVies
What’s the deal with masking?
Using masking can be beneficial when it comes to putting certain types of apps in app stores. For example, gambling, betting, or dating apps are often prohibited or frowned upon by app store moderators. Cloaking is a technique that allows you to show different content to different users. This can be done through a cloaker that filters out moderators, bots, and non-target users, showing them replacement content instead of the actual offer. The WebView with the actual offer is only shown to the target users.
HideLink is a tool available in the MyLead panel that can be used to mask WebView applications. However, it's important to first upload an app without WebView to the market and only after passing verification, upload the update with the loaded WebView with the offer. Substitute content can vary based on the industry, program category, and age rating of the app in the store. For example, a gambling app may use an arcade game, platformer, or tic-tac-toe as substitute content, while a bookmaker app may use an app with advice or information about teams, matches, or sports news, or even a sports game. Dating apps can use "guides" or primitive "swipers" imitating Tinder with stock photos uploaded to the server.
Creating substitute content can be done by yourself if you have experience in developing applications and games. Alternatively, you can purchase a bundle of ready-made assets and customize them or hire an external developer to do it and integrate cloaking and WebView. Developers can be found on independent sites like Fiverr or Weblancer.
What are the steps to add a fake app to the store?
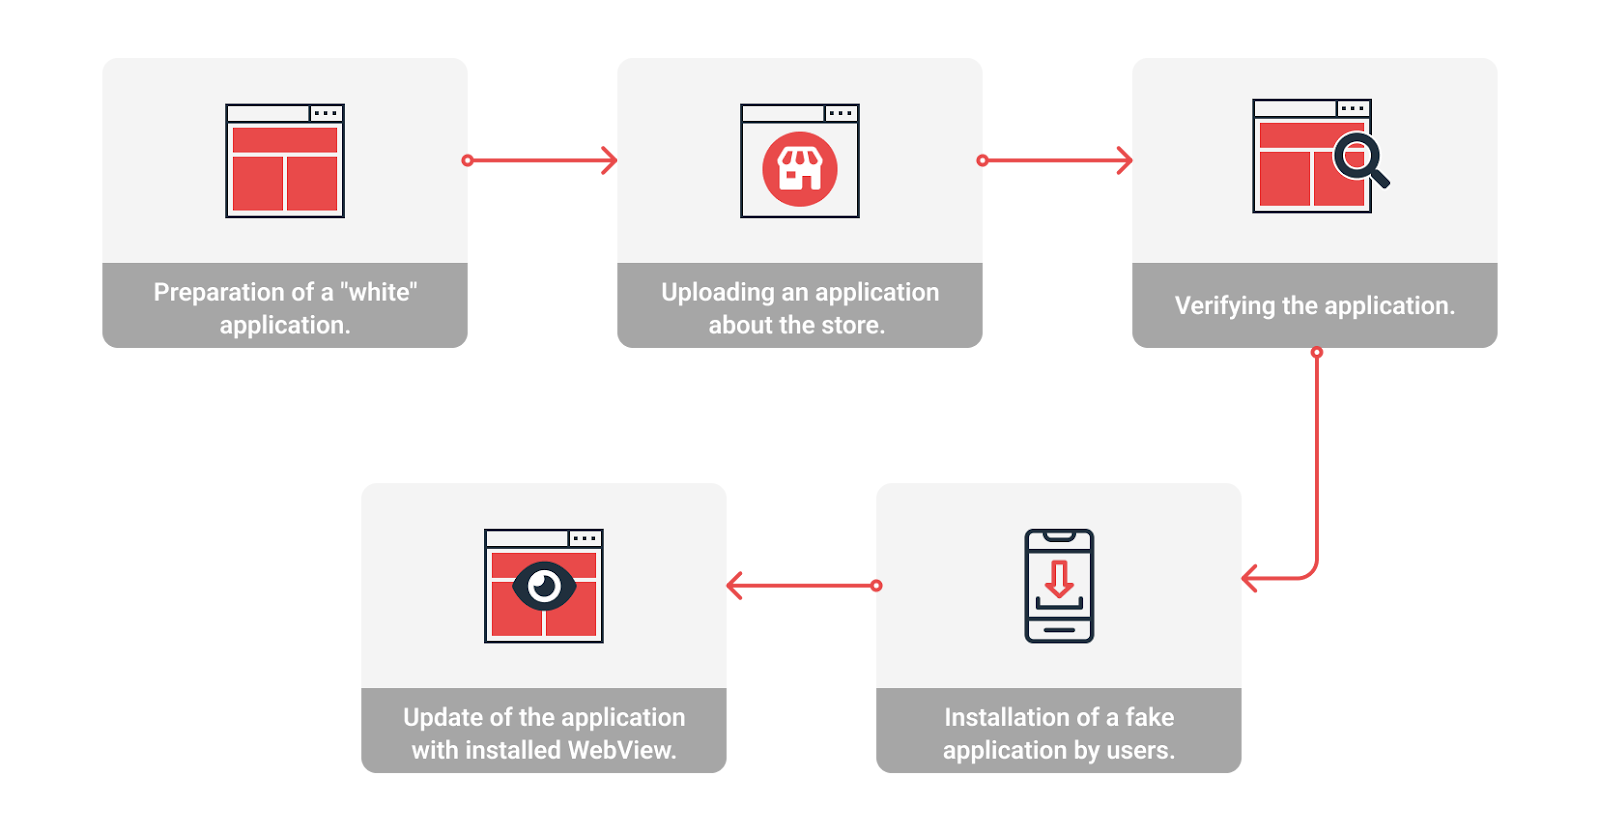
The image above illustrates the process of uploading an app to the store. To begin, you need to create a "white" app that does not contain any sensitive content and is as unique as possible. Then, you can upload it to the store. To add your app to the Google Play market, click here and specify whether it will contain ads, a privacy policy, or information about the target audience. Once your app passes the store's verification process, you can upload an update that includes a WebView with an affiliate link. This will make your app available for users to download and install.
What are some important things to keep in mind when getting your app ready for upload to the market?
To ensure a smooth application upload process, the first step is to ensure that there are no code bugs in the application. Some stores, such as the App Store, place a great emphasis on the accuracy of the code. Once this is done, it is advisable to prepare key elements, such as the application name, description, and high-quality images to be uploaded to the store. This will minimize the chances of being blocked in the store.
It is also important to note that in addition to the popular Google Play and Apple App Store markets, there are other markets available, including niche markets such as Rustore, AppGallery by Huawei, and APKPure.
It is also important to note that in addition to the popular Google Play and Apple App Store markets, there are other markets available, including niche markets such as Rustore, AppGallery by Huawei, and APKPure.
What other tasks should be completed before submitting the app to the store?
- Ensure that the app's performance, stability, and compatibility with various systems are optimized. The requirements for Google Play can be checked on this page.
- Incorporate conventional interaction patterns and elements that are typical for the chosen software to enhance the app's intuitiveness.
- Ensure that the app has an attention-grabbing name that includes relevant keyword(s).
- Ensure that the app's description is engaging, succinct, and accurately conveys the app's functionality. Incorporate keywords for improved visibility.
- Take note of the app's potential to be targeted by location. If the market doesn't support location targeting, consider utilizing smart links instead. If it does support location targeting, be sure to use the appropriate language when uploading the app for a particular country.
- Manage positive feedback by utilizing the chance to purchase reviews, but avoid overrating the app. A score range of 3.5 - 4.5 is adequate.
- Be attentive to the market's regulations regarding image placement, as certain markets (such as the App Store) may necessitate displaying a mockup visualization on a specific phone model.
---------------------------------------------------------------------------------------------------------------------------------------------------
Have you ensured that your app is prepared? Remember to incorporate one of the MyLead campaigns into it. The complete list of affiliate programs can be found by clicking on the button below.
Have you ensured that your app is prepared? Remember to incorporate one of the MyLead campaigns into it. The complete list of affiliate programs can be found by clicking on the button below.


")
