


The main purpose of this article is to understand the importance of tracking your activity and learn to implement dynamic trackings (DT). As we told you in our previous articles: data is gold! You can work with your offer links in order to manage your data and set how you want to see them in your platform. Setting up correctly your links will increase your accuracy and effectiveness as they will give you more information.
A DT is a parameter that is replaced automatically by the adnetworks after each click/impression with the information you are looking for. For example, let’s consider that you use a DT to receive the information about the website that is like this: {websitename}. When your banner is clicked or your pop appears, this parameter will automatically be changed by the name of the website. You can use it to know the website or any other campaign and user characteristic.
The way you will set your links depends on where they will run. Each adnetworks has specific tracking tokens to recognize your data.
Let’s understand how to implement DT’s. To set your smartlink, after gathering the dynamic trackings for your specific ad-network, you must replace the original tracking parameters:
Example DomainTrack1&data2=Track2
Check the next outputs on Mobidea with and without dynamic trackings:
Without DT:
Example DomainTrack1&data2=Track2

In the first columns (Track1 and Track2) we will receive the information provided by smartlink. If we didn’t set the DT, for each click we will receive data1=Track1 and data2=Track2. So in this case all we get is Track 1 and Track 2 in our stats, which is useless.
With DT (Exoclick’s DT’s):
Example Domain{campaign_id}&data2={src_hostname}
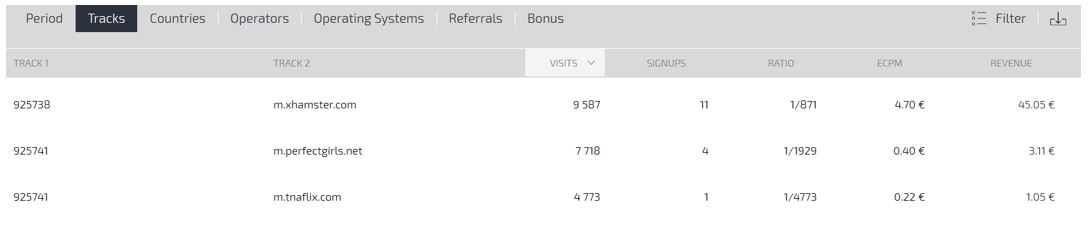
In this example we see the output from a smartlink set for Exoclick. In this smartlink we set:
Data1 = {campaign_id} – will provide the campaign ID
Data2 = {src_hostname} – will provide the website’s domain where the click was done
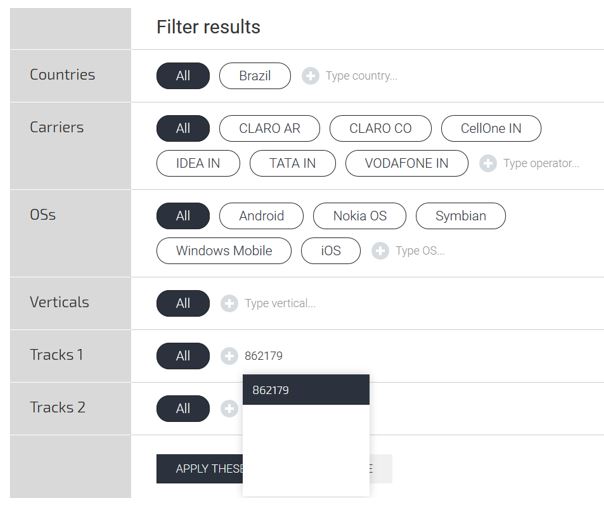
Regarding the picture below you can understand the main advantage of setting properly DT’s as you can see clearly the costs (in the adnetwork) and earnings (in this case, in Mobidea) for each one. Now in “Filter” option, you can enter the campaign ID in Track1 and Mobidea will display only the campaign stats.
We just obtained the possibility to track better our performance and increase the accuracy when we do analysis. For each campaign we can understand the performance per website, banners, operators, operating systems, etc.
Let check another example. Now setting DT’s for Adxpansion.
Example Domain{adgroupID}&data2={creativeID}_{zone}
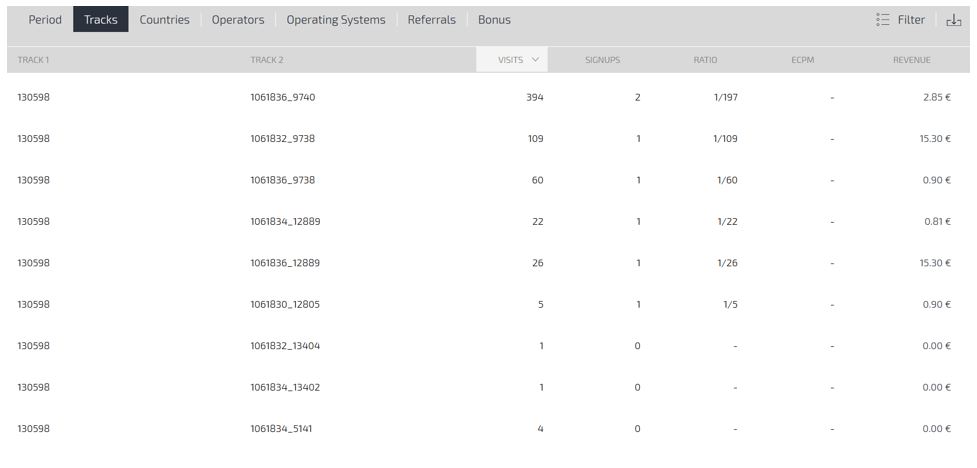
In this case the output shows:
Data 1 = {adgroupID} – will provide information about the campaign ID
Data2 = {creativeID}_{zone} – will provide information about the banner ID and also the website ID.
Most of the Affiliate Networks will show the data in one or two columns only. So if you need to track more than two parameters you can integrate them in the same Track and divide them with some symbol: (_) for example. If you have a lot of data, thanks to this “splitter”, you can work it on an Excel file and use the “Text to columns” tool. Then, everything will be split in different columns and will be easier to work.
Keep in mind that there are lots of different Dynamic Trackings: Adzone, Timestamp, Price, etc. It all depends on what you think is most important when optimizing your campaigns.
Although we’ve done this article all affiliates can and should contact the support or account manager to check if everything is set properly.
I hope this article opens different perspectives and help you on your mediabuying activity. Any doubt please contact us by email (affiliate-service@mobidea.com)
Cheers!
A DT is a parameter that is replaced automatically by the adnetworks after each click/impression with the information you are looking for. For example, let’s consider that you use a DT to receive the information about the website that is like this: {websitename}. When your banner is clicked or your pop appears, this parameter will automatically be changed by the name of the website. You can use it to know the website or any other campaign and user characteristic.
The way you will set your links depends on where they will run. Each adnetworks has specific tracking tokens to recognize your data.
Let’s understand how to implement DT’s. To set your smartlink, after gathering the dynamic trackings for your specific ad-network, you must replace the original tracking parameters:
Example DomainTrack1&data2=Track2
Check the next outputs on Mobidea with and without dynamic trackings:
Without DT:
Example DomainTrack1&data2=Track2
In the first columns (Track1 and Track2) we will receive the information provided by smartlink. If we didn’t set the DT, for each click we will receive data1=Track1 and data2=Track2. So in this case all we get is Track 1 and Track 2 in our stats, which is useless.
With DT (Exoclick’s DT’s):
Example Domain{campaign_id}&data2={src_hostname}
In this example we see the output from a smartlink set for Exoclick. In this smartlink we set:
Data1 = {campaign_id} – will provide the campaign ID
Data2 = {src_hostname} – will provide the website’s domain where the click was done
Regarding the picture below you can understand the main advantage of setting properly DT’s as you can see clearly the costs (in the adnetwork) and earnings (in this case, in Mobidea) for each one. Now in “Filter” option, you can enter the campaign ID in Track1 and Mobidea will display only the campaign stats.
We just obtained the possibility to track better our performance and increase the accuracy when we do analysis. For each campaign we can understand the performance per website, banners, operators, operating systems, etc.
Let check another example. Now setting DT’s for Adxpansion.
Example Domain{adgroupID}&data2={creativeID}_{zone}
In this case the output shows:
Data 1 = {adgroupID} – will provide information about the campaign ID
Data2 = {creativeID}_{zone} – will provide information about the banner ID and also the website ID.
Most of the Affiliate Networks will show the data in one or two columns only. So if you need to track more than two parameters you can integrate them in the same Track and divide them with some symbol: (_) for example. If you have a lot of data, thanks to this “splitter”, you can work it on an Excel file and use the “Text to columns” tool. Then, everything will be split in different columns and will be easier to work.
Keep in mind that there are lots of different Dynamic Trackings: Adzone, Timestamp, Price, etc. It all depends on what you think is most important when optimizing your campaigns.
Although we’ve done this article all affiliates can and should contact the support or account manager to check if everything is set properly.
I hope this article opens different perspectives and help you on your mediabuying activity. Any doubt please contact us by email (affiliate-service@mobidea.com)
Cheers!
Last edited:


